
Counterattack at Horton Cross
The Setting
By late August 1940 the RAF’s strength had been degraded beyond precarious. The grinding war of attrition in the southeast of England combined with a number of massive German fighter sweeps over London and the West Country had sufficiently reduced Fighter Command’s strength to a point where Göring’s forces could achieve local air superiority and OKH could consider a launch of Operation Seelöwe, the invasion of England.
Concurrent with the Luftwaffe’s campaign, the Wehrmacht, working with the Navy, had stripped western Germany of every available small-craft capable of transporting troops and equipment across the Channel and together with a small number of purpose-built landing barges moved them to various ports along the northern coast of France. Despite Bomber Command’s and the Royal Navy’s efforts to disrupt this movement of craft, as well their conduct of desperate raids of harbors and facilities along the French coast, by mid-September sufficient transport had been accumulated to launch the cross-Channel attack. After a period of anguished contemplation, Hitler gave his approval and the invasion date was set for Sunday, October 6, 1940.
On the evening of Tuesday, October 1 the German Navy had sent twenty-two minelayers into the channel to lay extensive mine-belts intending to wall off the Dover Straits in the east and a line in the west running from Swanage on the English coast to Omanville-la-Petite on the French. Air attacks on the RN destroyer bases on the Channel coast had significantly reduced this threat. Presuming they could defend this perimeter the Germans would have limited control of roughly half the English Channel. Two days later an attempt by the British to disrupt and clear a corridor through the western belt was driven off by the Luftwaffe and German destroyers inflicting heavy losses. Undeterred, the RN would continue the pressure while gradually moving heavier forces south from their northern bases.
With the eastern half of the Channel effectively “controlled” from Bournemouth in the west to Dover in the east, a series of pre-dawn landings were executed on the morning of October 6, primarily on the coast of southeastern England. Simultaneous air-landings were performed behind the beach assaults attempting to thwart British counterattacks by the few mobile forces available. By the end of the day the Wehrmacht had gotten the better part of five infantry divisions ashore at various points and had moved inland up to four miles.
Furthest west near Bournemouth landings were conducted by the 16th Infantry Division commanded by General Gotthard Heinrici. Despite an attack by Royal Navy torpedo boats which sank a number of small transports the bulk of the division was successfully landed. Encountering few beach defenses and facing relatively light resistance, the division, led by the 16th Reconnaissance Battalion and the 64th Infantry Regiment, was able to push nearly seven miles inland. Within a week, reinforced by the arrival of elements of the 79th Infantry Division, Heinrici had repulsed and/or destroyed counterattacking forces in his area and was pushing northwest toward Yeovil.
Through the spring and summer of 1940 British Home Forces under the command of Sir Edmund “Tiny” Ironside had developed an interior defense network sectioning the country into zones bordered by a number of lightly-fortified “stop-lines”. These were intended to halt or delay enemy advances, particularly those supported by armor, allowing mobile reserve forces time to come up and engage/destroy the opposition. These stop-lines were sited to take advantage of natural obstacles such as rivers, canals, soft or hilly ground, with inter-locking lines of fire with defined kill zones. Bunkers, pill-boxes, gun-emplacements, etc. were typically linked by buried telephone lines. Successful defense of the interior, however, relied extensively on the development of the mobile reserve. This languished under Ironside's leadership and by early summer Churchill and the CIGS gave him the sack, replacing him with General Alan Brooke in July.
The British Army, having lost nearly all of its heavy equipment in the retreat from France, was in a sorry state. However the Luftwaffe bombing campaign, primarily directed at airfields and aircraft production facilities, allowed nearly uninterrupted output from factories engaged in tank, small-arms and munitions production. Within two months nearly two hundred tanks had been built and sent to outfits around the country. Similarly production of the 25-lb field gun was accelerated and the first pieces began arriving at the Royal Artillery regiments. While most of the tank production was of types defeated handily by the Germans on the continent, the General Staff had opted for quantity over quality in the hope that a fully equipped mobile reserve could overwhelm an enemy force expected to have few tanks available.
For the Germans there was now an increasing sense of urgency. After twenty days their progress southeast of London had slowed as they ground relentlessly toward the great city and resistance stiffened. While they had destroyed a considerable number of British vehicles and formations, they’d failed to achieve a total breakout and now their own losses were growing. Now, with autumn upon them and the weather deteriorating, they were beginning to have difficulty maintaining supply as pressure by the Royal Navy was growing despite German air superiority over the Channel. British night operations were routinely broaching the western mine-belt to take a toll on supply shipping.
Things had gone a bit better for the Germans in the center until they’d run into Montgomery’s 3rd Division, the only full-strength outfit available to Brooke. Montgomery, having waged a brilliant campaign to garner a wealth of resources for his division at the expense of every other outfit in the country, had fought a series of vicious mobile battles on the Salisbury Plain against a force three times his size. Having halted the German advance, his attempts to push the blighters back had fallen short and now both sides soon ground to a halt, exhausted.
In the west Heinrici had been directed by OKH to press his attack west from Yeovil aiming to once and for all cut off British forces streaming south and east from Bristol and the western Midlands. With ever-lengthening supply lines and a lack of heavy equipment he'd made a quick lunge capturing the bridge over the River Isle on October 25th. However, two miles on whilst pushing toward the small town of Horton Cross he ran into a stretch of the southern end of the Taunton Stop-Line.
The line here was comprised of a small number of concrete pill-boxes, gun emplacements and anti-tank barriers, interspersed among a few infantry trench-lines and redoubts. Despite the small number of defenders and obstacles an initial assault by an exhausted battalion of the German 64th Infanty Regiment was quickly thrown back. Interrogation of a few captured enemy revealed the position at Heinrici's immediate front was held by elements of the British 15th Infantry Brigade detached from the 5th Infantry Division (most of which had been sent to northern Ireland), and a few units of Home Guard.
Realizing his men were at or past the point of exhaustion Heinrici called off further attacks for two days while bringing up what few reinforcements were available. Local weather conditions were foul, discounting any support from the Luftwaffe. He could wait another day or so to bring up the few batteries of his divisional artillery that had subsequently come ashore, but decided a second rapid stroke could break the British in their holes. With no replacements available he pulled men from the third company of the 2nd Battalion to bring the first and second up to full-strength. Among the reinforcements arriving were a platoon of the new Stug-IIIB assault guns and a few 37mm anti-tank guns. With these he was confident they could sweep the British aside allowing his infantry to press on toward the town.

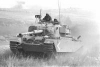
CinC 1/285 Stug-IIIB
The British sector commander, a Major John Barton, sensing both the imminent resumption of the attack as well as the Germans' increasingly depleted condition, called for whatever mobile reinforcements might be available from the sector's reserves. Having handily repulsed the German attack two days earlier, the men's morale was good. Barton had some concerns about the Home Guard but they'd performed adequately during the previous action. During the evening of the 27th a mixed troop of A9/A10 cruisers and a second troop of A13’s took up positions just east of Horton Cross, a quarter mile behind Barton’s line.
The Scenario
On the morning of October 28, 1940, elements of the German 2nd Infantry Battalion, 64th Infantry Regiment, together with a battery from the 16th Anti-Tank Battalion and an attached independent battery of Stug-IIIB assault guns launched an attack on dug in and fortified positions of 1st Battalion, King’s Own Yorkshire Light Infantry, supported by two platoons of the 42nd Royal Tank Regiment. This action is just one of a number of attacks launched by the German 16th Infantry Division this day, in and around the village of Horton Cross in County Somerset.
Low cloud blotted the sun from the morning sky precluding air attacks. A light rain had been falling for two days.
The scenario is fifteen turns long (approximately ninety minutes, but this may be lengthened on the first play-through depending upon the action).

A pillbox of a type employed on this version of the Taunton Stop Line. For this action these pillboxes will house a re-purposed 6-inch Mk VII naval gun of WWI vintage, as was frequently the case historically.
The Table
As this is primarily an infantry action with less than a dozen AFV's available, an effort was made to keep the action compressed by using a small table of just nine square feet:

The British will set up their positions anywhere on the western and central rows of squares. British armor will enter from the western table edge on a variable turn. The Germans will advance onto the table on Turn 1 from the eastern edge. Tilled fields are saturated to such an extent so as to prohibit the entry/movement of armor.
The Forces
German Order of Battle
64th Infantry Regiment, 2nd Battalion Veteran
Unit 1 – Battalion HQ, Command Stand (1), Rifle/LMG Squad (3), 81mm Mortar Squad (1) (attached)
Unit 2 – 1st Company, HQ, Combined Command-Rifle/LMG Squad (1)
Unit 3 – 1st Company, 1st Platoon, Combined Command-Rifle/LMG/Pzrb Squad (1), Rifle/LMG Squad (3)
Unit 4 – 1st Company, 2nd Platoon, Combined Command-Rifle/LMG/Pzrb Squad (1), Rifle/LMG Squad (3)
Unit 5 – 1st Company, 3rd Platoon, Combined Command-Rifle/LMG/Pzrb Squad (1), Rifle/LMG Squad (3)
Unit 6 – 2nd Company, HQ, Combined Command-Rifle/LMG Squad (1)
Unit 7 – 2nd Company, 1st Platoon, Combined Command-Rifle/LMG/Pzrb Squad (1), Rifle/LMG Squad (3)
Unit 8 – 2nd Company, 2nd Platoon, Combined Command-Rifle/LMG/Pzrb Squad (1), Rifle/LMG Squad (3)
Unit 9 – 2nd Company, 3rd Platoon, Combined Command-Rifle/LMG/Pzrb Squad (1), Rifle/LMG Squad (3)
Sturmartillerie Abteilung 665
Unit 10 – Batterie C (reduced), Veteran, Command Stug-IIIb (1), Stug-IIIb (3)
16th Anti-Tank Battalion
Unit 11 – Batterie D, Veteran, ATG Pak 35/36, 37mm (3), Lt. Truck (3)

Sturmgeschütz IIIB, the second variation of the German assault gun based on the Pzkpfw III chassis.
British Order of Battle
42nd Royal Tank Regiment, 1st Light Cruiser Squadron Regular
Unit 1 – 4th Light Cruiser Troop, A-13 (3)
Unit 2 – 5th Light Cruiser Troop (ad hoc), A-9 (2), A-10 (2)
15th Infantry Brigade, 1st Battalion, King’s Own Yorkshire Light Infantry Regular
Unit 3 – 1st Company, HQ, Combined Command-Rifle/LMG Squad (1)
Unit 4 – 1st Company, 1st Platoon, Combined Command-Rifle/LMG/Boys Squad (1), Rifle/LMG Squad (2)
Unit 5 – 1st Company, 2nd Platoon, Combined Command-Rifle/LMG/Boys Squad (1), Rifle/LMG Squad (2)
Unit 6 – 1st Company, 3rd Platoon, Combined Command-Rifle/LMG/Boys Squad (1), Rifle/LMG Squad (2)
Unit 7 – 4th Company, HQ, Combined Command-Rifle/LMG Squad (1)
Unit 8 – 4th Company, 1st Platoon, Combined Command-Rifle/LMG/Boys Squad (1), Rifle/LMG Squad (2)
Unit 9 – 4th Company, 2nd Platoon, Combined Command-Rifle/LMG/Boys Squad (1), Rifle/LMG Squad (2)
Unit 10 – 4th Company, 3rd Platoon, Combined Command-Rifle/LMG/Boys Squad (1), Rifle/LMG Squad (2)
Home Guard, Ilminster Green
Unit 11 – Battery A, BL 6” Mk VII (VIII) in Concrete Box (2), Vickers MMG in Concrete Box (2)

Cruiser Tank Mk I (A9). The Cruiser Tank Mk II (A10) was a slightly up-armored improvement of the Mk I, but without the auxillary MG turrets. Both served in France and carried on through the early days in the Western Desert.

Cruiser Tank Mk III (A13), a high-speed replacement for the Mk I/II (A9/A10). It had a top-speed of 30 mph as compared to 16 mph for the Mk II. Served in France and the Western Desert.
Special Rules
(1) Determination of the 42nd Royal Tank Regiment units' eligibility to enter play from the western table edge is determined using one D12 and the following table:
Turn 1 - Roll 1-2 on D12
Turn 2-3 - Roll 1-3 on D12
Turn 4-5 - Roll 1-6 on D12
Turn 6+ - RTR units automatically eligible for entry.
Once the RTR units are eligible they may be activated and enter the table at the British player's discretion. Units are not obligated to enter and may be held off-table for later activation/entry. A single die-roll is made for the entire RTR contingent.
(2) Any vehicle entering a tilled field for any reason is immediately immobilized and abandoned. Such immobilized vehicles count as destroyed for VP purposes.
(3) British redoubts and pillboxes may not be deployed on the road.
(4) The four-emplacement Home Guardsmen are not required to be sited within two inches of each other. Historically the bunkers/redoubts of the stop-line were equipped with buried telephone cables linking positions for communication purposes, theoretically providing unit cohesion/coordination without LOS requirements.
Victory Conditions
Germans are awarded 1 VP for each AFV, gun and/or pillbox destroyed/immobilized, 1 VP for each infantry-type squad destroyed and 1/2 VP for each AFV/squad exited off the western table-edge.
British are awarded 2 VP for each AFV destroyed/immobilized, 2 VP for each infantry-type squad destroyed.
Counterattack at Horton Cross
#1

-
- Members
-

- 744 posts
Lt Colonel
- LocationMaryland USA
Posted 23 May 2017 - 11:05 AM
#2
-
- Members
-
- 744 posts
Lt Colonel
- LocationMaryland USA
Posted 04 June 2017 - 10:29 AM
Counterattack at Horton Cross
After Action Report (Part 1)
Having taken a shot at the British position three days earlier, the Germans are generally familiar with Barton's disposition. Their orders are to clear the road and advance westward toward the crossroad at Horton Cross. Patrols have reported no movement of additional enemy forces into the area.
The German player moved out at 0740 with 1st Company once again advancing up the southern edge of the road with its first objective being the pill-box (Alpha) atop the small hill at the center of the table. 2nd Company moved cross-country at the southern table edge hoping to take advantage of a covering tree line to approach the British main position. The assault guns moved up the road in column advancing slightly ahead of the infantry and to their right.

British defensive positions together with the German initial plan of advance/attack.
The HomeGuard in pill-box Alpha soon got a look at the Germans and radioed back that enemy infantry and tanks were approaching along the road from the east. Shortly after that message was received the troops in the trenches heard the clatter of Alpha's Lewis gun raking the eastern hillside.
The lead assault gun began moving/firing at pill-box Alpha on turn 1. No hits were scored until turn 3 and those did not penetrate the thick reinforced concrete structure. 1st and 2nd Platoons of 1st Company took up positions at the base of the hill behind a narrow rock outcropping which provided cover from Guardsmen's MMG fire. 3rd Platoon advanced along the base of the hill’s southern edge in an effort to get behind the pill-box but came under fire from the 6-inch gun in its box (Beta) and had to hold up.

1st Platoon of 1st Company taking cover behind a rock outcropping preparing to assault pill-box Alpha (infantry by Heroics & Ros on Litko plywood bases).
The German infantry then attempted to attack Alpha position using their Panzerbüchse 39's but were unable to penetrate the target. Additional assault guns were brought up but their 75mm L24 just couldn’t get it done (primarily due to poor die rolling). It was briefly considered to manhandle a 37mm AT gun into position for a shot but chance of success looked to be minimal. On turn 7 the lead Stug fired smoke to obscure the box’s LOS, allowing the 2nd Platoon to assault and destroy the box using charges.

2nd Platoon rushes the pill-box behind smoke (ran out of cotton balls).
With the game half over the assault guns began to move forward cross-country where they came under fire from the pair of 6-inch guns in boxes Beta and Delta. Beta missed on its first shot but Delta hit the lead Stug-III head-on, failing to penetrate. On turn 8 the Home Guardsmen in Beta hit the battery commander’s vehicle on the side of the casemate to no effect (rolled a 20). Delta missed with its second shot. Similarly the assault guns fired at the square concrete boxes housing the guns without effect (amazingly poor gunnery by the Germans). Even firing HE one might think that a 6-inch shell would stove in the front of a Stug-IIIb (and it can with a good die-roll).

The Stug-III's resume the advance where they start taking fire from Beta and Delta (CinC Stug-IIIB).
German 2nd Company reached the tree line and was laying flanking fire into the British dug-in infantry while attempting to take out box Beta using their Panzerbüchse 39’s…no dice. The German commander gave the order to form up for a general moving assault which would involve crossing nearly 100 yards of open ground, hopefully under cover of smoke. The German 1st Company, having lost only one stand in the attack on Alpha, began moving north where it came under fire from the British 4th Company.
Major Von Schtupp, Heinrici's local commander, lamented the loss of time and not having the proper equipment to deal with the British position. A flamethrower or two would have done the trick. Now he faced a second failure in as many days and the possible premature end of a promising career.

Major Von Schtupp directs the attack from a safe distance (never mind that Schwimmwagen's weren't produced until 1942).
Schtupp ordered his Battalion HQ reserves and the mortar stand forward in support of 2nd Company realizing soon after they will most likely not arrive before the attack jumps off. He then orders the Stug-III's to concentrate their fire on the Beta position in support of 2nd Company's attack while first company redeploys northward.
For his part Barton's men are relatively unscathed in their well-timbered redoubts. Box Alpha has gone silent and has presumably been destroyed. 1st Company has been taking increasing amounts of small-arms fire from the tree-line to their right and they can see German infantry moving toward similar cover on their left. He orders 3rd Platoon/1st Company to move and occupy the hill and the incomplete redoubt on their right. Now, expecting flanking attacks at either end of his line, Barton radios back to his RTR mates that it's time to spring the trap.
With turn 8 complete results have been fairly bloodless. The British have destroyed one German infantry stand (2 VP) while the Germans have knocked out pill-box Alpha (1 VP). Inept die-rolling has greatly limited the casualties.
(AAR part 2 to follow)
#3
-
- Members
-
- 744 posts
Lt Colonel
- LocationMaryland USA
Posted 11 June 2017 - 11:04 AM
After Action Report (Part 2)
Turn 9 opened with a few smoke shells fired into the open ground separating the German 2nd Company from pill-box Beta and the entrenched British 1st Company. With the British LOS obscured the Germans moved out hustling across the open toward the British position. However they soon came under fire from an unobserved platoon of infantry from 1st Company which Barton had ordered onto the hill at the southern end of the line. Good Brit die-rolling soon had two squads knocked out and the remainder pinned down. With the smoke dissipating the Germans soon fell back to the tree-line in disorder having lost the equivalent of a platoon. There they would remain for the duration.

German infantry advances across open ground behind smoke.
Fire from 4th Company and Delta had the German infantry of 1st Company pinned against the hill topped by the knocked out PB Alpha. Despite support from the Stug battery their attempt to reach the tree-line and flank the British entrenchments had failed. Having fallen back a few squads lighter, they now were hunkered down in what cover they could find, casualties mounting.
Turn 9 also saw the arrival of the RTR. Barton split them sending the A9/10’s weaving through the sodden farmland on his left avoiding the plowed fields. He held the A13’s back behind the center of his line as a sort of reserve. By turn 12 the A9/A10’s had successfully navigated through this ground and formed up amongst the trees. Pushing through a gap in the tree-line they emerged onto the open ground beyond to fall upon the German assault guns’ flank.

British tanks shoot the gap to attack the German armor.
A bit bunched up, the lead A10 fired and hit the nearest Stug-III square in the side immobilizing him. The crew immediately bailed out, taking what cover they could find. The following A10 fired at the lead assault gun (battery commander) striking the hull behind the drive sprocket knocking him out. The A9’s, their LOS blocked by the leading A10’s, couldn’t bring their 2-pounders to bear.
The remaining two Stug’s whirled around to face the onrushing Brit tankers. The furthest back fired at the lead A10 striking him square on the hull-front. The up-armored A10 spun to a stop, emitting a faint wisp of smoke before erupting in flames. The second Stug had a shot at one of the following A9’s but missed. Von Schtupp, cursing himself for not having brought up the AT guns, ordered the two Stug’s to fall back.

The Germans fall back in the face of British armor.
As the Stug’s retreated on turn 13 they fired smoke to try to cover their withdrawal. However Barton now sent the A13’s forward and the lead tank got a narrow firing angle on the closest assault gun. The Brit managed a hit on the superstructure to the right of the gun but it failed to penetrate. The remaining A10 and the pair of A9’s moved cautiously forward, obscured by thick smoke.
On turn 14 Von Schtupp ordered a general withdrawal. His battered 1st Company fell back beyond the hill to take cover among the rocks from which they’d launched their initial attack. 2nd Company fell back to the eastern end of the tree-line where it could provide covering fire if the British pursued (which they didn’t). The two remaining assault guns took up positions on either side of the road intent on blocking any pursuing tanks.

British tanks drive past knocked out Stug-III's pursuing the retreating Germans.
Not willing to take any further losses Barton halted all pursuit of the enemy on turn 15. The remaining A10 squeezed off a long-range shot at one of the Stug’s sitting on the northern edge of the road, damaging its running gear and immobilizing it. With that the game came to an end.
Results
There is little to be said other than to concede the entire operation had been a disaster for the Germans. They’d lost three of their four assault guns and nearly a quarter of their infantry. The failure to bring up the anti-tank guns deemed ineffective against the hardened strongpoints had stripped the Germans of a possible defensive screen against the British tanks. The Panzerbusche 39 anti-tank rifles proved ineffective, even against the lightly armored A9 and A13 tanks.

A13 cruisers jump off in the closing moments of the battle.
For their part the British lost one tank and strong-point Alpha. They probably could have run the table but would most likely have had similar problems moving across open ground in the face of German small arms fire. All of the British tanks were armed with 2-pounders, unsuited for use against infantry. The 6-inch guns battered the German infantry but showed little effect against the German armor. In the end Barton settled for having easily repulsed a second attack on their position. If you’re counting, the final VP tally was a whopping 18-2 in favor of the British.
Observations
The Germans channeled their attack right into the teeth of the British position with little regard for their own flanks. A superior strategy would have been to use the tree-lines to approach the enemy and attack his flanks from close-range. They should have bypassed Alpha early on, its field of fire to the east presenting no threat to the German rear. Instead they spent nearly five turns neutralizing six old men and a Lewis gun.
The Stug’s proved surprisingly vulnerable from the side. The tankers of the Royal Tank Regiment made hash of the assault guns from the flank, while the Germans' heavier 75mm shells had difficulty finding their mark. Initial good shooting by the A10’s effectively gave the Germans no chance, outnumbered 6-2 in the closing moments of the battle. Turning to face the A9/A10 force exposed their flank to the A13’s…they just didn’t have the numbers to effectively deal with the sudden appearance of the British armor.
The Germans need a few more assault weapons to help deal with the strong-points. Flamethrowers and mortars were available and should be added to the OB. Also the game needs to be lengthened. A really interesting infantry slug-fest would require at least another ten turns.
If and when there’s a third attempt at Horton Cross the Germans will assuredly bring up their artillery. General Heinrici gives Von Schtupp a pass, attributing the defeat to his men’s exhaustion. As he waits for new orders word comes that the push toward London has been resumed with vigor, Hitler hoping to seize the city before the onset of the wet, damp English winter.
The partisans, however, are stirring in the forest…
#4
-

- Members
-

- 348 posts
Captain
Posted 17 June 2017 - 01:55 PM
Thanks for posting this Healey. It is always good to see Mein Panzer AARs on this forum and anywhere else for that matter. Nice looking terrain and vehicles!
I plan to do a Kursk game later this year using Mein Panzer with GHQ miniatures and Terrain Maker. I will try to get some good pictures and post it here as well.
I did post my North Africa game here last year.
#5
-
- Members
-
- 744 posts
Lt Colonel
- LocationMaryland USA
Posted 07 July 2017 - 09:19 PM
Even a small bit of Kursk would seem a massive endeavor. A couple of full-strength Panzer Divisions would be somewhere between 180 and 240 tanks, then throw in a couple assault gun battalions, all up against a Tank Corps (or two) and multiple defense lines comprised of 76mm AT guns and dug in infantry...wow, almost too much to even contemplate in terms of the number of tables, players and gear. Make sure you post some details if you ever do it.
Healey
#6
-
- Members
-
- 744 posts
Lt Colonel
- LocationMaryland USA
Posted 08 December 2017 - 09:04 PM
A second battle of Horton Cross is contemplated for what is evolving into a campaign series based on hypothetical actions we're calling "Wessex 1940".
It's ten days later and Heinrici, with considerable difficulty, has managed to seize the small town of Horton Cross and is paused on its western edge. His 16th infantry division has become increasingly stretched trying to defend the gains made the last several weeks over a twenty mile front. He has had to send the bulk of two regiments of infantry north to defend positions northwest of the Isle where he had hoped to resume the push toward Taunton. While he has driven nearly sixty miles inland west-northwest and wreaked terrific losses on the enemy, his efforts to turn north have been effectively blunted.
For their part the British have not abandoned the West Country. With the German drive on London effectively grinding forward at a crawl and Monty holding his own in the center, Brooke has now committed significant reserves to maintaining their right flank. He has directed that armored forces, including the new Valentine tank now rolling off the assembly line at BRCW, be sent to the western counties for deployment.

On the morning of November 7, 1940 Von Schtupp comes under renewed attack by reinforced British mobile forces in front of his position just west of Horton Cross. The Major and his depleted Germans have to quickly pull together a screen to try and hold the Brits back on his narrow bit of front until relief is sent.
Developing an OB and table now...should be fun.
Healey
#7
-
- ODGW Staff
-

- 901 posts
Mein Panzer Guru
Posted 10 December 2017 - 02:26 PM
Excellent AAR.
Thanks
#8
-
- Members
-
- 744 posts
Lt Colonel
- LocationMaryland USA
Posted 06 January 2018 - 02:10 PM
A few of the new Valentine infantry tanks have begun arriving:

CinC 1/285 Valentine Mk1
These have been ordered forward for the planned counter-offensive to retake Ilminster. They are detraining at the GWR yard at Creech St. Michael where they will then move southeast for deployment with the 42nd RTR.
Edit:


0 user(s) are reading this topic
0 members, 0 guests, 0 anonymous users

