

Using trucks is most realistic if you have time and space in the game, in the sense that truck-borne infantry typically won't be at the cutting edge of an attack but instead will follow behind recce and less vulnerable units (e.g. marching infantry), dismounting their vehicles under cover and conducting the attack on foot. So if the trucks are coming on-board you will need to have them enter after your recce has fixed where the enemy is and park them somewhere behind a hill or set of woods or whatever and leave them there after the infantry moves in.

Pete's Minis
Started by
Peter M. Skaar
, Jul 15 2020 09:26 AM
128 replies to this topic
#22

Peter M. Skaar
-
- Members
-

- 348 posts
Captain
Posted 09 August 2020 - 06:03 PM
Hi Doug
Using motorized infantry mounted on trucks is more tricky to do in a game as usually they dismounted prior to contact unless they were ambushed or something like that. Knowing when and where to dismount is key to actually using trucks in a longer and larger game. Otherwise I would probably have the infantry already dismounted ready to go in on the assault if you are playing a shorter game in less space.
I have used trucks as targets in a game before. It was a situation I created for an East Front battle set in 1942 where the Russians are attacking and the Germans have some random truck columns of HQ and logistics vehicles trying to get off the map. The Germans were trying to see how many they could get off the map while the Russians were trying to kill as many as possible. Neither player knew exactly when and where the next group of trucks would show up as I made the arrival random. It kept both players guessing so neither could rely on a perfect plan.
#23
healey36
-
- Members
-

- 744 posts
Lt Colonel
- LocationMaryland USA
Posted 10 August 2020 - 06:22 AM
Like artillery, we have rarely had trucks on the table...typically the infantry starts on foot and deployed or within short march distance. Soft vehicles do get used in HQ units, occasionally with forward observer teams, or to bring up AT batteries.

While it's easier on the boots, riding around in trucks can prove lethal when confronted by hostiles. Relatively light weapons can make hash of such soft targets (and all inside them).
- Peter M. Skaar likes this
#24
Peter M. Skaar
-
- Members
-
- 348 posts
Captain
Posted 20 August 2020 - 02:28 PM
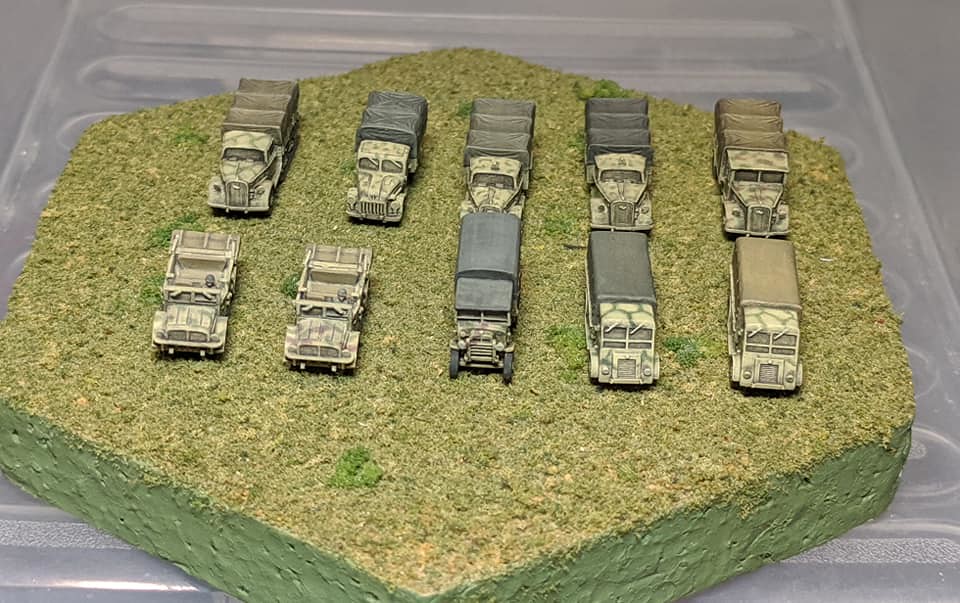
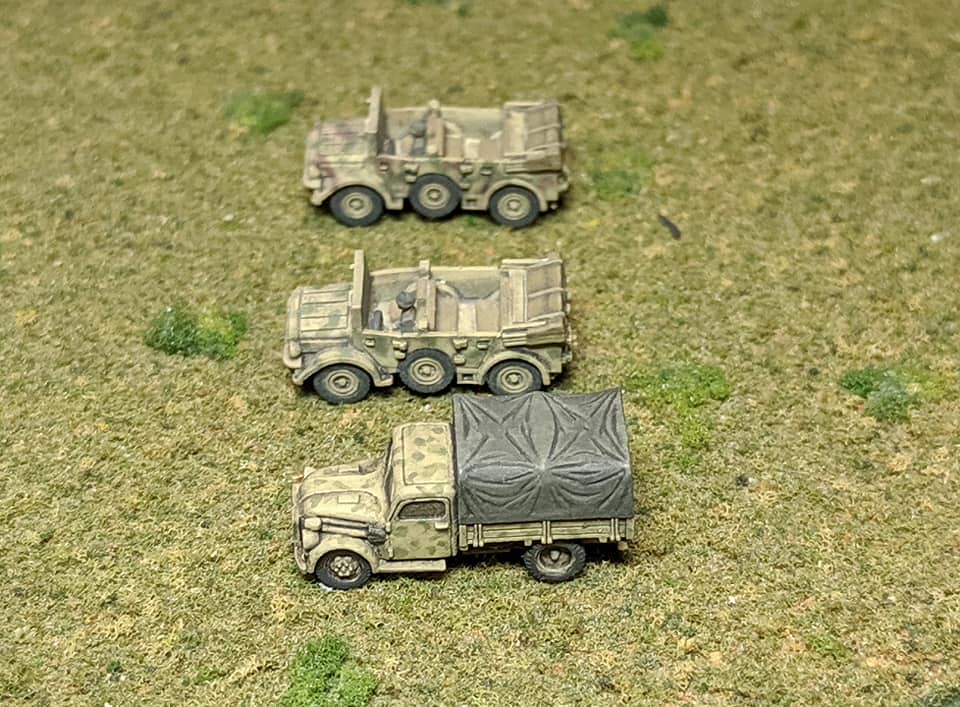
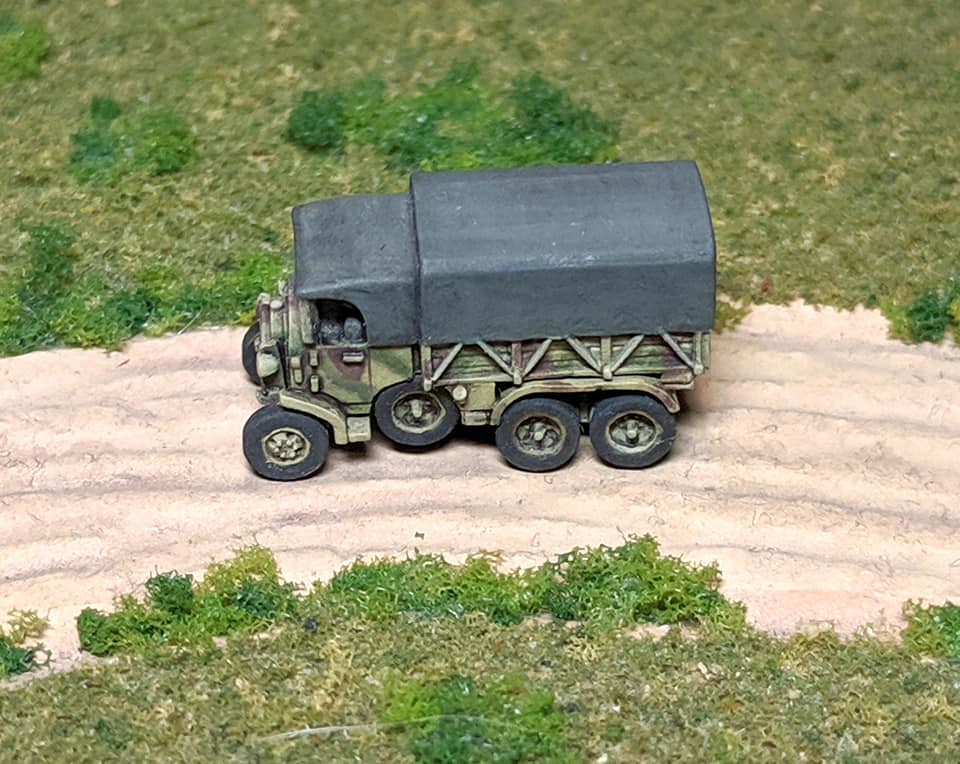
Here are some pictures of my eclectic mid to late war German truck motorpool. These are all GHQ miniatures.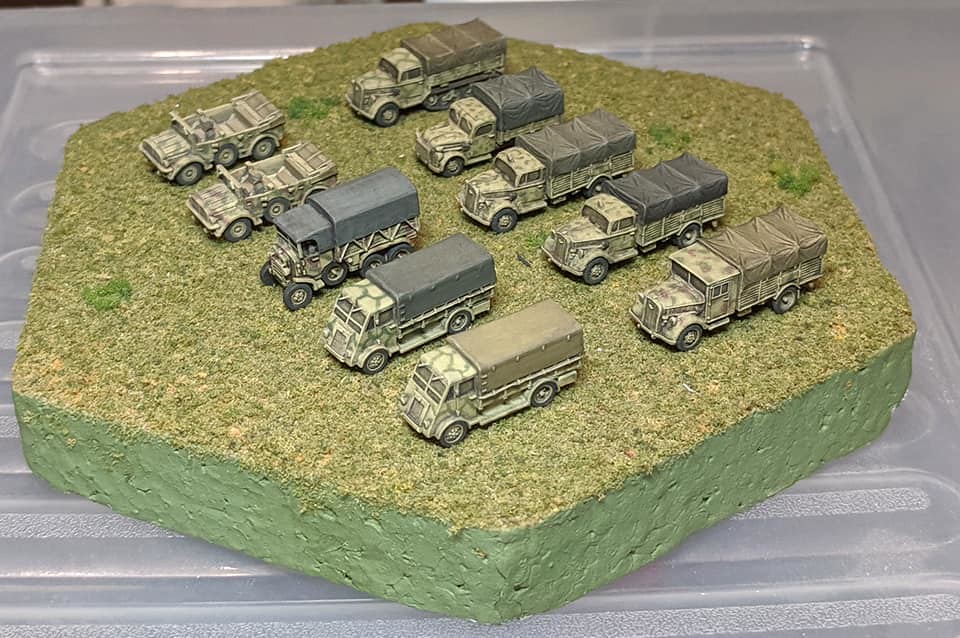


#25
healey36
-
- Members
-
- 744 posts
Lt Colonel
- LocationMaryland USA
Posted 29 August 2020 - 01:29 PM
Pete - A page back you mentioned you are using a turpentine-based black or dark brown wash on your gear. Is this a home-brew of your own, or is it something that's commercially available? Do you ever have issues with the wash dissolving the underlying Humbrol?
Paul
#26
Peter M. Skaar
-
- Members
-
- 348 posts
Captain
Posted 04 September 2020 - 10:38 PM
Hi Healey!
The wash is my own brew, actually copied and adjusted a bit from a GHQ how to on how to paint their minis. I use Humbrol #33 Matt Black for the black wash and Humbrol #98 Chocolate Brown combined with #33 Matt Black for my brown wash.
My brown wash is a very dark brown.
I have not had issues with the wash pulling the paint off with Humbrol but have had issues with the Model Master by Testors and X-tra Color which had a couple really neat colors. The Humbrol seems to take the wash fine while the others seem to pull off. I am not sure why this is exactly except for something in the formula of the paint.
#27
Peter M. Skaar
-
- Members
-
- 348 posts
Captain
Posted 04 September 2020 - 10:44 PM
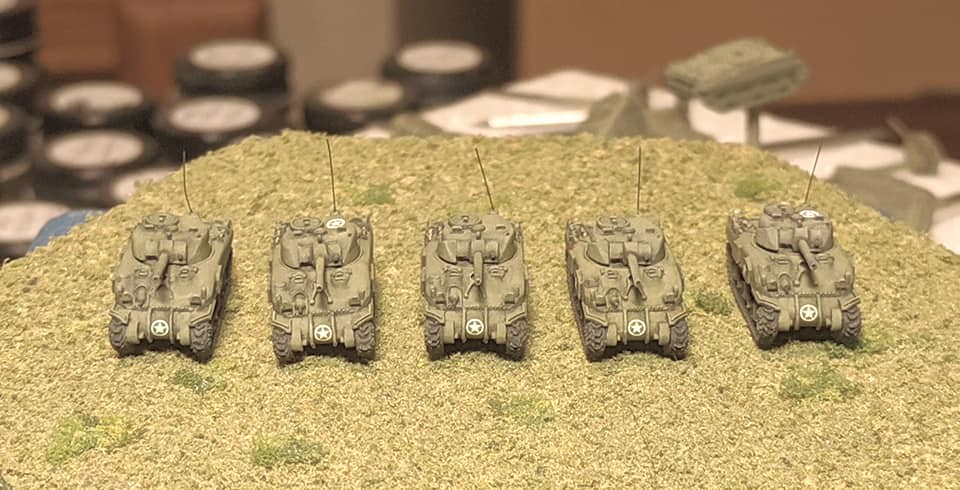
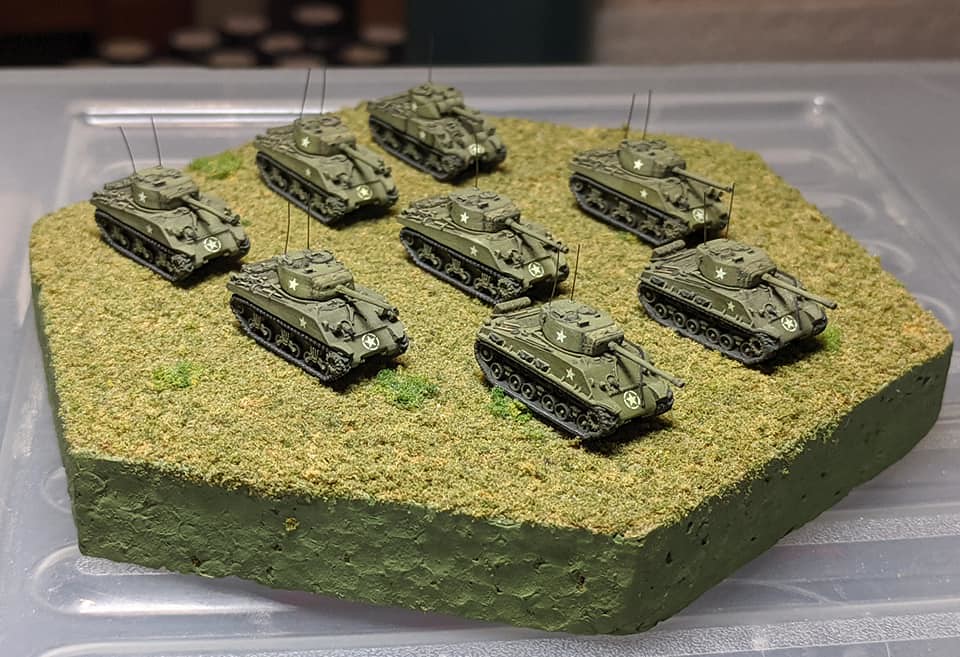
Here are some M4A1 Shermans I finished last week. These are 1/285th scale by GHQ. I added the M34A1 turrets to these models.


#28
Kenny Noe
-
- ODGW Staff
-

- 901 posts
Mein Panzer Guru
Posted 09 September 2020 - 09:23 AM
Really impressive!! Great work!!
#29
Peter M. Skaar
-
- Members
-
- 348 posts
Captain
Posted 09 September 2020 - 11:35 PM
Thanks very much, Kenny! I am working on getting more Shermans done for my American forces for NW Europe, 1944-45.
#30
Peter M. Skaar
-
- Members
-
- 348 posts
Captain
Posted 17 September 2020 - 01:40 PM
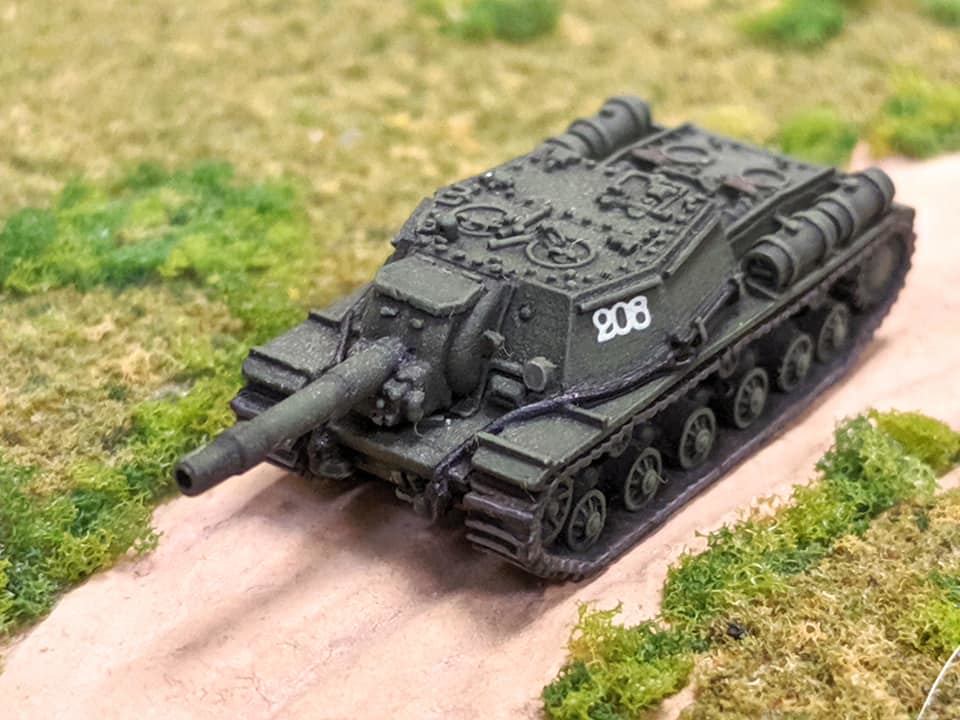
A few years ago, I painted up a SU-152 regiment for the time of Kursk. At that time, there were 12 SU-152s in a regiment plus a command tank, in this case a KV-1S.


#31
Peter M. Skaar
-
- Members
-
- 348 posts
Captain
Posted 09 November 2020 - 11:51 PM
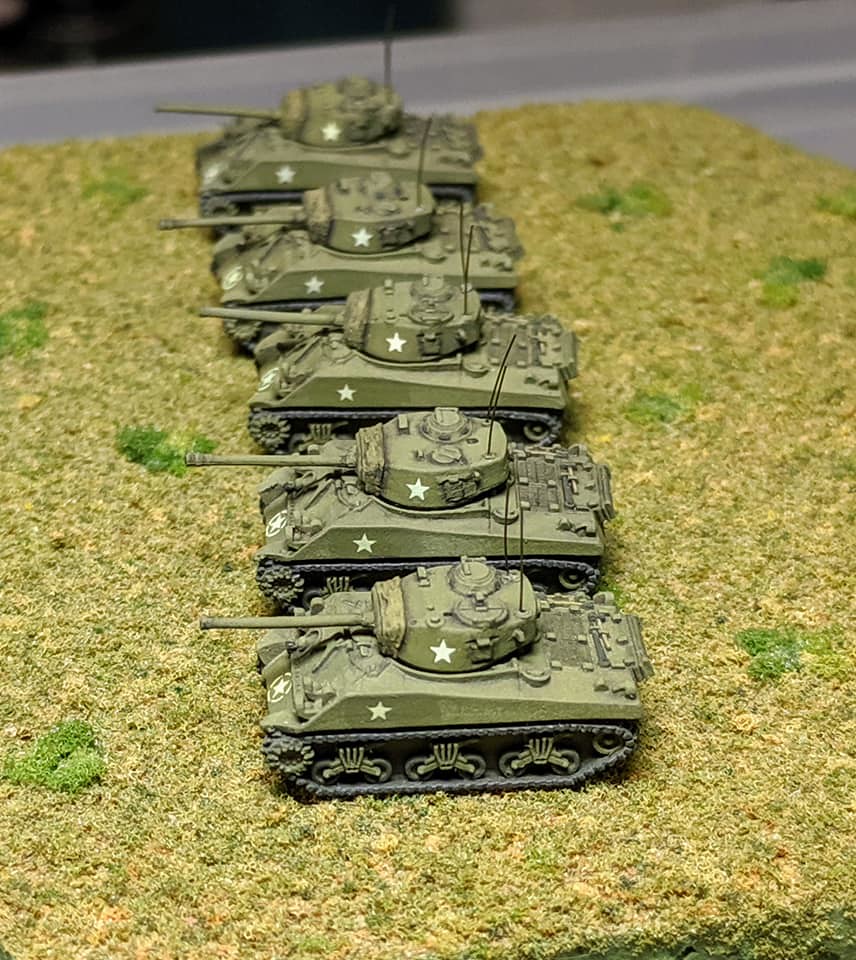
I added more Shermans to my existing forces. These are by GHQ and consist of 2 M4A3E8s, 5 M4A3 76s, and 1 early type M4A3.


#32
healey36
-
- Members
-
- 744 posts
Lt Colonel
- LocationMaryland USA
Posted 12 November 2020 - 10:24 AM
They look brilliant, Peter! Stretched sprue for aerials? Also, I've taken to cementing the turrets in place, which seems to limit the damage to the piece on the game-table. Are yours cemented on, or still free to rotate?
#33
Peter M. Skaar
-
- Members
-
- 348 posts
Captain
Posted 12 November 2020 - 05:36 PM
Thanks very much, Healey! The aerials are actually black nylon thread cut to length, in this case about 1/4" high from the base of the antenna to the tip. I also glue my turrets in place as they are less likely to get damaged and the rules sets I use including Mein Panzer do not require separate turret facing.
#34
healey36
-
- Members
-
- 744 posts
Lt Colonel
- LocationMaryland USA
Posted 12 November 2020 - 06:16 PM
Black nylon thread...makes sense, just wouldn't necessarily have thought to try that. I've actually been kicking around the idea of using some heavy clear-plastic fishing line to base some 1/1250 aircraft. Not sure if it'll work, but I might give it a shot.
#35
Cpt M
-

- ODGW Retired Staff
-

- 939 posts
Colonel
Posted 14 November 2020 - 09:23 PM
Beautiful work, Pete! I especially like your German camo work. Very subtle, but very effective.
#36
Peter M. Skaar
-
- Members
-
- 348 posts
Captain
Posted 03 December 2020 - 02:20 PM
Hi Captain M! Thank you very much! I am currently working on more Shermans for my late War U.S. forces.
Pete
#37
Peter M. Skaar
-
- Members
-
- 348 posts
Captain
Posted 15 December 2020 - 12:16 AM
Here are some GHQ Elephants I painted last year.
]


#38
healey36
-
- Members
-
- 744 posts
Lt Colonel
- LocationMaryland USA
Posted 16 December 2020 - 07:34 AM
Really nice, Peter. Let those Elefants tangle with a few of those Shermans (strength in numbers, eh).
I have a pack of GHQ Elefants in the lead-pile, deserving of some paint. I noticed they have a few prominent casting lines. These are sometimes difficult to remove/mitigate...what's your secret for dealing with them?
Paul
#39
Peter M. Skaar
-
- Members
-
- 348 posts
Captain
Posted 18 December 2020 - 08:29 AM
Hi Healey!
Thank you very much! Casting lines occur in virtually all 2 part molds. Sometimes also, in GHQ models, there will be a shift which is not intended. A shift occurs when the 2 halves of the mold don't align properly in the casting process.
Normal cast lines or flash, is pretty easy to remove. For me, I use a #11 hobby blade to carefully scrape the lines away. I try to make the scrape as smooth as possible. I sometimes will go in with a hobby file after that to smooth things out. On large, flat areas such as the side of a hull or the sideskirts on German tanks, I will use fine steel wool to do the final smoothing. Be careful, though, not to smooth out any details.
Sometimes you will also have some "nubs" as well. These are pieces of metal sticking up that are not actually details on the model. I carefully examine the model to determine what is detail I want and what are nubs left over from the casting process. These are usually residue from the vent holes in the mold. I either carefully slice them off with my X-Acto blade or just file them down.
I use a #11 X-Acto type blade for most of my scraping. Try to use a newer blade as it works better.
That is basically it. Have a great day!
Pete
#40
healey36
-
- Members
-
- 744 posts
Lt Colonel
- LocationMaryland USA
Posted 21 December 2020 - 08:48 AM
Thanks for that, Pete. I've been using an Xacto for scraping away mold lines, but sometimes the casting is so out-of-alignment the marks are almost impossible to remove. This seems especially true for some of the older castings of vehicles with skirts, where removing the horizontal mold marks might obliterate the vertical lines outlining the individual plates. I have a couple packs of StuG-IVs that might be a lost cause.
Hope you are well and safe, geared up for a good holiday. It will be quiet here, thankfully.
Paul


0 user(s) are reading this topic
0 members, 0 guests, 0 anonymous users

