Jump to content


Photo

Rearguard at La Cochère


  • Please log in to reply
6 replies to this topic

#1 healey36

healey36

    Lt Colonel

  • Members
  • 744 posts
  • LocationMaryland USA

Posted 01 April 2017 - 07:29 PM

Rearguard at La Cochère


The Setting

The 9th Panzer Division, having been greatly reduced during the battles in the Dnieper basin during the second half of 1943, was withdrawn from the eastern front in early 1944 and sent to Nimes in southern France for rest and refit. There it was rebuilt to full strength.


At the time of the 1944 Allied landings the division was sent to Avignon, then on to support the disintegrating 7th Army where it was encircled in the Falaise Pocket. Commanding General Erwin Jolasse, grievously wounded on August 10, was replaced by General Walter Scheller. Under Scheller’s command the division was able to extricate itself from the pocket but not before suffering severe losses in men and equipment. By late August the division had been reduced in strength to that of a single infantry and artillery battalion with less than a dozen operative tanks.


With the remnants of the 84th infantry Division on their northern flank and little more than a regiment-strength 2nd Panzer Division immediately to their south, 9th Panzer and the remains of 47th Panzer Corps continued the desperate withdrawal eastward once clear of the collapsing pocket. On August 19 Scheller ordered the last bits of the depleted 33rd Panzer Regiment to screen the division from rapidly pursuing elements of the U. S. 32nd Armored Regiment (CCA, 3rd Armored Division) a few miles east of La Cochère.


Brigadier General Maurice Rose had recently taken command of 3rd Armored Division from Major General Leroy Watson who had been demoted and relieved by Eisenhower for his failure to get and keep the 3rd moving and engaged. Rose, who had a reputation for relentless pursuit of the enemy and leading from the front, was promoted to Major General in place of Watson on August 7. Now 3rd Armored together with the 2nd French Armored Division were pushing eastward to seize a bridge over the Ure while maintaining contact with and destroying the last of the German formations having escaped the southern edge of the pocket.


RGaLC 1a


The Scenario

On the morning of August 20, 1944 tanks of Company C, 4th Armored Battalion, 32nd Armored Regiment ran headlong into two understrength platoons of the 1st Panzer Battalion, 33rd Panzer Regiment, blocking the Argentan - Le Merlerault road. Low cloud and occasional light rain precludes air operations, otherwise ground-level visibility is good. The scenario lasts ten turns, roughly one hour.


The Terrain

The scenario requires a three-foot-by-four-foot table representing a narrow valley with fields whose fence-lines are occasionally overgrown by old trees as follows:


RGaLC aa


German forces deploy in their rear area along the eastern baseline. Allied forces enter the table from the road on the western baseline and proceed eastward. Allied forces must continue along the road in-column until initial enemy fire is taken.


RGaLC table

A view of the table, east to west.


The Forces

German Order of Battle

33rd Panzer Regiment, 1st Panzer Battalion - Two platoons reduced to 3-PzIVH ea.

Unit 1 – Medium Tank Platoon Veteran, Command PzIVH (1), PzIVH (2)

Unit 2 – Medium Tank Platoon Veteran, Command PzIVH (1), PzIVH (2)


U. S. Order of Battle

32nd Armored Regiment, 4th Armored Battalion – Company C, two platoons of 5-M4A3 ea.

Unit 1 – Medium Tank Platoon Veteran, Command M4A3 (1), M4A3 (4)

Unit 2 – Medium Tank Platoon Veteran, Command M4A3 (1), M4A3 (4)


Victory Conditions

Germans score 2 points for each Allied vehicle destroyed.

U. S. scores 1 point for each German vehicle destroyed and 1 point for each U. S. vehicle advanced off the eastern baseline.


This hypothetical scenario has been developed as a first-off in learning the mechanics of Mein Panzer. Tank-vs-tank, of short duration on a compressed landscape.


RGaLC bb

Pz-IVH moves into position along a tree-line on the evening of August 19, 1944.


#2 healey36

healey36

    Lt Colonel

  • Members
  • 744 posts
  • LocationMaryland USA

Posted 15 April 2017 - 01:02 PM

Dammit...slight schedule delay...went to pull the bits out of inventory and somehow I'm two M-4's short. Had to whip up a couple from the parts bin:


RGaLC 1b


Should be good to go now.  


I'll be interested to see how many hours it takes to knock out one scale hour of MP...


Healey


#3 healey36

healey36

    Lt Colonel

  • Members
  • 744 posts
  • LocationMaryland USA

Posted 18 April 2017 - 02:58 PM

AAR - Pt. 1


A brief recap of Rearguard at La Cochère playthrough using just the MP Basic rules (we'll try it again later with the Advanced bits). This is divided into two parts pending recompilation of the notes/photos from turns 6-10.


The Allied player's orders to his combat team was simply, "Get the hell off the east table-edge as quickly as possible and let no one stop you!" The two platoons of M4's were lined up single file, platoon #1 immediately followed by platoon #2, motoring eastward along the Argentan - Le Merlerault Road. Lieutenant John Brock , commander of platoon #1, followed the lead M4 forward in his tank while Lieutenant William Middlebrook followed with his platoon #2, from the rear of the column. Only with General Rose taking over, their division, the 3rd Armored, had they begun to push eastward in any serious way against the Germans, They were more afraid of Rose than they were of the Germans. 


RGaLC 2

US tanks move along the Argentan-Le Merlerault road.


The German commander split his two platoons of PzIVH, one (White) assuming a blocking position adjacent to the road along a thick tree line, the second (Red) taking position among some trees near the fork in the road with orders to attack any American tanks that pushed south of the road once the shooting started. Unit #1 (White) was commanded by Hauptmann Gunter Szelinski, while unit #2 (Red) was commanded by Oberleutnant Oscar Gullmann. Together with their men they'd been in continuous action for nearly ten weeks, their division now a husk of its former self. Their orders were to stop the Americans at all cost, giving the rest of 9th Panzer a chance to get over the Ure river.


Turns 1-3 saw the Americans advance to mid-table. Szelinski and his Mark IV's remained hunkered down in their tree cover, having walked the field the night before to lay out their firing lines westward along the road. Now spotting Shermans pushing toward them past the destroyed farm Szelinski gave the order to fire. To his left tank 112 sent its shot into the lead Sherman, blowing off the M4's left drive-sprocket and severing the track. The tank lurched to the left and stopped, the track wound out behind it. Szelinski, in tank 111, fired striking the second-in-line M4 at the top of the hull just below the turret front, penetrating to the interior and destroying the vehicle. Lieutenant Brock and his crew were not observed to bail out. Tank 113 fired at the fourth M4 in the column, striking the right side of the turret a glancing blow with no damage incurred.


RGaLC 3

The lead tank and commander Brock's tank second-in-line are hit, with Brock's tank destroyed (we didn't have any cotton balls so we just used a small pip to denote the tank's destruction).


On turn 4 the Germans have the initiative. Szelinski orders his platoon to continue their fire on the American column. With the first two M4's immobilized, the following Shermans begin moving off the road to the left while continuing forward. Tank 111 (Szelinki) fires again, hitting the immobilized lead tank a second time, maintaining its suppressed condition. Tank 113 fires down-column and misses. Tank 112 has no shot.


Brock's platoon, now down to three tanks, moves off the road into a pasture on the left searching for the source of the enemy fire.


RGaLC 4


The remnants of Brock's platoon moves off to the left toward their antagonists, while Gullman's platoon moves up along the southern edge of the road.


Gullman now orders his platoon forward, breaking out of the trees toward the Americans. His line of sight is somewhat blocked by a slight rise directly in front of him so no gunnery is possible.


However, the lead tank of the second American platoon does have a shot and fires at Gullman's Mk. IV, striking and blowing away a small piece of his turret schurzen with no other effect. Turn 4 is now over.


Turn 5 and the Americans have the initiative. The immobilized lead Sherman of Brock's platoon rallies while observing a number of German tanks moving past on their right. Tanks 3, 4 and 5 of Brock's platoon continue moving off to the left having spotted Szelinski and his three Mk IV's in the tree line.


Szelinski, observing that the Sherman's will shortly flank his position orders his platoon to reverse out of the tree line and reorient their vehicles back into a head-on profile.


RGaLC 6

Szelinski's platoon backs out of its position along the tree line in the face of the flanking M4's.


Middlebrook orders his platoon off the road to the right, moving along a tree line that runs perpendicular to the road. He intends to turn east at the end of the hedgerow and make a dash toward a small hill with its accompanying cover.


Gullman's platoon turns toward the road and the immobilized Sherman, intent on taking the remaining three Shermans of Brock's platoon from the rear.


RGaLC 5

Middlebrook's platoon moves cross-country along a hedgerow attempting to bypass the Germans. Gullman's Mk IV's turn north to engage Brock's platoon from the rear. (Note, in this photo Gullman's tank 121 is incorrectly marked as knocked-out...this was due to an inappropriate fire result from the immobilized Sherman which had just recovered from its suppressed condition in that turn).


Other than the opening German shots down the road, the ranges in the first five turns were crazy close due to the slight undulations of the ground and the numerous tree-lines. Getting a clean look was a challenge and the Americans were motoring el-pronto. As so often happens in these games the proximity can look outrageous.


Score at the close of turn 5 - Germans 2, Americans 0.


Healey


#4 healey36

healey36

    Lt Colonel

  • Members
  • 744 posts
  • LocationMaryland USA

Posted 19 April 2017 - 01:43 PM

AAR - Pt. 2


Turn 6 begins with German initiative. Platoon White is up first. Szelinski orders fire onto the group of Shermans moving left to right in front of him as they try to reach a row of trees at the foot of the hill. The blast of his tank's L48 crashes in his ears and he observes a hit on the second M4 in the group. It lurches to a stop, a faint wisp of smoke trailing from its engine vents. Tank 112 fires at the tank immediately behind but misses overhead. Similarly tank 113 fires at the same trailing M4 and also misses.


Brock's platoon continues moving east across the German front. The crew of the tank Szelinski hit, stopped with unknown damage, recovers and stays with the vehicle. They hear the crash of an American 75mm behind them which hits the German tank 113, penetrating the brake-cooling air intake in front of the driver's position and destroying the vehicle. Meanwhile tank 1, immobilized on the road but still fighting, fires at Panzer 212 at near point-blank range hitting it yet no damage is incurred.


RGaLC 7

Gullmann's MkIV's push through the smoke past two knocked out Shermans.


Tank 212 returns fire, hitting the immobilized M4 in the hull below the turret blowing it apart in spectacular fashion. Gullmann then orders his tanks down the road back toward the crossroad.


Middlebrook, having consulted his map for an alternate route, orders his tanks south around a small hill where he then plans to make a push east.


RGaLC 8

Middlebrook's platoon of M4's skirts a low hill and the table-edge motoring southeast toward the crossroad.


Turn 7 and the Germans maintain the initiative. With Brock's remaining M4's moving behind a hedgerow, Szelinski has his two remaining tanks back into a better firing position where he hopes to take the Americans from the flank when they emerge from the tree-line.


The remaining two mobile tanks of Brock's platoon stop momentarily for their commanders to caucus...they decide to improvise and use the tree-line to begin moving onto a steep hill to their left. From there they hope to locate the German tanks that have been pounding them and perhaps make amends.


Gullmann's platoon of Mk IV's continue down the road, expecting Sherman's to burst through the trees at any moment. None are seen and the crossroads is just a short distance ahead.


Middlebrook gets his platoon around the base of the small hill quickly turning east.


Turn 8 and the initiative now shifts to the Americans. The immobilized Sherman of Brock's platoon which has been sitting quiet for some time suddenly fires and hits Szelinski's MkIV. The 75mm round passes through the schurzen to hit the intercooler, spewing hot oil into the engine compartment and filling the tank with smoke. Szelinski orders the turret and driver's hatches thrown open to ventilate the vehicle (they are suppressed, lol). The other two M4's of Brock's platoon continue to move toward the hilltop.


Gullmann's platoon reaches the crossroad and positions his tanks to block Middlebrook's approach from the west.


Turn 9 and the Americans maintain the initiative. The lead tank in Middlebrook's platoon, having swung around a small rise the previous turn, gets off a head-on shot at Gullmann's MkIV and knocks him out. Gullmann and his crew abandon the smoking wreck and run for cover along the edge of the road. Over his shoulder he can see a number of other Shermans moving into view.


RGaLC 9

Middlebrook's tanks burst through the trees and begin exchanging fire with Gullmann's MkIV's occupying the crossroad.The marker in the foreground is incorrect - it should indicate 'suppressed', not 'casualty'.


Tank 212 of Gullmann's platoon returns fire and hits the lead Sherman (the one which had just knocked out Gullmann) and temporarily stops (suppresses) it. Tank 213's LOS is blocked by a few trees and has no shot at the oncoming M4's.


The last remaining Shermans of Brock's platoon have reached the top of the hill where they take cover behind some trees. Dismounted, the sergeant now commanding can see the Germans below while observing that the distance to the table's edge is not reachable in the final turn. They decide to stop here.


Szelinski, covered in oily soot from the near catastrophic engine-compartment damage, rallies his crew and waits for the Shermans to reappear. Tank 112 remains behind some tree cover on his left.


Turn 10, final turn. The Americans once again have the initiative. Middlebrook, his M4's firing before moving, push toward the crossroad and Gullmann's last two tanks. Spotting a MkIV slightly to his left (212) he orders his gunner to fire, striking the tank's leading armored facia adjacent to the driver's position destroying the gear-box. Immobilized, the tanks commander assessed the situation and orders his crew to continue their shooting. The Sherman on Middlebrook's right fires at the same tank but misses. From behind him, Middlebrook hears tanks 2 and 3 moving up.


RGaLC 10

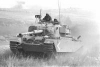
Middlebrook (center M4) rolls up to the crossroad moments before being knocked out by a PzkpfwIVH out of the picture on the right. The high-water mark for the Americans.


Tank 212 rallies while 213 fires at Middlebrook's Sherman, hitting the front of the hull, smashing the driver-position and killing his driver before plowing through one of the ammo racks. With the tank filling with smoke and having little faith in the Sherman's wet stowage, Middlebrook orders the crew to bail out.


Szelinski and his two remaining tanks await the last of the Americans to come into view, but they never do.


Results


The Germans knocked out four Shermans for 8 points, while the Americans knocked out two of the six German tanks and immobilized a third for a total of 2 points. They failed to exit any of their tanks off the eastern table-edge. Points aside, the Germans have won a substantial victory as they have stopped/slowed the American advance presumably allowing the less-mobile bits of 9th Panzer Division to slip across the Ure to fight another day.


The American player attempted to quickly move past/around the Germans with limited success, while the relatively narrow field of play greatly helped the Germans block a direct line of advance. In hindsight it can be seen that it would take the Americans nearly five turns to just motor unopposed across the table using road movement...scarcely enough time to deal with a determined adversary. While it came down to the last turn, the scenario could probably stand to be extended a further two turns. A good strategy for the Americans might be to send one platoon straight into the teeth of the German defense while attempting to circumnavigate them with the other (and get off the table, or at least into a position where a last turn dash could be attempted).


The M4A3 with its short 75mm was at a decided disadvantage here. The German 75mm L/48 was clearly superior, with a slight tip to the German crews as well. Certainly the 75mm M4A3 was reaching the end of its usefulness by this point of the war, many of the new M4's having been upgraded to a superior short 76mm.  


Observations


MP-Basic is a good, fun game in a beer-and-pretzels sort of way. It is fairly simple, fast moving, highly playable and thankfully doesn't require a bucket of dice to generate results. Calculating to-hit and any resulting abstract damage is simple and quick. To add some interest we used an old damage table from the ancient Angriff! rule-set to put some color on the MP-Basic hit results. It served no purpose other than to further detail the results and perhaps add to the AAR notes. Best of all MP plays quickly...we knocked the whole thing out in a bit more than two hours, pretty good for a first run-through.


Looking forward to incrementally adding the advanced rules and especially getting some infantry on the table.


Rearguard at La Cochère z

Immobilized, tank 212 continues pouring fire into the line of advancing Shermans on turn 10. Panzer 212 was the 'ace' of the day with two kills and numerous hits scored. With the tank-recovery teams far to the rear tank 212 will most likely be abandoned and its crew will catch a ride on one of the surviving MkIV's.


Healey


#5 Kenny Noe

Kenny Noe

    Mein Panzer Guru

  • ODGW Staff
  • 901 posts

Posted 20 April 2017 - 09:51 AM

Healey,


Excellent AAR.  Thanks for the kind words.  We play alot of MP Basic convention style games (Tank on Tank with a little Arty and maybe a couple INF AT stands) in a 4 hr slot.  This gives the players a chance to learn the basic rules and have fun killing tanks.


Playability - Fast easy to learn and play was the topmost goal when MP was in development.


Thanks again.


#6 healey36

healey36

    Lt Colonel

  • Members
  • 744 posts
  • LocationMaryland USA

Posted 11 June 2017 - 10:45 AM

Thanks Ken.


#7 Peter M. Skaar

Peter M. Skaar

    Captain

  • Members
  • 348 posts

Posted 17 June 2017 - 02:00 PM

Thanks for posting this AAR Healey.  It looks like a nice simple game to get newbies up and playing quickly. 

I live in the Phoenix area and have run some simpler Mein Panzer games at Imperial Outpost Games.  The owner, Darren, is a great guy and has been very gracious to let me use his gaming tables for this.  It usually attracts lots of attention and I usually manage to get some new players that way.

Pete


0 user(s) are reading this topic

0 members, 0 guests, 0 anonymous users