Thanks Bob.
Here a couple notes I thought some readers might be interested in from the battle.
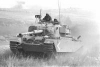
The battle involved the 1st Canadian Infantry Division’s 2nd Canadian Infantry Brigade (2 CIB), with an infantry battalion from the Loyal Edmonton Regiment (the “Loyal Eddies”), an infantry battalion from the Seaforth Highlanders of Canada (the “Seaforths”), and an infantry battalion from the Princess Patricia’s Canadian Light Infantry (the “Patricias”). In support were the 12th Canadian Armoured (“Three Rivers”) Regiment, the Royal Canadian Engineers’ (RCE) 4th Field Company, and the Royal Canadian Artillery’s 90th Anti-Tank Battery’s six- and seventeen-pounder guns. The German defenders were the 2nd Battalions of the German 3rd and 4th Regiments of the 1st Parachute Division.
The Germans also took full advantages of the inherent complexities of the urban geography itself. They destroyed many buildings so the rubble fell into the secondary streets, creating piles ten to fifteen feet high, which were then sown with booby traps and mines to block any advance up any street that was not through the center of town. The defensive scheme of maneuver inside Ortona was to hold a line of forward positions in the town’s southern outskirts, after which the defenders would withdraw into the heart of the town, enticing the Canadians up Highway 16—invitingly left clear of rubble, unlike the secondary streets—and into their main defensive area, the various piazze (squares), where the Canadians were to be destroyed. The buildings around the squares had several machine gun positions protected by marksmen and antitank guns on several floors of every structure. Doors, windows, and furniture—even toilets—were booby-trapped with explosive devices. The Germans had also destroyed the walls on one side of each of several buildings so that the Canadians, thinking they were walking into a room that would give them shelter as they approached the far side of a building, could be observed and then gunned down by the Germans positioned across the street. German artillery was planned to blanket Canadian positions as they advanced through the town. The obstacle and defense plan gave the Germans the advantages of an interconnected network of well-protected, three-dimensional mini-fortresses with sub- and supersurface capabilities.
Canadian forces also evolved their tactics during the battle. When the Canadians had fought their way to the older part of the town, they encountered buildings that were much more densely situated than those in the south, with many of them sharing adjoining walls. Recognizing this, and after clearing a building of the enemy, Captain Bill Longhurst of the Loyal Eddies’ A Company directed his infantry pioneers and engineers to use explosives to blow holes on the top floors of the connected buildings to move from one to another via the upper levels. This helped to address the problem of heavy casualties they were taking when soldiers were exposed on the streets and entering through booby-trapped doors and windows to clear structures from the bottom up. After the holes in the top floors were created, the Canadians utilized grenades and small arms to enter and clear the rooms. From that point forward, they began clearing buildings from the top down, killing the surprised Germans with explosive charges or showering them with grenades and automatic fire while moving downward. After clearing the building, the Loyal Eddies would just return to the top floor of the now clear building to repeat the process into the next one. Soon, the Seaforths were copying this technique, called “mouseholing.”
The Canadians demonstrated great adaptability as they now entered into the heart of the German defense. The Three Rivers Regiment tank personnel began using different types of ammunition—the first round to strike a building was an antitank shell to make the hole and initially kill whoever was inside, and the second was a frangible round that would be fired through the newly created hole to finish off the remaining Germans inside. The tanks rapidly became a vital part of the infantry and engineer assaults of enemy-held buildings. The tanks were also used as sustainment platforms during lulls in attacks, bringing ammunition and supplies up to the front lines and ferrying the wounded back to casualty collection points.
The sheer amount of ammunition used by Canadian forces illustrates the intensity of this battle. Soon after the battle began individual infantry soldiers from both the Loyal Eddies and Seaforths were each given a daily issue of twelve to fifteen grenades, and Canadian engineers eagerly used an abundance of abandoned German munitions and mines on top of their supply of explosives to create mouseholes or bring down houses. In just eight days of fighting, the Loyal Eddies used 918 antitank shells, 4,050 three-inch mortar rounds, two thousand two-inch mortar rounds, fifty-seven thousand .303-caliber rounds, 4,800 submachine gun bullets, six hundred No. 36 “Mills bomb” hand grenades, and seven hundred No. 77 smoke grenades.
Most lessons learned from Ortona can be found at the tactical level. A clear lesson is the inherent advantages the urban environment gives the defender. If paratroopers, who were typically dismounted and did not have any tanks, were to defend against the Canadian advance, then it was logical for German military leaders to choose Ortona as the eastern anchor point of the Gustav Line rather than the Arielli River valley. Their four months of creative planning and preparation, combined with their tactics within the town, made it a strong defense against their attackers. Their use of rubbling—including destroying building faces to establish ambushes from the other side street, obstacle plans, engagement area development, and improvised building bombs—transformed a small urban area into a complex juggernaut that cost the Canadians time, resources, and soldiers to break through.
Another tactical lesson, with operational-level planning implications, is highlighted by the large amount of ammunition used during the fighting. Operations in urban areas consume at least four times the amount of ammunition required in other environments. At Ortona, this high expenditure was due to the prepared defenses, buildings’ construction (which allowed them to act as naturally fortified strongpoints), and the close-quarters combat between both forces. Canadian soldiers, tanks, and antitank guns, and both Canadian and German artillery, required large amounts of ammunition, especially high-explosive rounds, to destroy strengthened buildings that housed enemy positions. Given these urban warfare requirements, operational headquarters must be prepared to forecast, move, supply, and resupply large quantities of ammunition.
The Canadians’ improvisation of weapons systems and explosives was another critical tactical lesson. Given that this was the first prolonged urban battle of the Italian campaign, nobody within the Allied camp had the tools and equipment that modern militaries can carry into urban combat today. Thus, the Canadians improvised with what they had: the equipment on their backs and the weapons systems they possessed. The Royal Canadian Artillery’s use of six-pounder and seventeen-pounder antitank guns to blow away and reduce the rubble piles and destroy German positions was one of the critical factors contributing to the Canadians’ success. The use of tanks in direct-fire support to breach building walls with a mixture of ammunition, to provide mobility and protection to advancing infantry and engineers, and to serve as sustainment vehicles highlights the essential requirement of tanks in high-intensity urban warfare.
Finally, the use of the mouseholing method was another tactic that heavily influenced the battle’s outcome. It enabled the Canadians to avoid having soldiers cut down on the open streets by remaining and moving inside buildings and allowed them to fight from the top down instead of from the bottom up. Although it was not invented by the Canadians—the method was actually already formalized in British doctrine and called “the vertical technique”—mouseholing was a common-sense tactic to apply to avoid casualties, advance under protective cover, and surprise the Germans by attacking from above.
 Map_Battle_of_Ortona_1943.gif 26.35KB
0 downloads
Map_Battle_of_Ortona_1943.gif 26.35KB
0 downloads