Looking through old NARA photos recently, saw a few shots of LST 906, one of six LSTs converted to a “baby aircraft carrier” for the purpose of providing artillery observation. According to US Army records, LST 906, as converted, carried ten L-4 Piper Cub Army observation planes, six in deck-park and four in cradles (other sources report fewer). The aircraft were flown off as required, flying their mission and landing on a strips located inland. Here 906 is seen on 31 July 1944 off Gaeta, Italy, providing observation for 634 Field Artillery Battalion, 3rd Infantry Division.
LST 906 operating near Gaeta, Italy, in July, 1944.
Even for the Cub, one of the most forgiving aircraft ever designed and manufactured, it must have been a challenge taking off. The flight-deck on 906 was 220 feet long and just 16 feet wide. I’ve seen a mate of mine take off in just 60 feet with his Cub (with a slight headwind), but keeping inside a width of 16 feet must have required some real skill.
L-4 taking off from LST 906.
A while back I picked up a couple packs of LSTs made by Viking Forge. These have been languishing in the lead-pile waiting for me to figure out what I wanted to do with them. For sentimental reasons, I want to make an Achelous-class repair ship out of one of them, and looking at these photos, I figured I could fashion LST 906 out of one of the others.
Not much in the way of supplies is required, just the casting, a small scrap of super-thin styrene, a short length of guitar string, and a base of some sort (I’ve grown partial to ODGW’s etched bases, so that’s what I’m using here).
Supplies, excluding the guitar string.
While the Viking Forge version isn’t perfect in configuration, I figured it’s generally suitable. Most glaring is the missing AA mounts on either side of the flight-deck forward, replacing the forward 40mm mount. A good modeler could likely make a couple without too much difficulty, but I passed. Later I realized I probably could have punched a couple tubs out of sheet styrene using a craft-punch that I have, but I didn’t want to double back. Maybe I’ll try that on the repair ship conversion.
Using a couple of modeling files, I removed most of the forward tub, leaving just enough to support the leading edge of the flight-deck. I then used a bit and pin-vise to drill the hole for the mast/aerial, which is located a few feet behind the deck-house toward the stern. Drilling holes by hand in pewter/lead castings takes a few minutes, quite a few depending upon the thickness. I generally drill all the way through, as I find this provides a more rigid fit which will prevent the mast from being knocked off by over-exuberant players in the heat of battle. I use metal guitar string for the masts, snipped off in length using a wire clipper. It’s not the neatest cut, which occasionally can be seen in photos, and it can be sharp. Attempts to use stretched sprue for mast has generally failed, as they seem to break off fairly easily, especially if painted.
I tried to cut the styrene flight-deck to something close to scale, but when you cut really thin bits the styrene has a tendency to curl. Sometimes you can straighten it out afterwards, rolling it over an edge, sometimes not. The first couple attempts to cut the narrow neck of the deck just curled up into a ball, so I had to make it quite a bit wider than it should be (mine’s probably close to 30 scale feet wide). From the styrene scrap, I also cut a pair of “extensions” for either side of the hull. I’m not sure what these mods are, but they are visible in the overhead photograph of 906. They could be for storage, or they could be additional bits of stowed flight-deck, don’t know and I can’t find mention of them in any of my reference books.
There was enough detail left on the deck to act as support for cementing the flight-deck in place; once cut into the approximate shape and trimmed, a little bit of Loctite GO2 holds it in place. It had a tendency to sag to one side on the first attempt, but I was able to pull it off, apply a bit more glue, then get it back in place properly. The two hull mod strips were similarly glued to the sides.
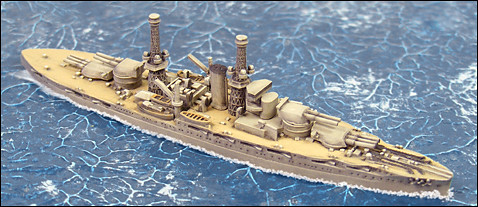
LST 906, mid-conversion (absent her hull modifications).
A few hours to dry, then it was ready for paint. LSTs had a wide assortment of schemes, but 906 doesn’t look to have a mottled scheme in the photograph. Photos of LST 16, the first to see conversion, has her in a haze gray. My first inclination had been to paint 906 some shade of drab green, but seeing this photo, I went with a gray (actually a shot of ModelMaster FS-35164 Intermediate Blue). A wash with Vallejo 76-516 gray wash, a dry-brush with some Vallejo 70820 off-white, then a shot of Tamiya TS-80 clear flat finished the paint job. It should have a center-line down the flight-deck, but these old hands are far too unsteady for that.
The last thing to do was base her. I pulled out an ODGW 3/4-inch-by 3-inch etched base, which looked a bit long. You can score these with a knife, then snap them off to length. I carefully round the new corners using a sanding wheel on the Dremel. Using Excel, I make/print/cut a label, than attach it to the underside using a bit of clear tape. Once happy with the cut-down base, I glue the ship on with a thin coat of GO2.
Ready for operations.
That’s it, just need to find a sprue of 1/2400 L-4s for the flight deck.