Here is the Command Distance Chart I created for this scenario.

Because the Germans have a greater command distance, it allows them a bit more flexibility in their deployment and allows them to spread out a bit more if needed without suffering the adverse effects of being out of command.

MP tutorial
Started by
Joe LePard
, Jan 27 2021 10:49 PM
89 replies to this topic
#61

Peter M. Skaar
-

- ODGW Members
-

- 552 posts
Major
Posted 30 August 2022 - 11:21 AM
#62
Peter M. Skaar
-
- ODGW Members
-
- 552 posts
Major
Posted 30 August 2022 - 12:46 PM
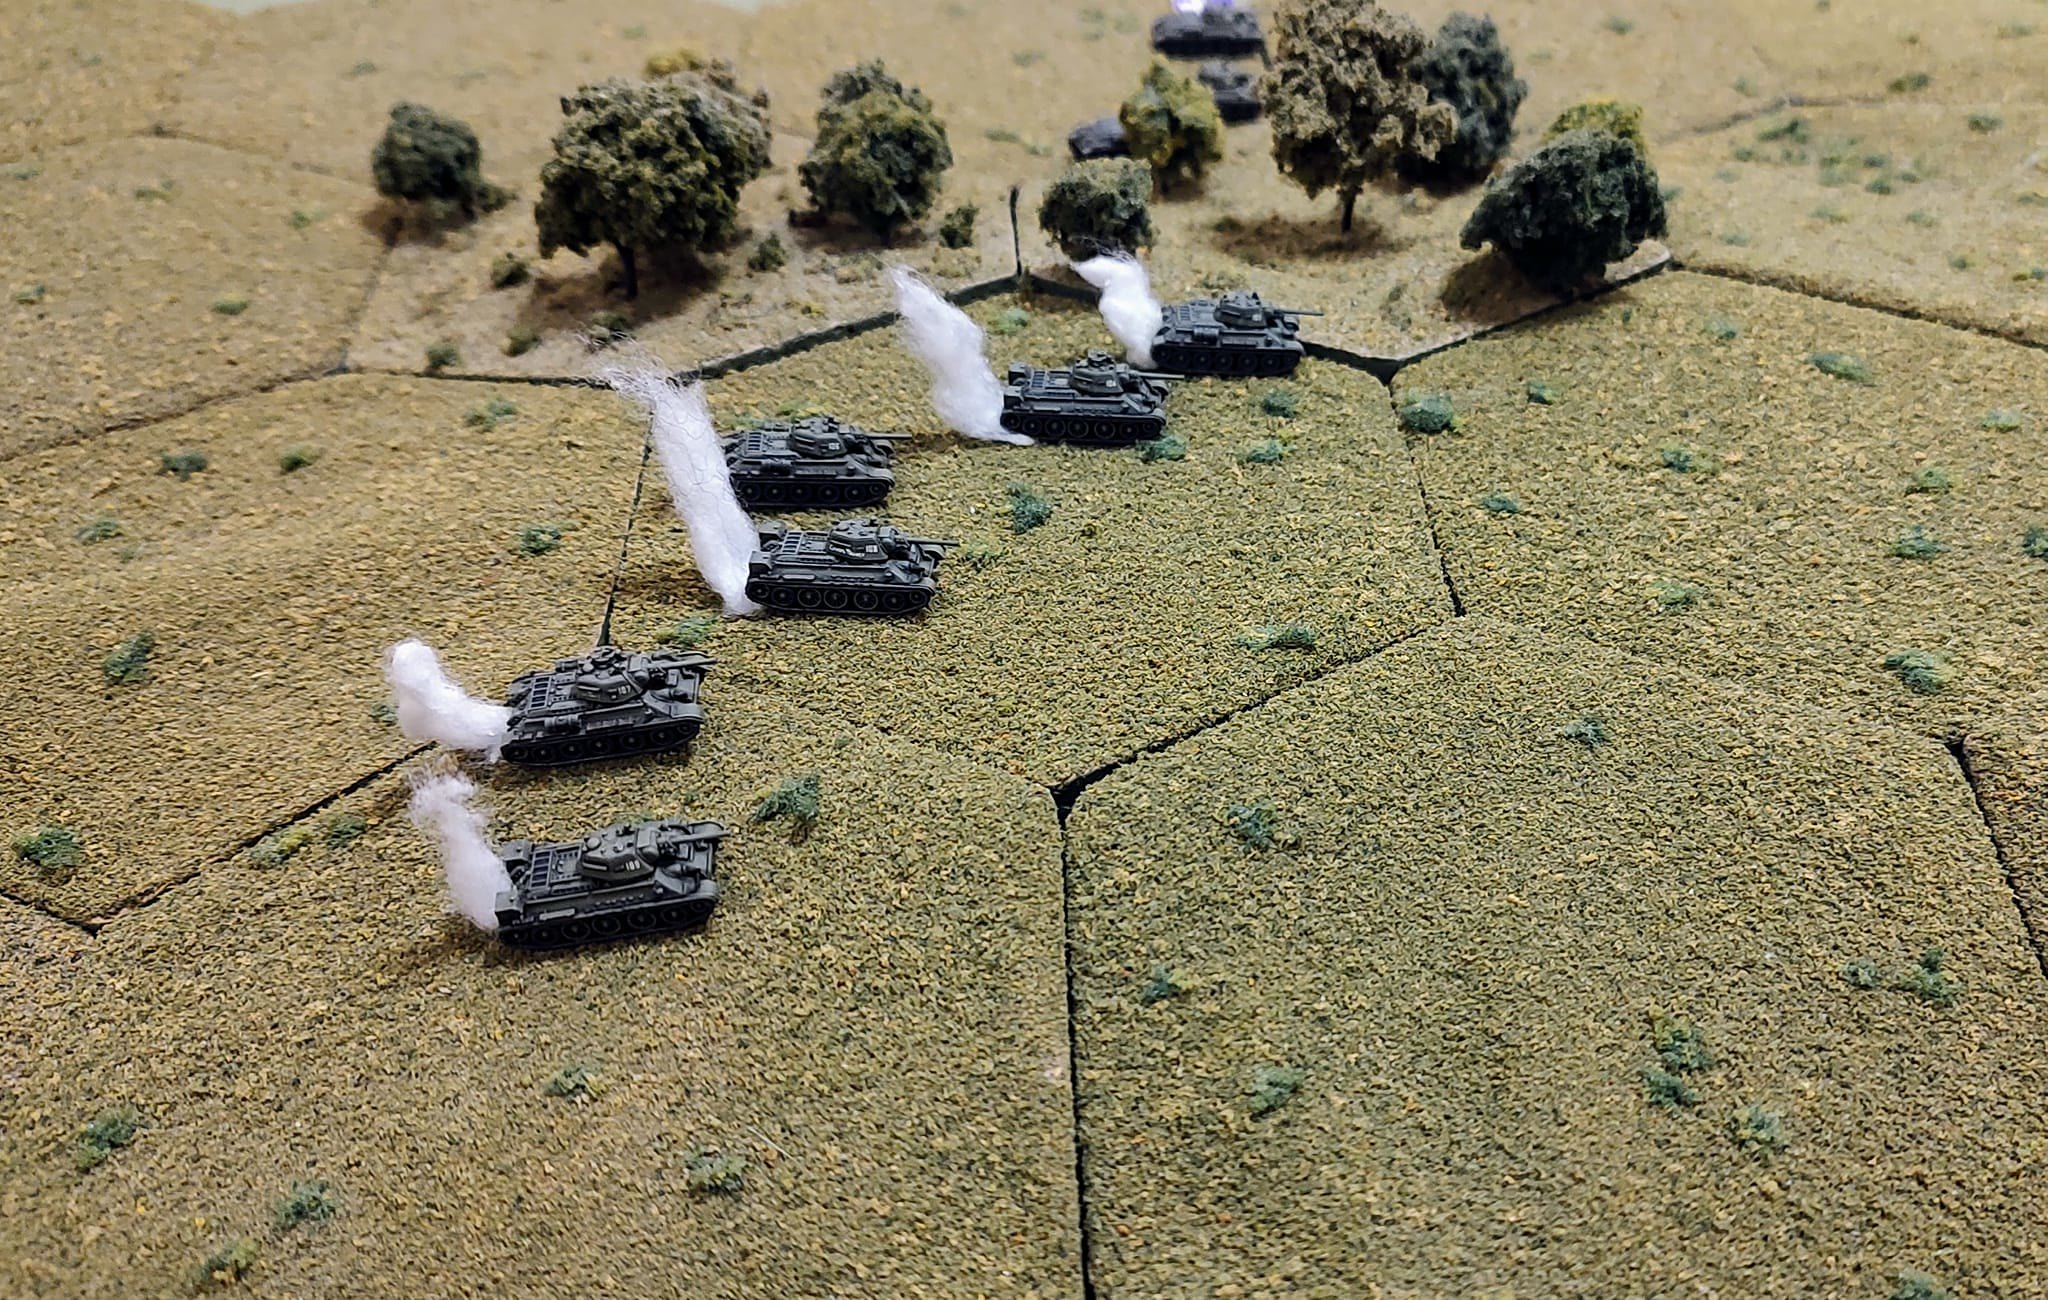
Turn 3. Initiative goes to the Germans this time. The German player decides to activate his 1st platoon of Panzer IIIL/Ms on the right.

The Panzer III on the far left of the German position decides to take a flank shot at one of the T-34s from 2nd Company that is on the German left.

The range is 14 inches so the 24" section of the To Hit table is used. The first shot hits!
The Panzer III has an AP of 7. The side armor of the T-34 is a 6. With no further modifiers this would be resolved on the 1 section of The Kill Table.
There is a -2 modifier, however, since the 50mm gun on the Panzer III has a -2 Modifier for the round being less than 57mm due to distance. This -2 forces the German to use the -1 section of The Kill Table instead.
The roll is a 6.

The attack results in the T-34 being immobilized (Track or suspension hit) and suppressed (Crew a bit shaken up as well). Although not actually knocked out, the T-34 can no longer move and must spend a turn or more trying to recover from suppression which requires a 10 or less on the 20 sided die to recover.
Due to having a rate of fire (ROF) of 2, The Panzer III takes another shot at the T-34 it had just targeted. This time, the Panzer III gets to add 2 to the hit probability since it had fired at the same target and that target has not yet moved since then.

This time, the dreaded 20 comes up on the die roll. It is now time to check the Misfire Procedure.
If a natural 20 is rolled on the To Hit Table, a misfire may have occurred. Roll again.
1.On a 1-10 it is a Dud Round. No penalty other than the round was defective and did not hit the target.
2.On a 11-19 a Misfire has occurred. Mark the vehicle with a Misfire Marker to indicate this. The tank cannot remove the misfire until its next activation.
3.On a 20 - BOOM! The tank is no longer functional and is considered knocked out. I'm not sure what exactly happened but something occurred to cause the tank to be inoperable and no longer able to function.
The German, holding his breath, rolls. A 14 us rolled so a Misfire occurs.

The Panzer III is marked with a Misfire Marker and is unable to fire again until the Misfire is cleared.
There are 2 ways to Remove a Misfire.
1. Use a Standard Activation to remove it. No other action can be taken.
2. Attempt to remove the Misfire as part of a Move Action. While moving roll the die. If the die roll is equal to or less than the troop quality, the Misfire is removed. If greater than the TQ, the Misfire remains and the attempt can be made again in the next turn or just use a Standard Action in the next Turn to remove it automatically.
The Germans had some bad luck with Misfires on Turn 3 as 2 tanks out of 5 had rolled Misfires. Some bad luck indeed for the Germans.
If the German Panzer III on the left, had not had a Misfire, it could have engaged the T-34 target again using its Bonus Shot for being a Veteran. Since the chances are less of hitting due to being halved or -3, whichever is worse, the chance of success is less but still possible. You never know. Always take the shot if you have it.
- Kenny Noe likes this
#63
acctingman69
-

- ODGW Members
-

- 28 posts
Private
Posted 31 August 2022 - 11:52 AM
Pete - this is AWESOME!!! Any chance you'd do a tutorial involving infantry combat?
#64
Peter M. Skaar
-
- ODGW Members
-
- 552 posts
Major
Posted 31 August 2022 - 02:53 PM
Hi acctingman69! Thank you very much! I will definitely consider doing an infantry action. I have played with infantry before and they add another dimension to the game for sure. I may even throw in a bit of mortars, artillery, and an AT gun or two as well.
Before I get too far ahead here, I will finish this tutorial before doing that. I will be posting some more of my Tutorial here soon. I am happy you like it so far.
#65
Bob Benge
-

- ODGW Staff
-

- 1,235 posts
Mein Panzer Guru
- LocationLas Cruces, NM
Posted 04 September 2022 - 11:32 AM
Excellent Job Pete! Love the work you are putting into this! 
~ Bob Benge ~
ODGW Designer
Product Manager - Mein Panzer
ODGW Designer
Product Manager - Mein Panzer
#66
Peter M. Skaar
-
- ODGW Members
-
- 552 posts
Major
Posted 04 September 2022 - 01:05 PM
Thanks very much, Bob! It has been fun, and educational for me as well. I have been posting this AAR on a few other sites as well and hoping to get some crossover to this site. Some people have told me they have the Mein Panzer rules and haven't played them yet or have played them but not for a while. I am hoping to motivate some people to give these rules a shot as I think they are very good.
#67
Peter M. Skaar
-
- ODGW Members
-
- 552 posts
Major
Posted 04 September 2022 - 02:13 PM
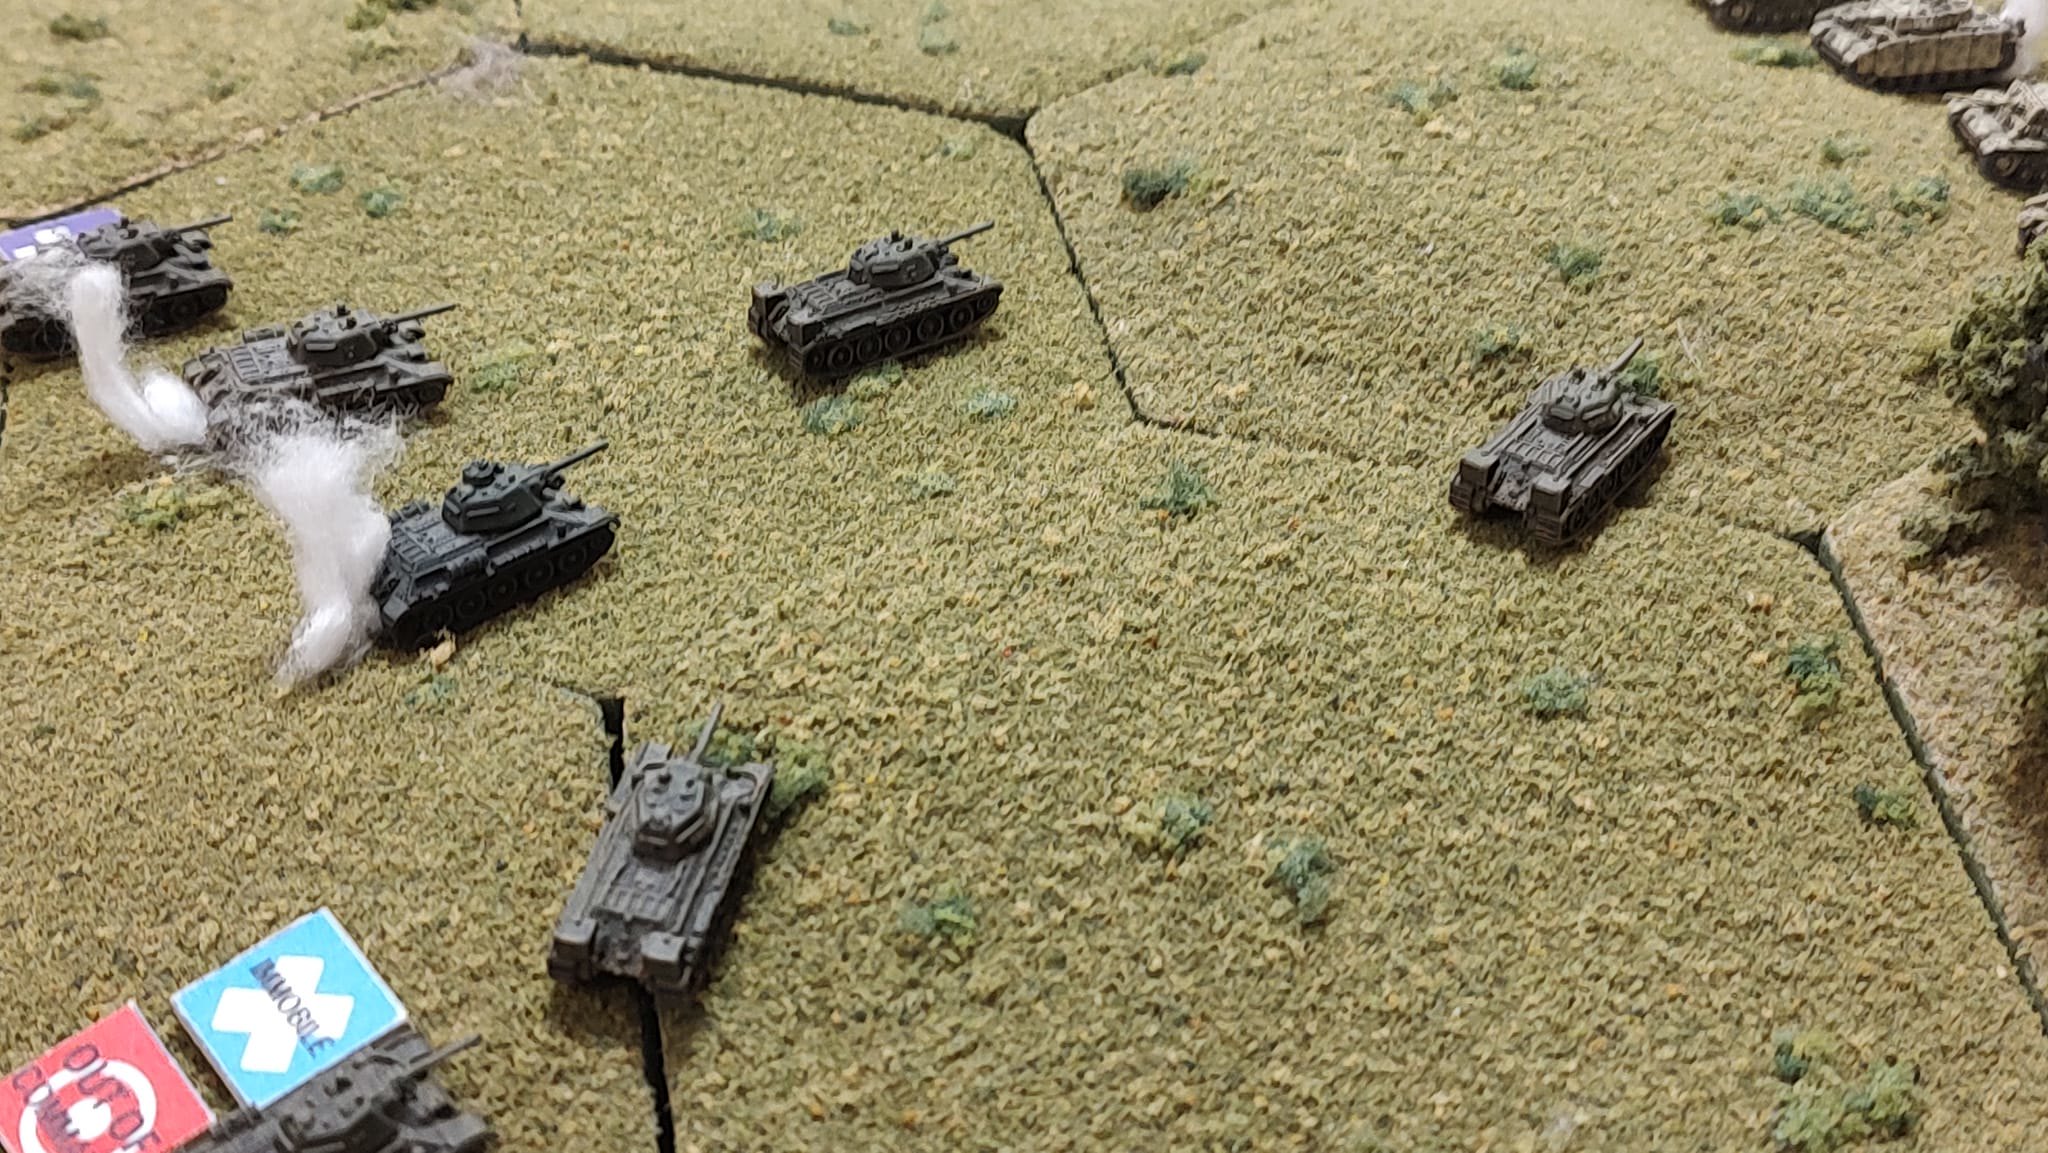
On to Turn 4. This was big! This time, the Russians had some great shooting during their 2nd Activation and managed to knock out 3 of the 4 Panzer IIIs of the German 1st Platoon. This left the 1st Platoon with 1 Panzer III left plus the Company XO holding the entire German right flank.
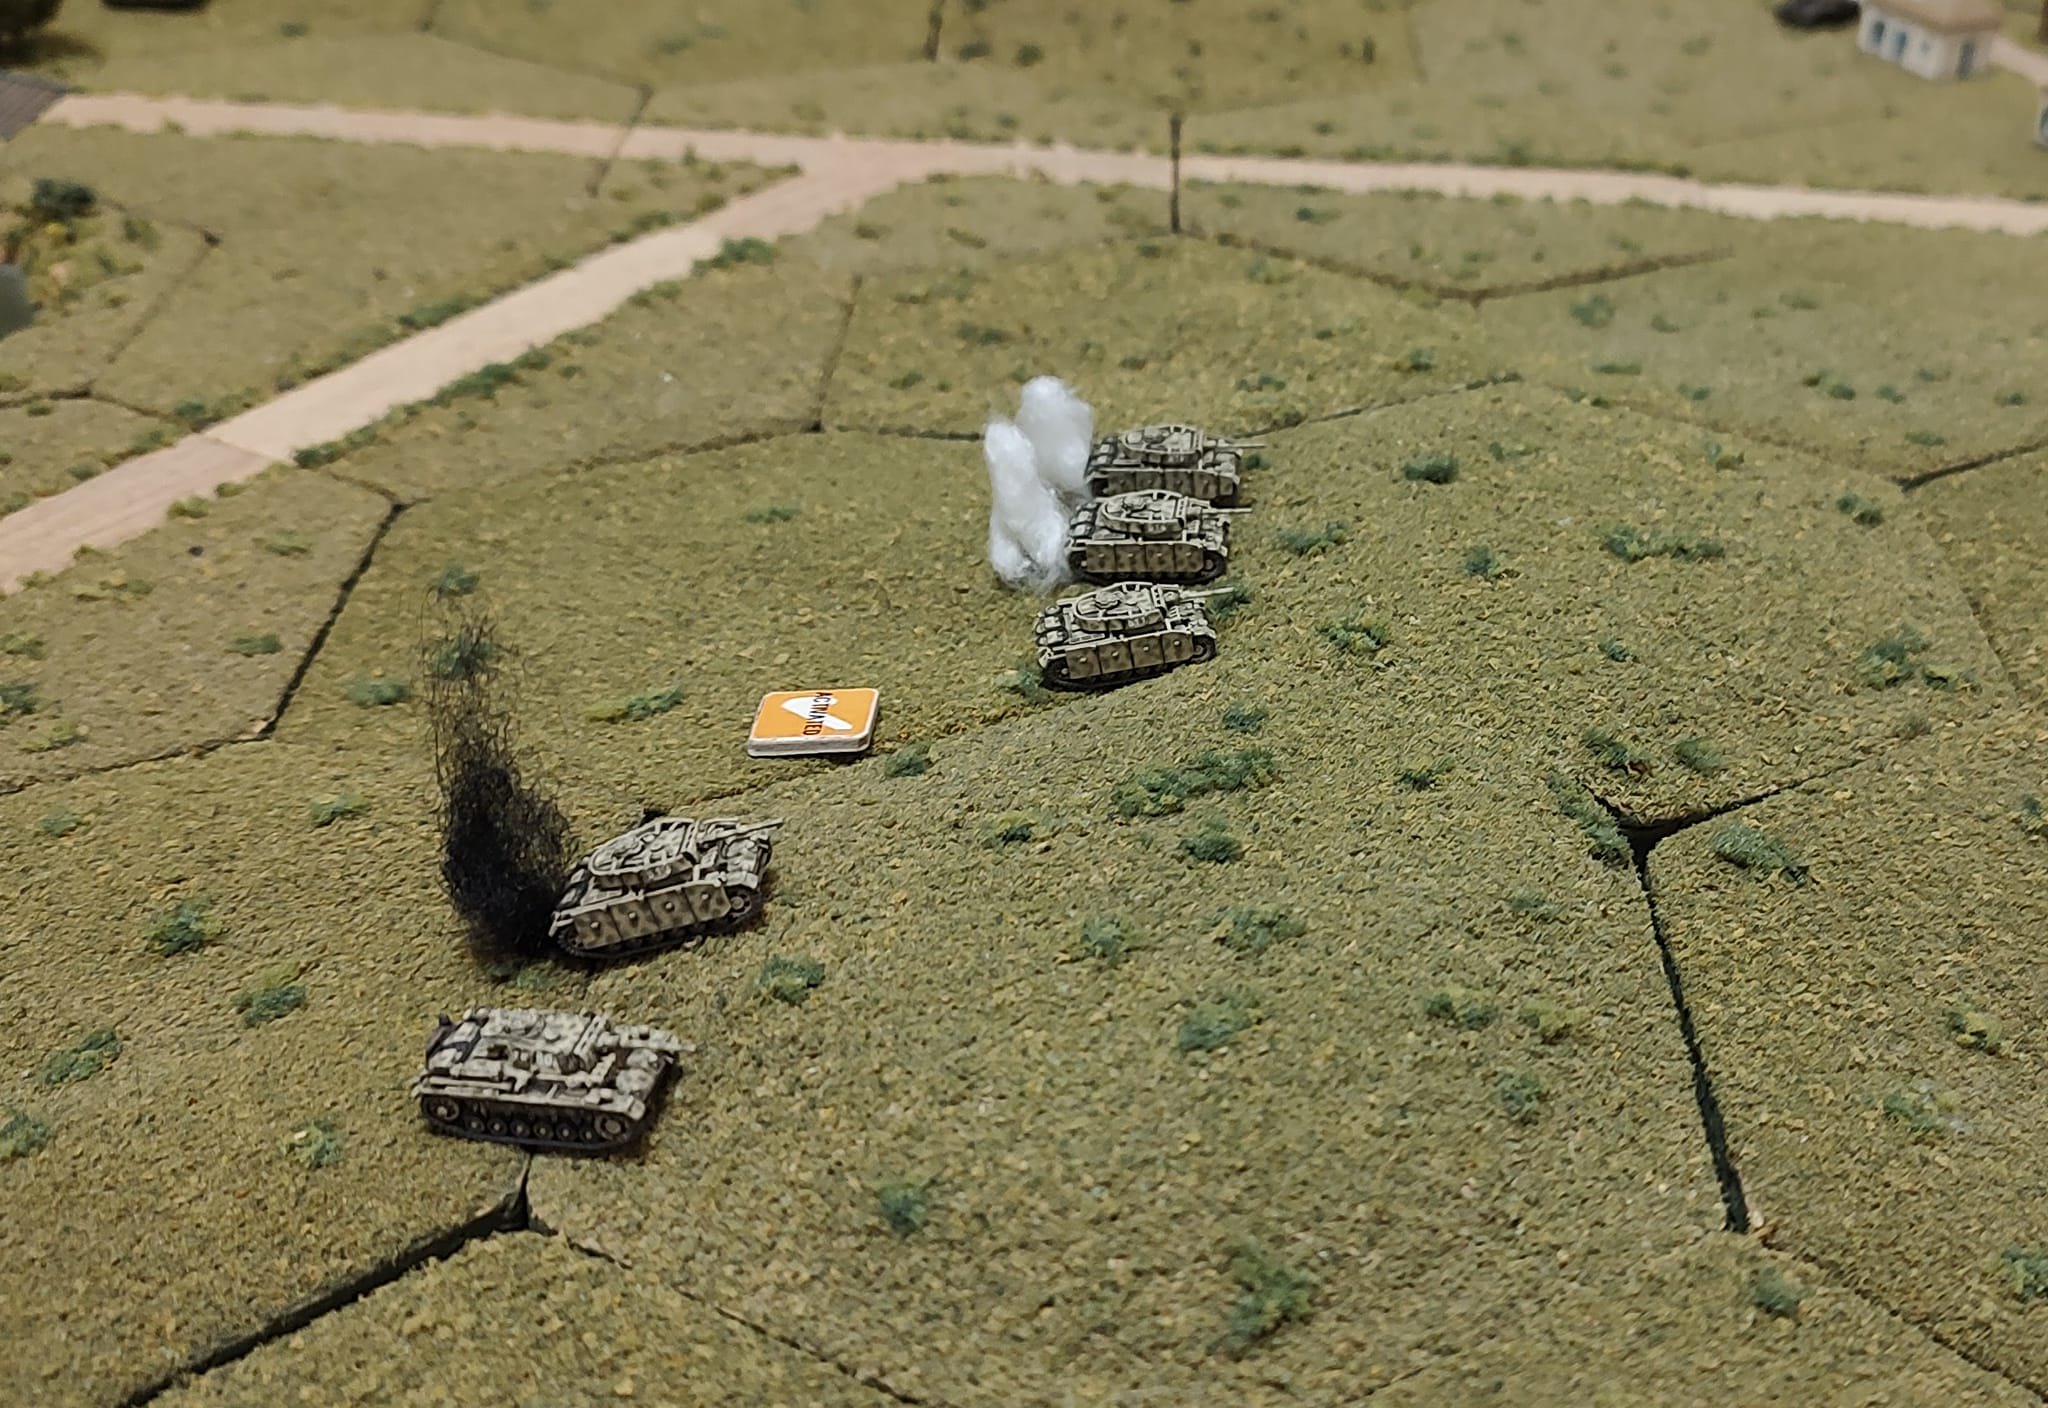
This was certainly much better for the Russians than they had been having in the first 3 turns. They even managed a catastrophic kill on one of the Panzer IIIs of 1st Platoon resulting in a "brew up"
Remember, if you get 2 hits on a vehicle that can only take 1 hit, it is considered brewed up. That means the tank is totally destroyed. I mark brewed up tanks with black filament to indicate this vs white cotton to indicate tanks that are only knocked out.
The bad news for the Russian 1st Company on the Russian left, is that they have lost 2 more tanks to the German gunnery. Starting with Turn 5, they will start making moral checks for this Company to determine if the remaining tanks soldier on with the mission, hold in place, or actually begin withdrawing off the board. I will go into my morale rules a bit more in the next segment. The last 2 casualties were victims of the Panzer IVs across the road on the other side of the map.
On the Russian right, 1 T-34 was immobilized and suppressed but the Russians do manage to get 1 intact platoon of 3 tanks to the top of the hill.
One other thing.
I mentioned that the Germans had some bad luck with Misfires during this game, certainly more than the Russians had. One Panzer IIIN from 2nd Platoon was lost due to rolling two 20s in a row resulting in "Boom" or at least making the tank nonfunctional for the duration of the game. This did not help the German cause.
At the end of Turn 4, the Germans are down 4 tanks out of 14 including 1 brewed up. The Russians have lost more and 1st Company has now hit its morale threshold of 5 tanks which is 50% of their starting force.
Who gets the initiative for Turn 5 could be crucial (as it always seems to be). Also good or bad gunnery will definitely be a key factor as well.
Here are some pictures of the action on Turn 4.
Turn 4 end of turn from the Russian side.
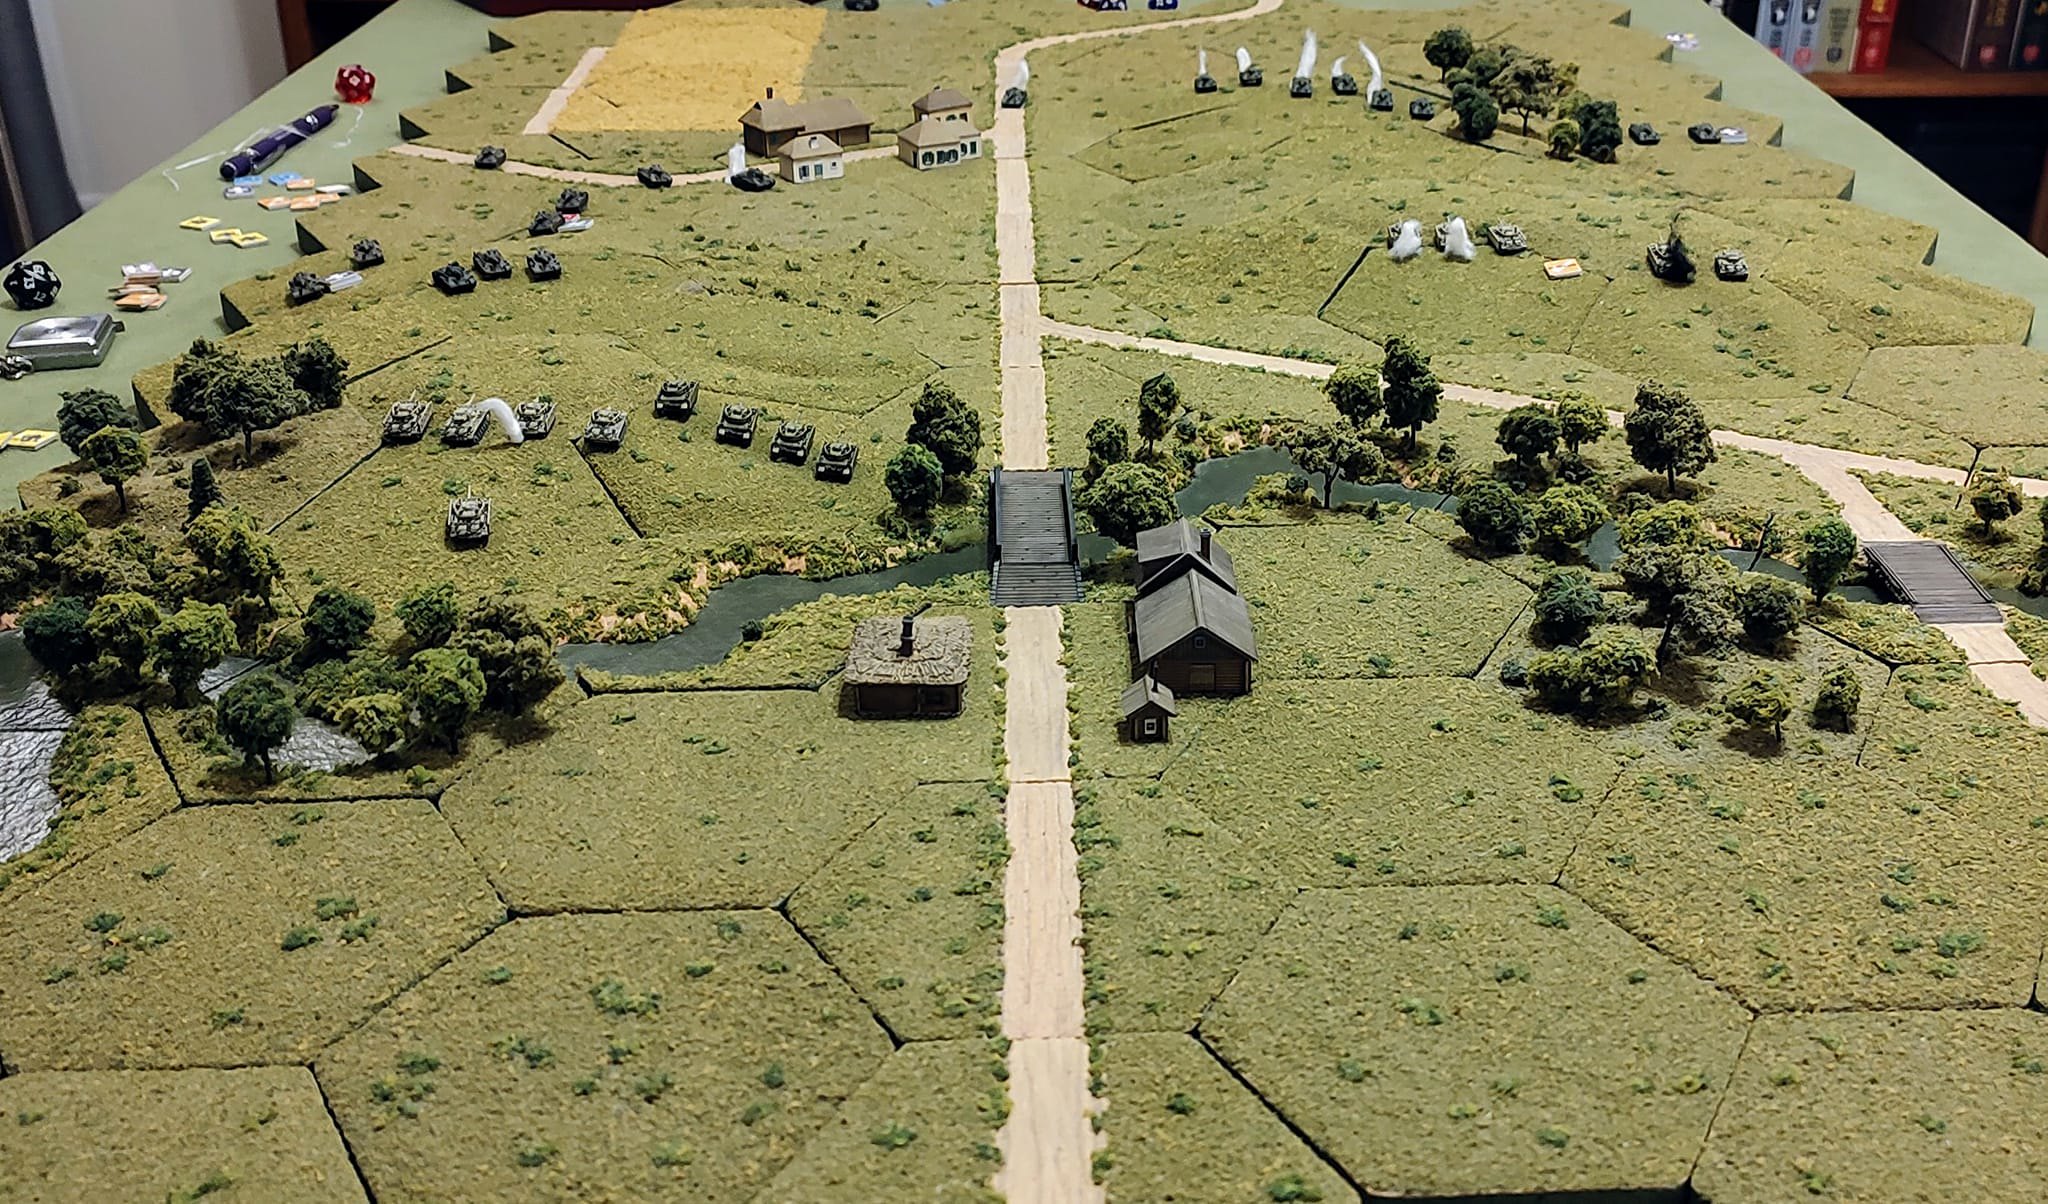
Turn 4 from the German side.
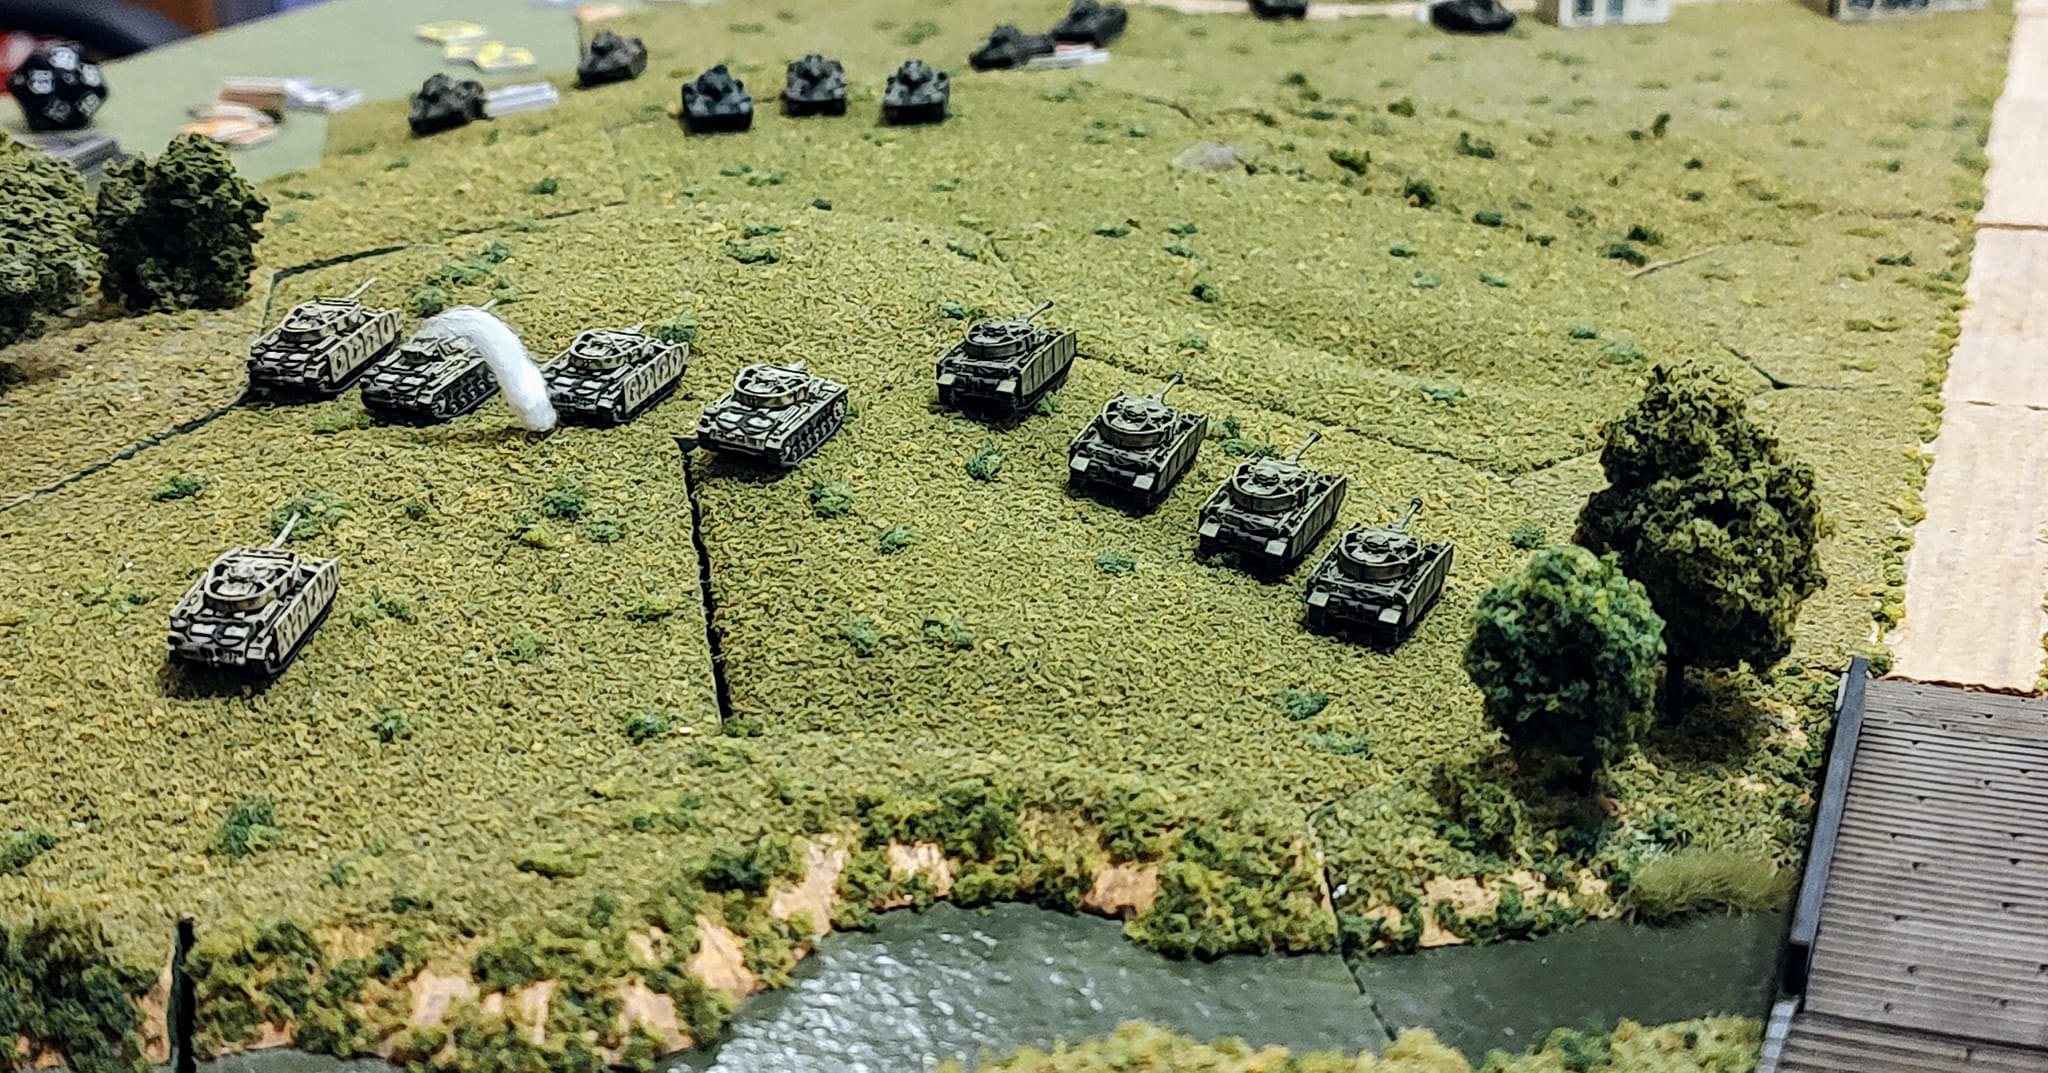
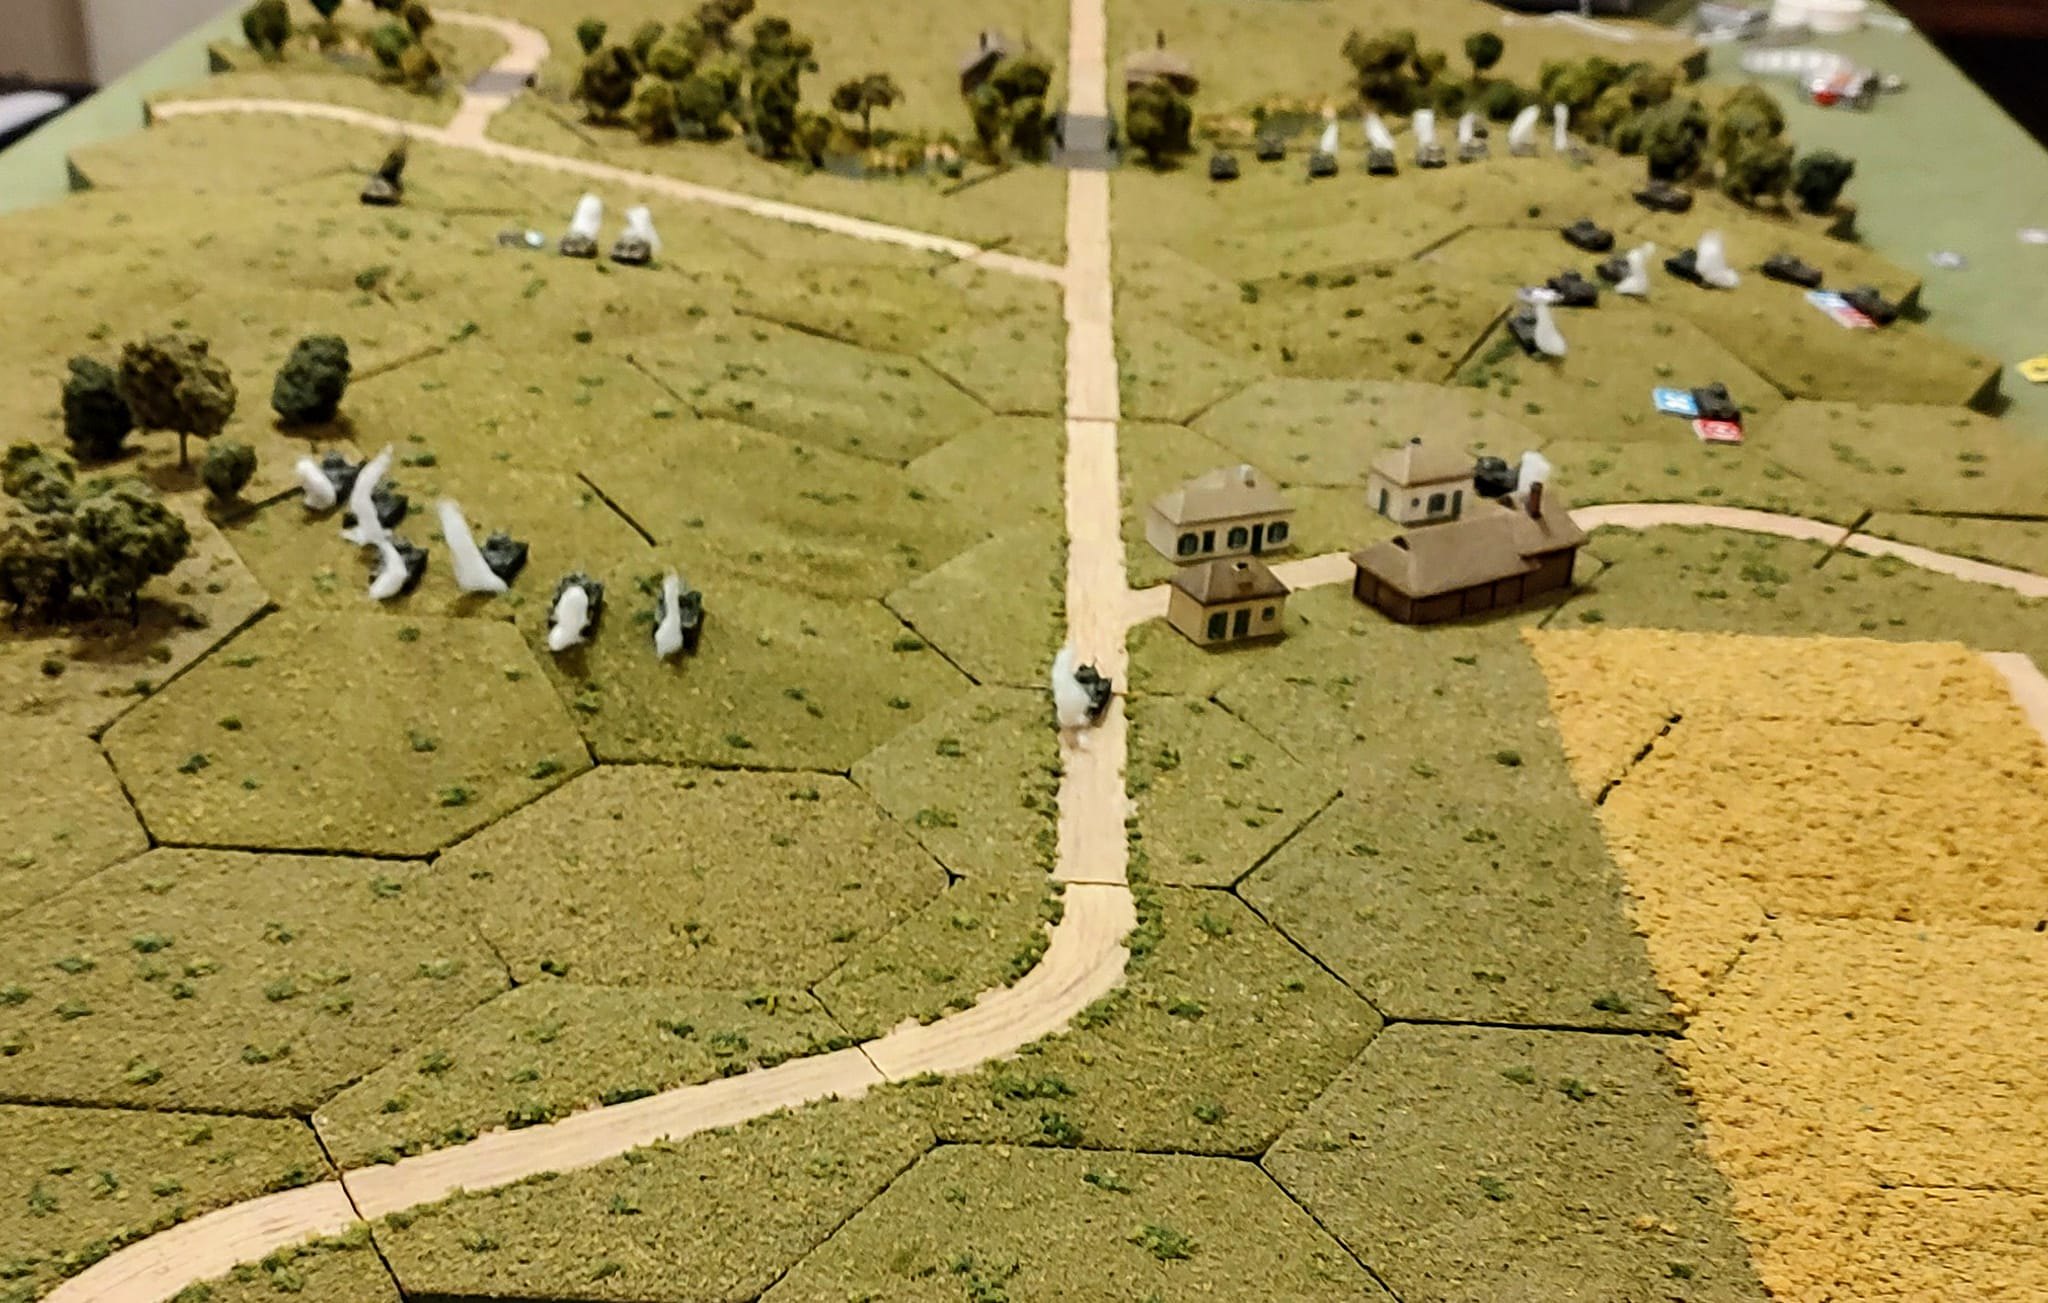
The German left flank, consisting of 2nd Platoon in Panzer IIIs, and 3rd Platoon in Panzer IVs. The CO's Panzer III is located behind both platoons.

One Russian platoon from 2nd Company has managed to crest the hill. Who gets the initiative and better die rolls for Turn 5 will be crucial to the game. Both sides are now at very close range.

The Russian 1st Company has hit its morale break point with 5 losses.
The German 1st Platoon on the right has taken 3 losses out of 5 tanks on that side. It is getting a bit tense as the Germans don't have much left to counter the Russians here.

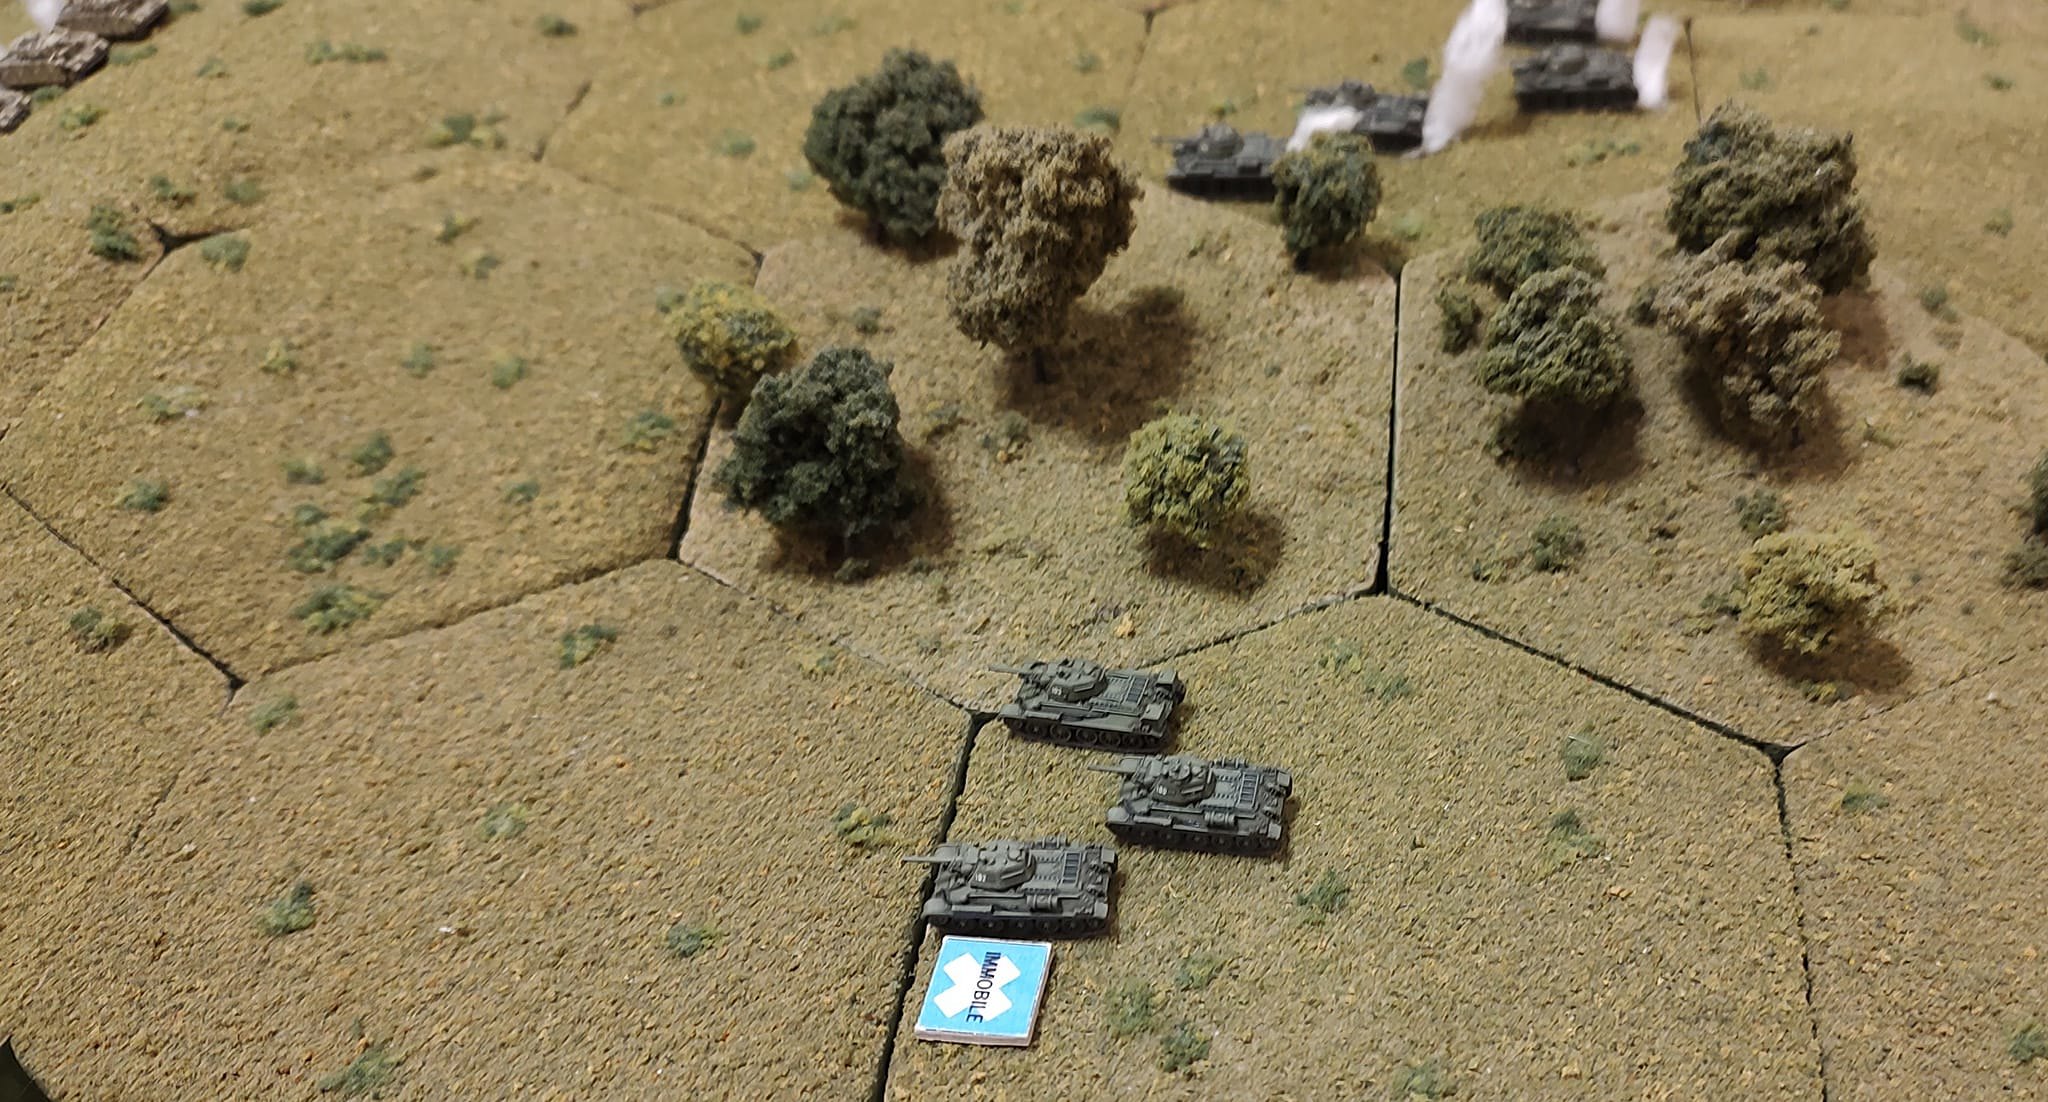
A view on the Russian extreme left flank. 1st Platoon has already lost 1 tank on the road on Turn 1. The remaining 2 tanks plus the 1st Company CO are attempting to outflank the German right flank but another 1st platoon tank has been immobilized and suppressed. If it recovers from Suppression it can still shoot but cannot move for the rest of the game.

Here is a picture of the lucky shot that brewed up a Panzer III from 1st Platoon. The shot came from one of the 2nd Company T-34s from across the road. This shot did hit the Panzer III on its less protected side armor. The resulting roll on the Kill Table was 2 hits which resulted in a Brew-Up.
Next time, we will cover Overwatch and Pete's Morale Rules. Then on to Turn 5.
#68
Peter M. Skaar
-
- ODGW Members
-
- 552 posts
Major
Posted 05 September 2022 - 09:47 AM
Overwatch. Overwatch is a Standard Action that can be taken during a unit's activation. Overwatch is sometimes known as Opportunity Fire in some other games and allows a tank or other vehicle to fire during an Enemy Move or right after an Enemy Fire Action.
To go into Overwatch, simply indicate the vehicle or vehicles going into Overwatch with an Overwatch marker.
Here are some things to keep in mind when going into Overwatch.
1. Overwatch is not 360 degrees but limited to the general direction of the arrow on the marker. Be sure to position the Overwatch arrow where you want to Overwatch. The does not necessarily have to be to the front on a tank or other turreted vehicle. Use the Overwatch section on the Template to verify Overwatch sectors if you need to.
2. Overwatch is lost if the vehicle on Overwatch activates, is suppressed, pinned, etc.
3. When on Overwatch, the vehicle loses 1 Rate of Fire(ROF) but a vehicle will always have a ROF of 1. Bonus shots due to Troop Quality can still be taken during Overwatch.
4. You are never forced to take a shot while on Overwatch. You can opt not to take a shot at all. You are never forced to fire.
5. Overwatch fire takes place AFTER an enemy vehicle fires but anytime during movement.
I regard going into Overwatch as "Banking a Shot". By that, I mean when going into Overwatch, you are saving the shot for later. You can take your Overwatch shot during your opponents turn and if your vehicle or unit has not yet taken its activation during your part of the turn, you can fire again during your own activation. It can provide a 1-2 punch, especially if you are on the defensive.
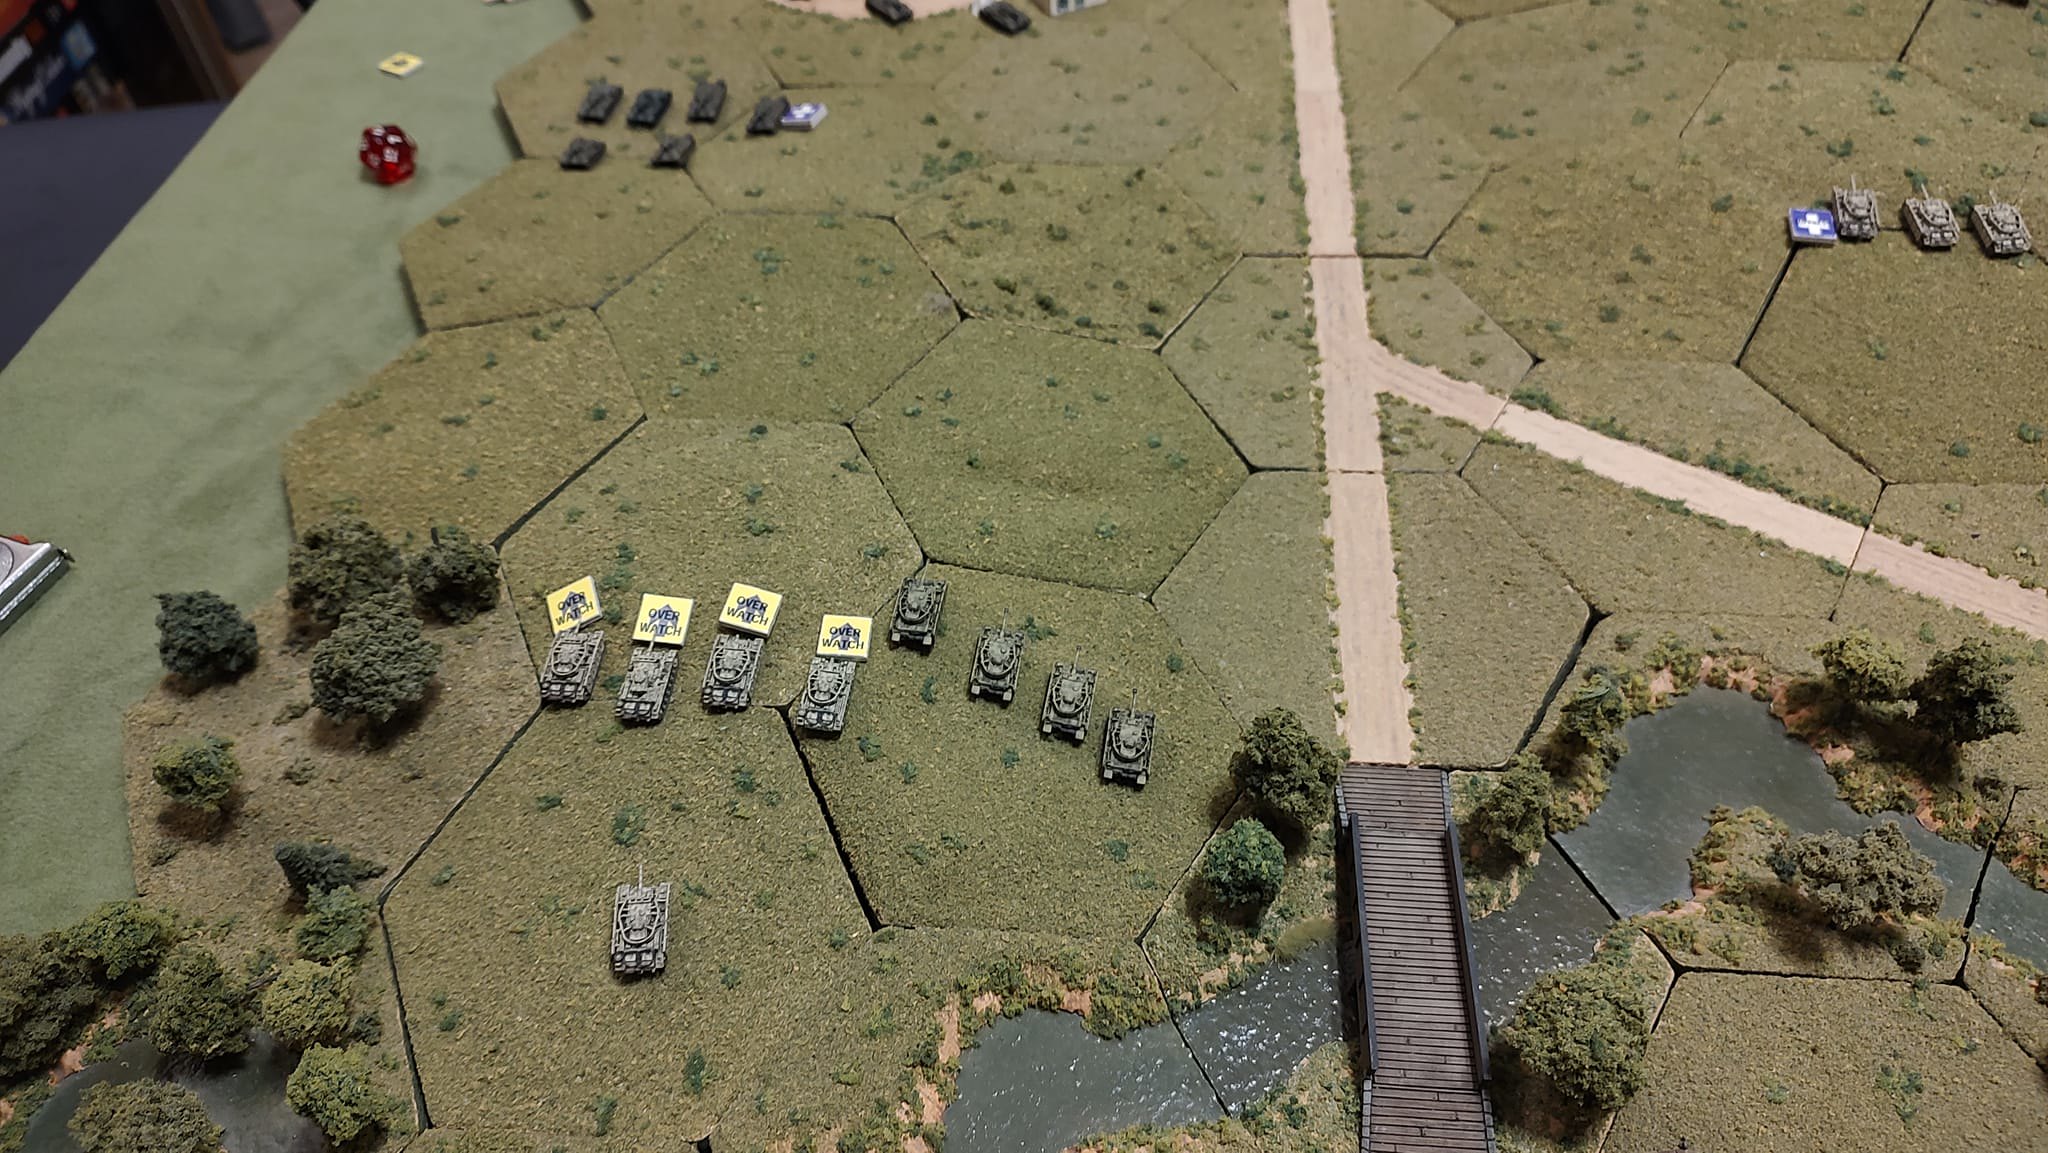
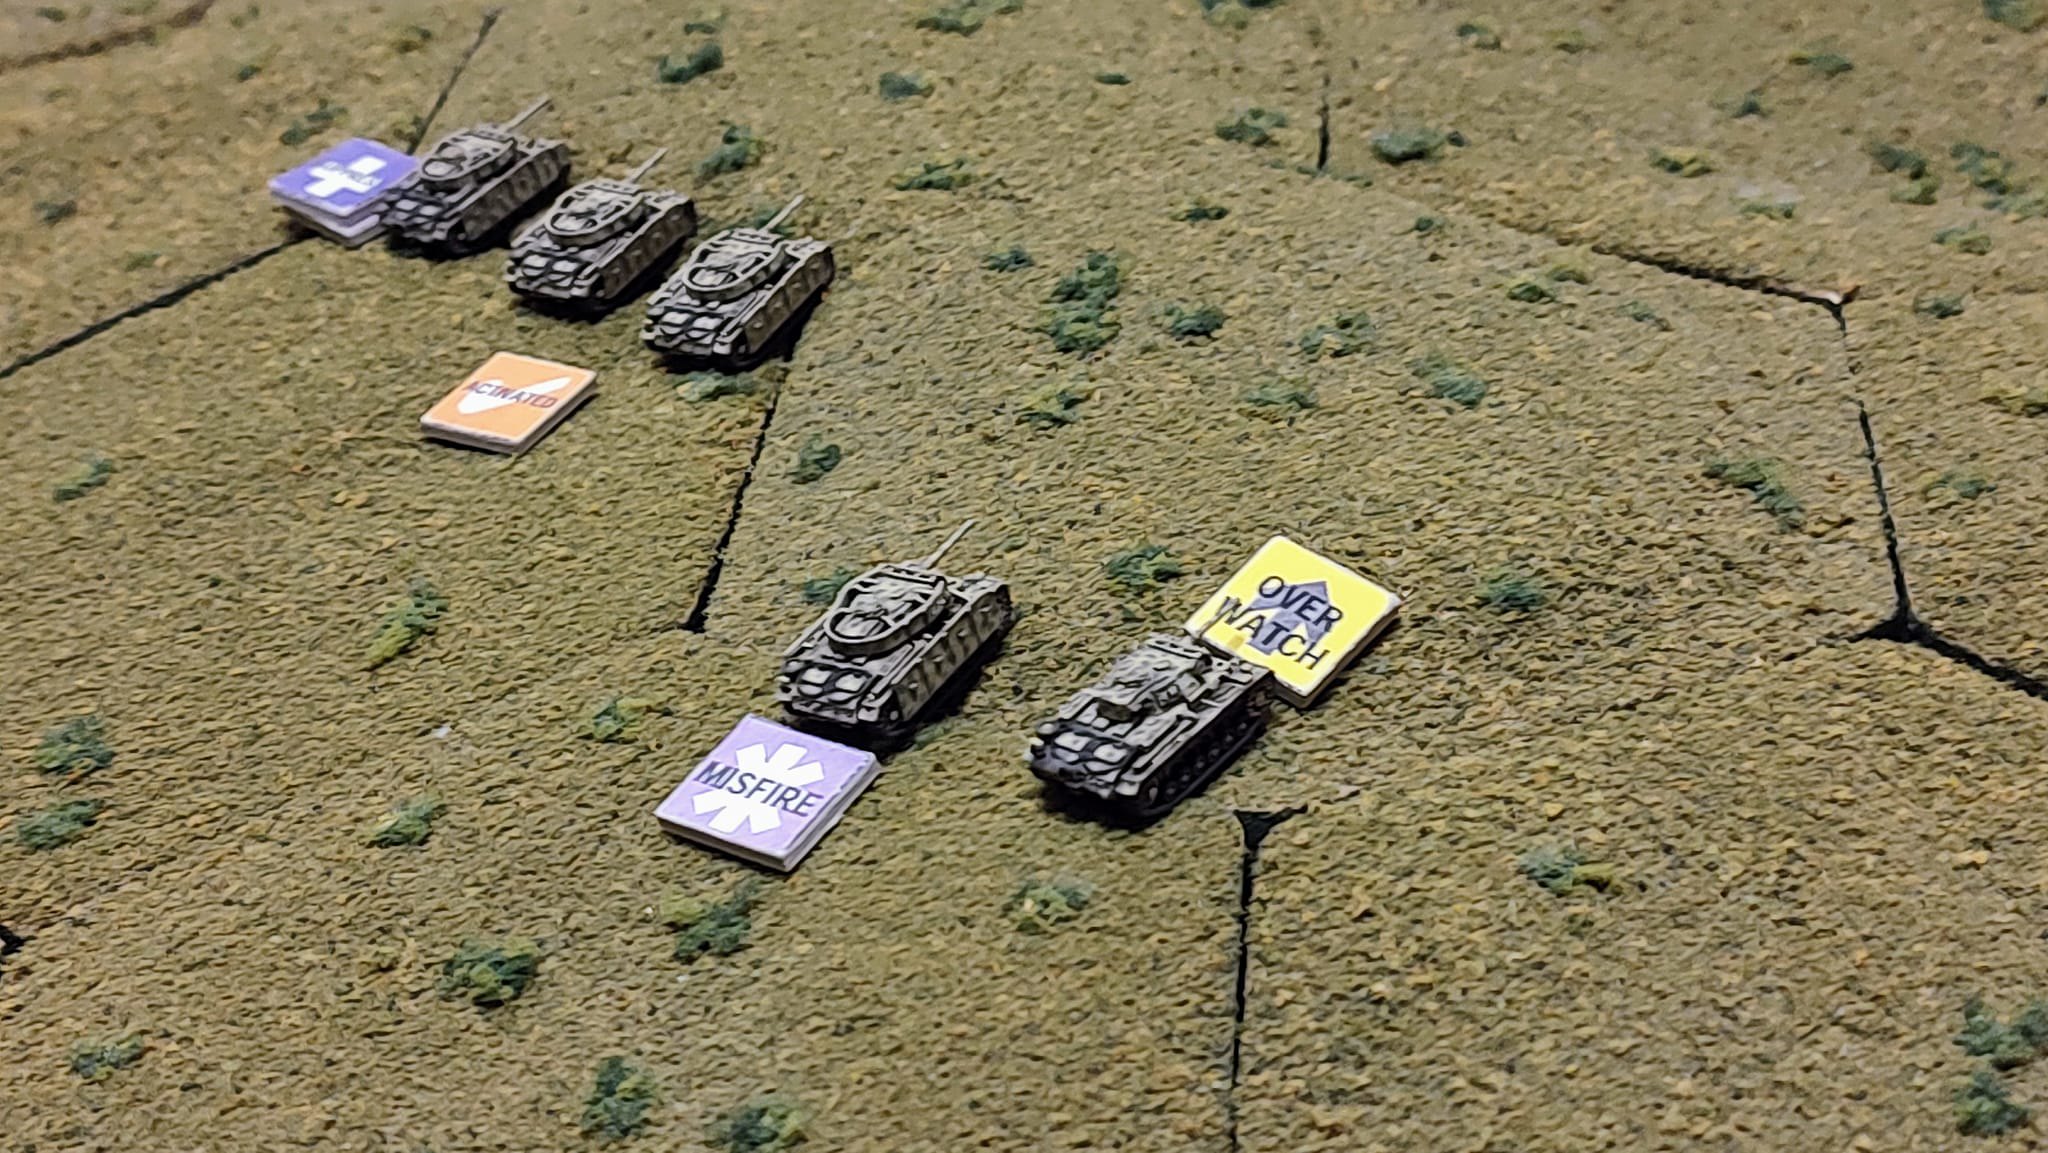
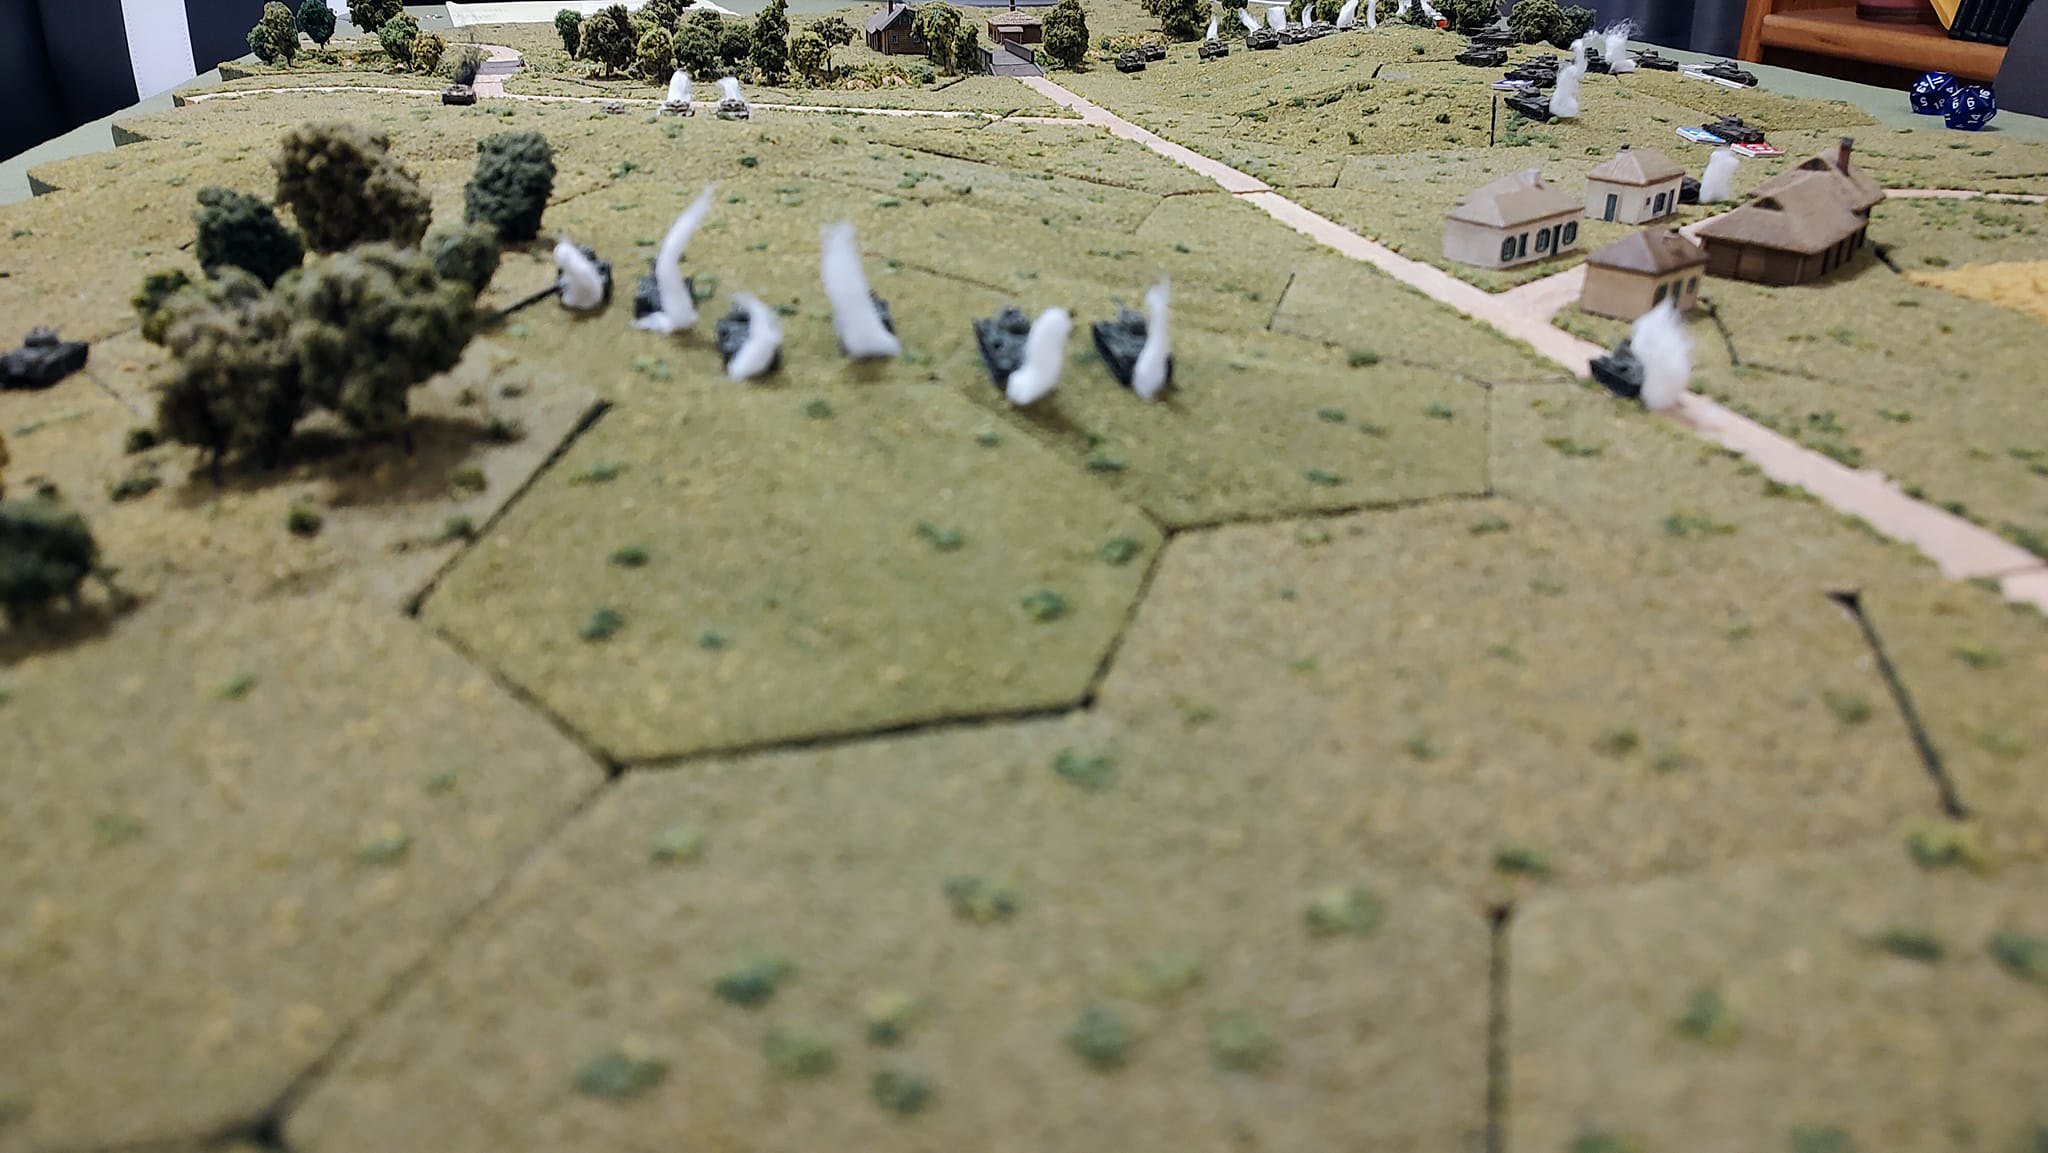
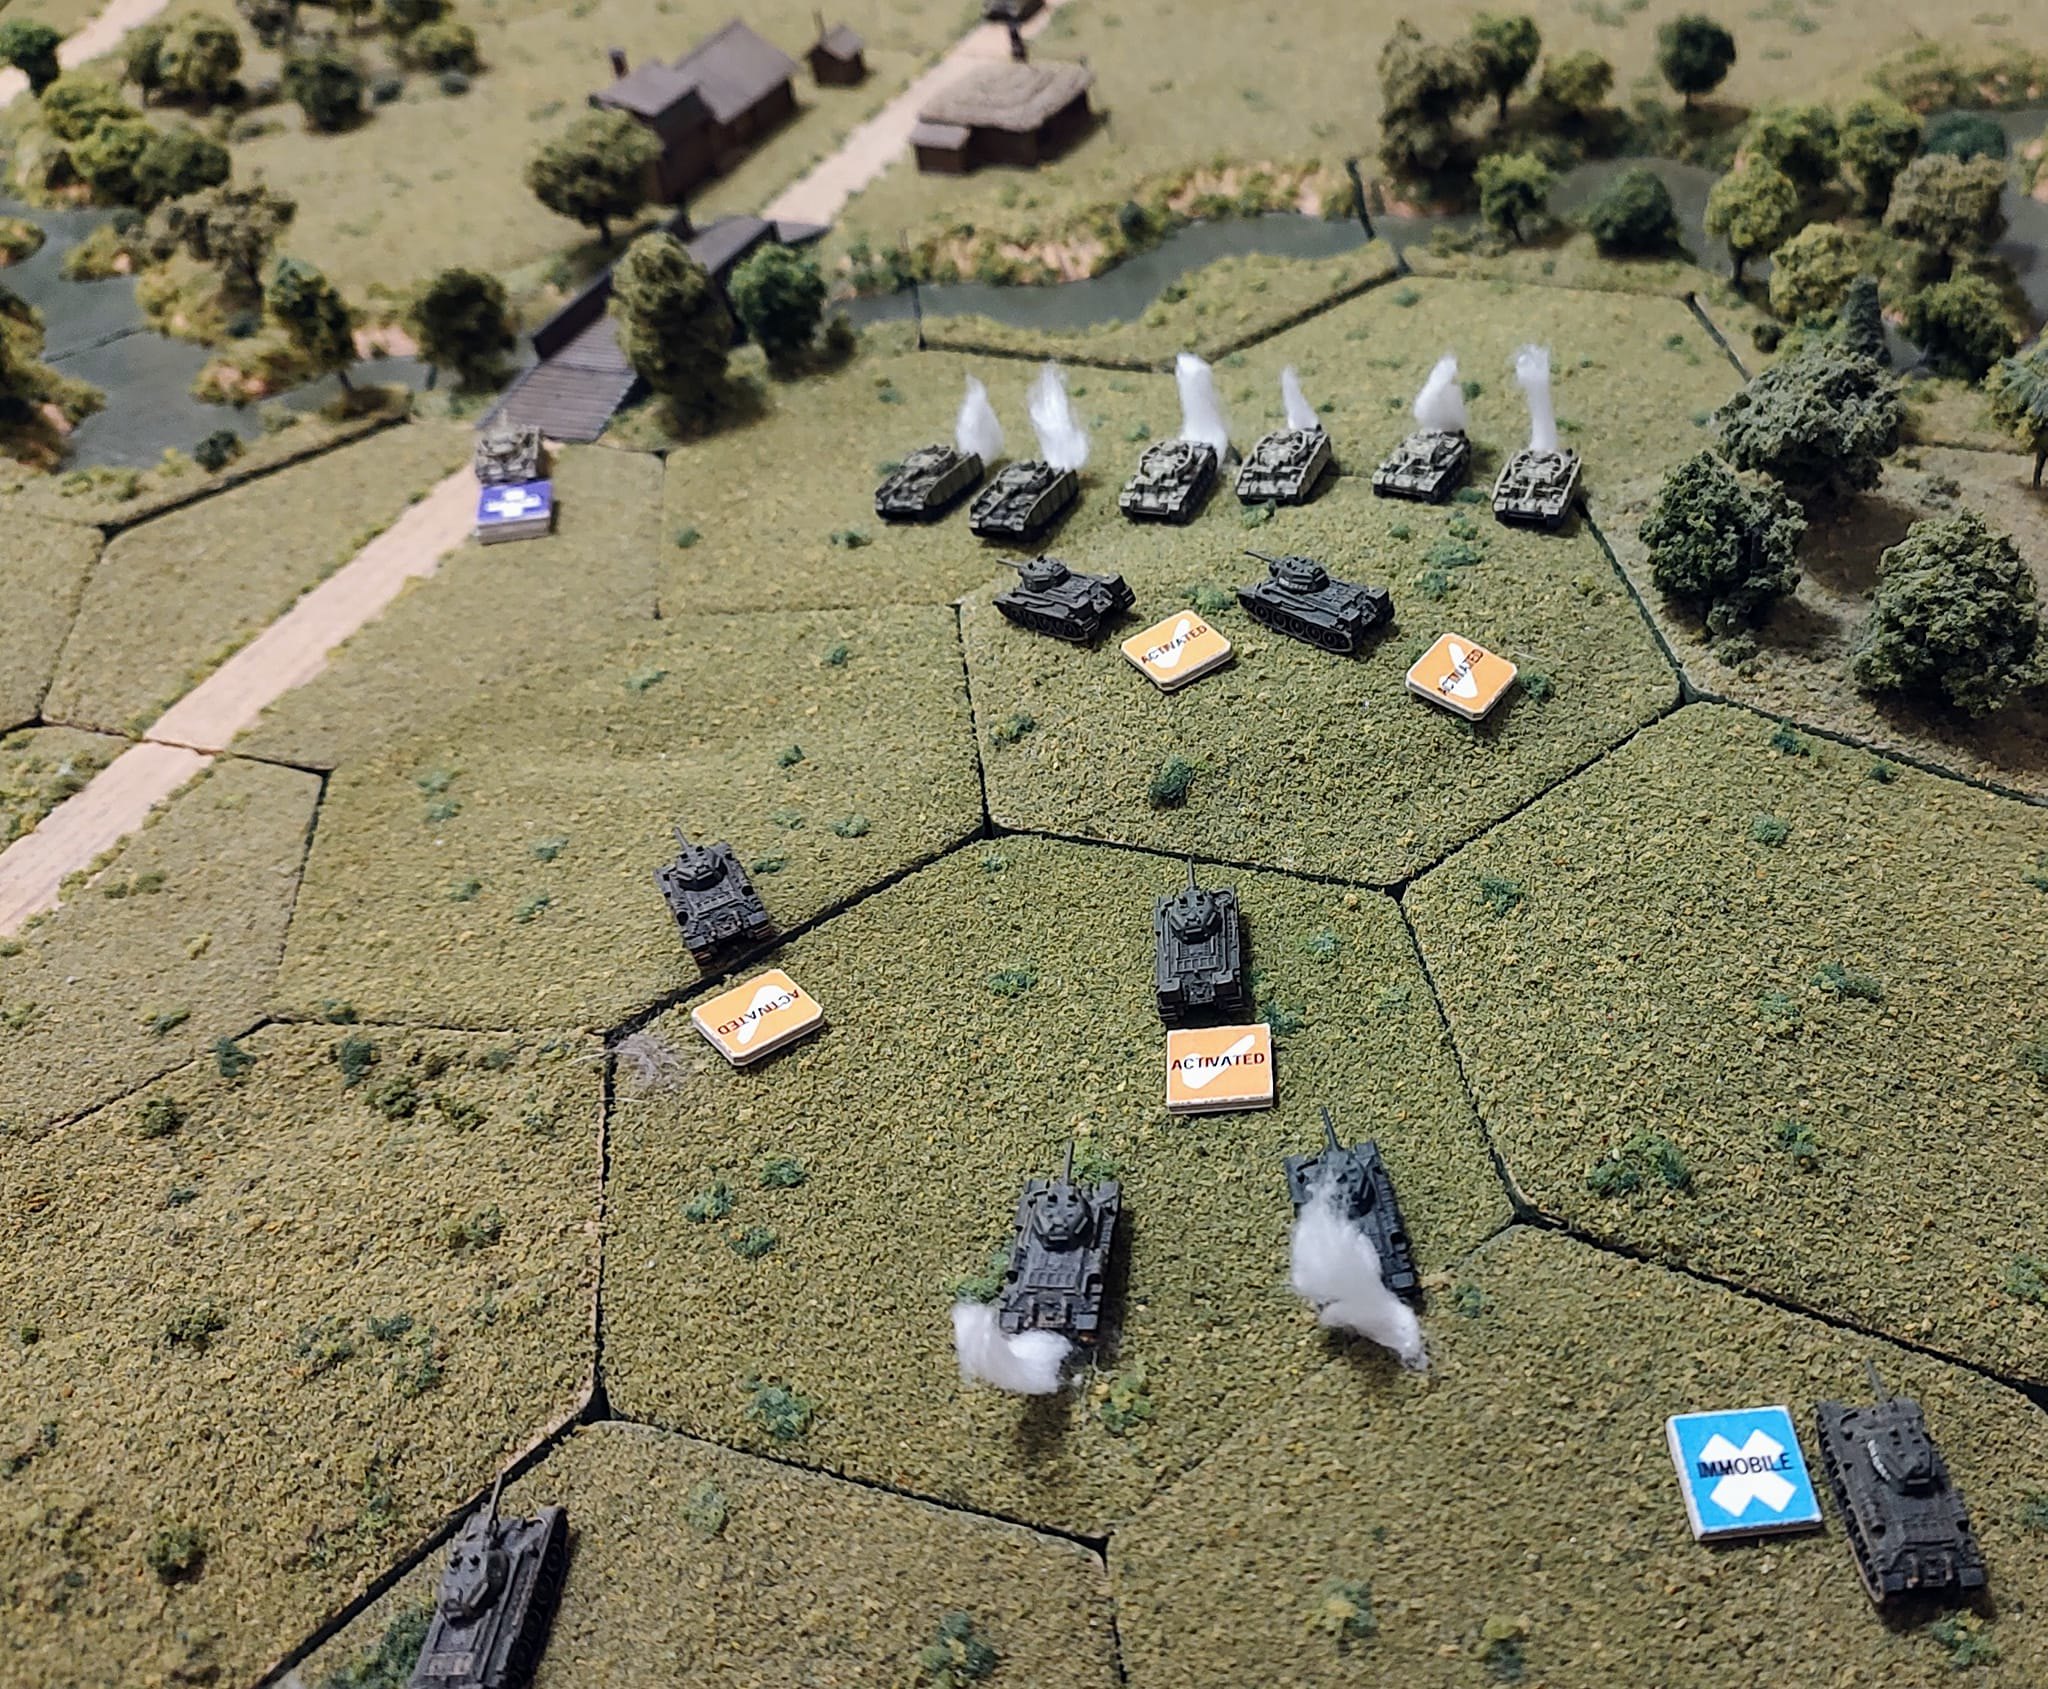
The German 2nd Platoon's tanks are on Overwatch as indicated by the Overwatch markers.
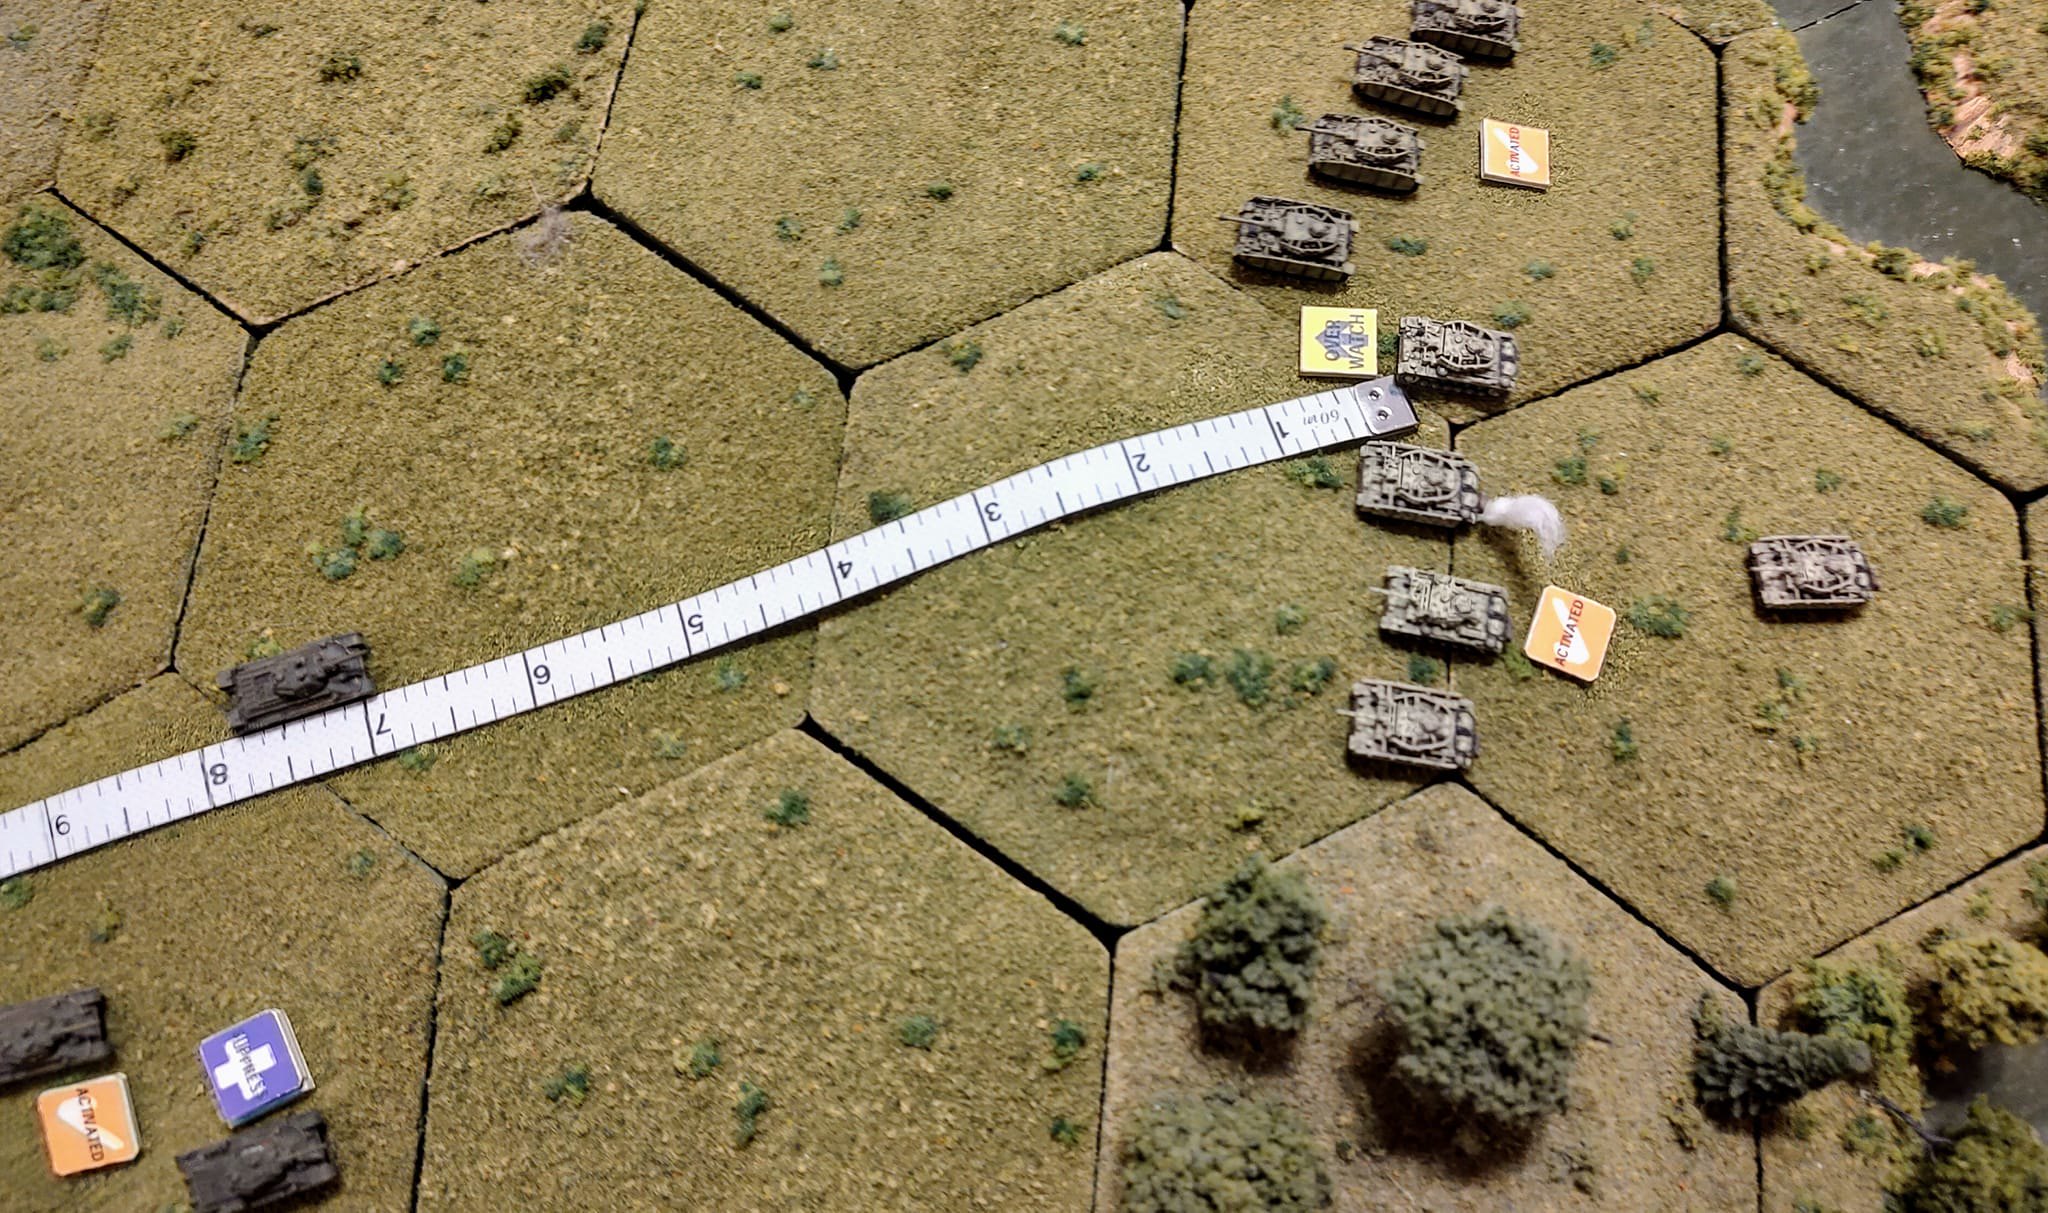
This picture shows a German Panzer IIIN on Overwatch engaging a Russian T-34 moving up the hill.
#69
Greg Mc
-

- ODGW Members
-
- 20 posts
Private
Posted 06 September 2022 - 06:27 PM
This is awesome Pete, thanks for sharing.
Side bar: Very heavily considering the GHQ terrain maker stuff now, very simple and easy and your battlefield looks incredible. Do the hexes come pre-flocked or do you design them how you want? Thanks!
#70
Peter M. Skaar
-
- ODGW Members
-
- 552 posts
Major
Posted 07 September 2022 - 01:09 AM
Hi Greg Mc
Thanks very much! I'm glad you like the Tutorial so far. More is coming.
The Terrain Maker hexes come unflocked. The basic pieces are white styrofoam hexes measuring 4 inches across. Any sculpting, painting, flocking etc is left to you to do. There are instructions for doing this enclosed in the Terrain Maker packages.
I have done my own variations to these as opposed to strictly following the GHQ formula, especially for my roads but if you follow the instructions it will produce a decent set of terrain. I have 3 sets of Terrain Maker for my games. The one pictured here is my European summer set which could also be used for other locations as well. I also have a European Winter set and a North Africa Middle East set as well.
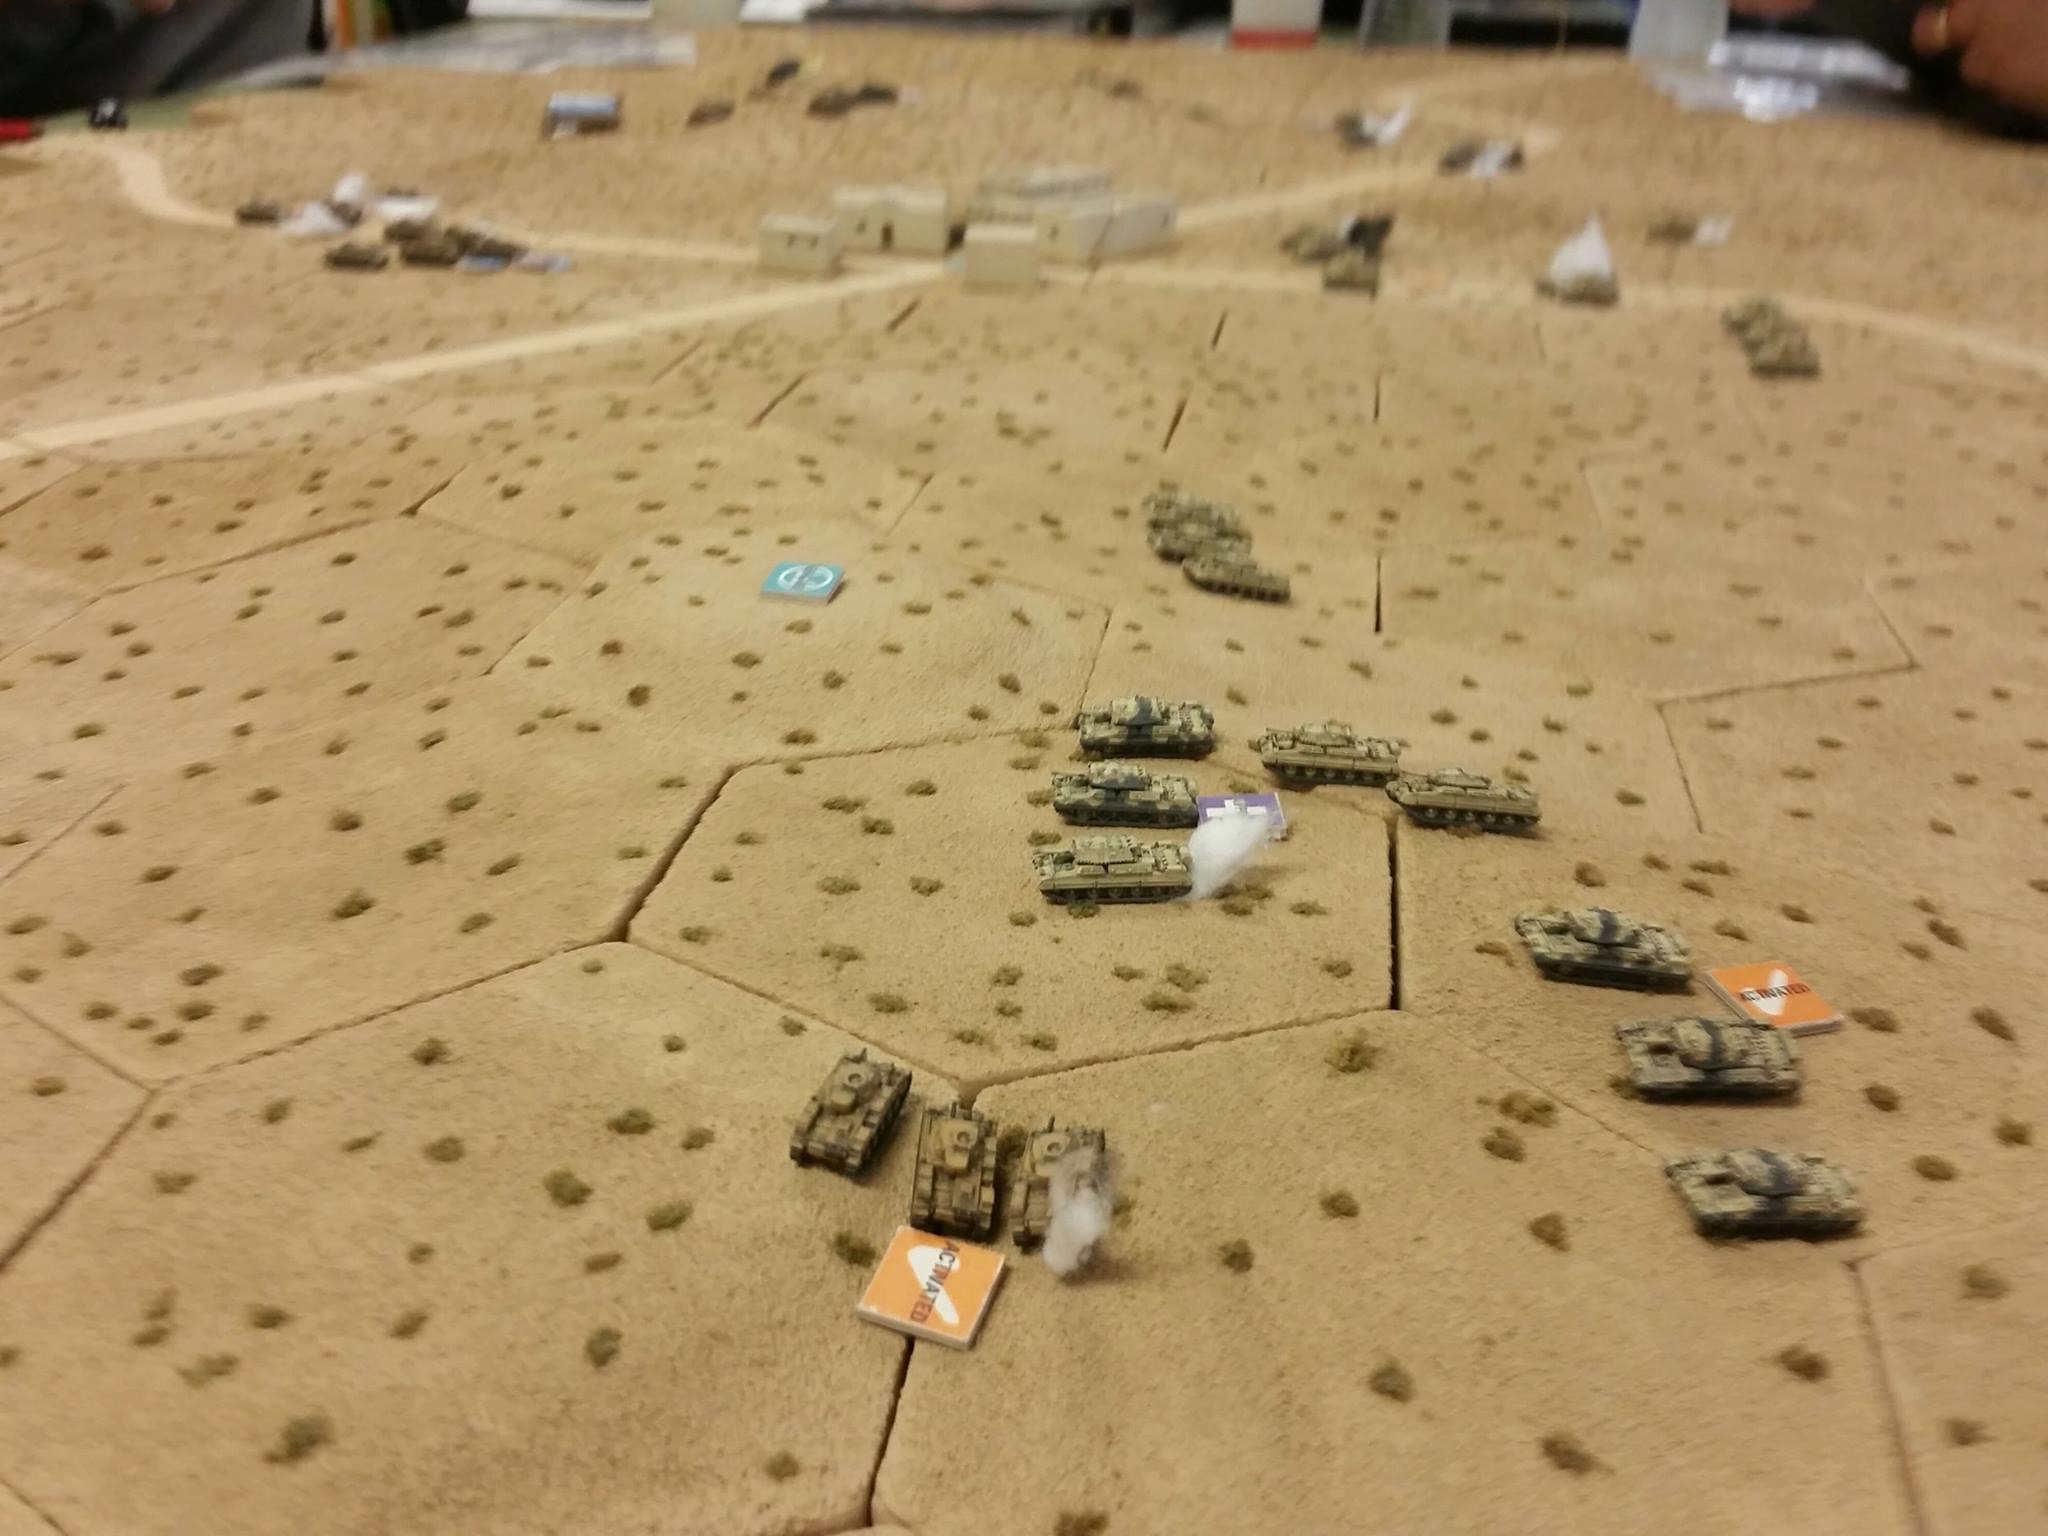
Here is a picture of a Mein Panzer game played on my desert layout a few years ago.
#71
Peter M. Skaar
-
- ODGW Members
-
- 552 posts
Major
Posted 07 September 2022 - 01:05 PM
Morale Rules: Mein Panzer has a set of Morale Rules that players can use if they like. Those can be found in the Morale Chapter of the Core Rules book.
I created a set of my own Morale Rules that players can try out if they are inclined to do so. I did use these rules for this scenario.
Introduction:
These are simplified Morale Rules for Mein Panzer. They are designed to add morale effects into the game without having to check the effects of morale on each individual stand within the unit but reflects the morale state of the unit as a whole. They are provided to show the effects of casualties on the overall morale of the unit and prevent players from fighting to the last man or tank which is pretty rare in war.
Procedure:
1. Each unit, usually company size but sometimes smaller elements as well, will have a percentage of losses it can take before morale effects will apply. This casualty threshold will be determined prior to the game for each unit and is expressed as a percentage such as 50% etc. In the case of an odd number of stands in the unit, I will round the numbers up.
For example if using 50% , a unit that has 17 stands can lose 8 stands with no adverse effect. When the 9th stand is lost then the Casualty Threshold has been reached.
*Count tanks knocked out or brewed up only. Do not count tanks immobilized or suppressed for this.
2. Once the Casualty Threshold has been reached, at the start of the next turn, roll a single 20 sided die. Compare the die roll to the Troop Quality of the unit.
If the die roll is equal to or lower than the Troop Quality (TQ) there is no effect. The unit has passed its Morale Check and can continue to function normally in attempting to complete its mission.
If the die roll is higher that the unit's TQ the unit has failed its Morale Check. Roll the die again to check possible effects of the failure. There can be one of three outcomes for this check depending on the die roll.
A. Roll TQ or less = Pass Morale Check. The unit can move no further toward the enemy. It may still engage enemy units. In effect, the unit is holding its position. Stands within the unit can move in any direction except toward the enemy. Stands may engage any enemy units normally.
B. Roll higher than TQ = Fail Morale Check. The unit must now withdraw towards its own map edge using, as a minimum, the Bonus Move each turn until it leaves the map. The unit may still use its normal activation for firing, suppression recovery, even movement etc.
C. Roll 20 = Catastrophic Failure. If the modified roll is 20 or more, the unit routs. Both Normal and Bonus Activations are used to move the friendly map edge as expeditiously as possible and no other type activations can take place. The unit is routing and is now only concerned with survival and getting away.
D. Additional Casualties and Effects. If additional casualties occur to the unit after the Casualty Threshold has been reached add 1 or more to the die roll for all effects. This number depends on number and type of casualties taken within the unit.
Example: If our unit of 17 tanks has hit its Casualty Threshold of 9 vehicles lost (50%) it will roll for Morale. For any casualties above 9 add one or more to the die roll for the Morale Checks. If this unit had lost 10 tanks then you would add one to the Morale Check which gives a slightly higher chance of failure. If 11 then add 2 to the die roll etc.
These modifiers will apply to both the first and second die roll in case of failure increasing chances of unit withdrawal or even rout.
3. Each turn the unit suffers additional casualties it will have to roll in the next turn to check its Morale.
Example: A unit of 17 tanks has suffered its 9th loss on turn 5 and passes its Morale Check at the beginning of turn 6. If, 0n Turn 6 it suffers 3 additional losses for a total of 12, then It will roll for Morale at the beginning of Turn 7 adding 3 to the first die roll. If Failure occurs, it will add 3 to the second die roll. A die roll of 10 now becomes a 13 etc.
OPTIONAL: I count Company Commanders as 3 tanks for losses if knocked out and 4 if brewed up. I count brew-ups as 2 tanks for Morale effects so a single brewed up tank is equal to two tanks for Morale purposes .
Try not to lose your CO as you will not only suffer the adverse temporary command effects but it will greatly hurt unit Morale as well.
- Kenny Noe likes this
#72
Peter M. Skaar
-
- ODGW Members
-
- 552 posts
Major
Posted 16 September 2022 - 09:31 PM
Now for Turn 5 of my solo game of Mein Panzer. This time the Russians get the initiative.

Low roll wins the initiative.

Overview from the Russian side at the end of Turn 5.
Overview from the German side at the end of Turn 5.
The Russians need to check the morale of 1st Company as the Morale Threshold had been hit with the loss of 5 tanks during Turn 4. The die is rolled!

1st Company passes its Morale Check. With 5 tanks lost, any number at 10 or lower is sufficient to continue on. 1st Company will continue on .... for now.

The 2nd Company, on the Russian Left, continues to close with the Germans on the reverse slope of the hill. They take a fire but continue to press on. The tank that is immobilized is now out of command. Since it is unable to move at all it can still do other actions in its standard activation.

There is an exchange of fire between the surviving elements of 1st Company and the Panzer IVs of 3rd Platoon. The ultimate result of this exchange was the loss of 2 more T-34s from 1st Company.
The Russian 1st Company has now lost 7 T-34s or just over 2/3rds of its starting force.

Meanwhile, all the German 1st Platoon tanks are either knocked out, brewed up, or immobilized. Only the Company XO remains.

The Germans lose 2 of their 4 Panzer IVs in the short range gunnery duels.

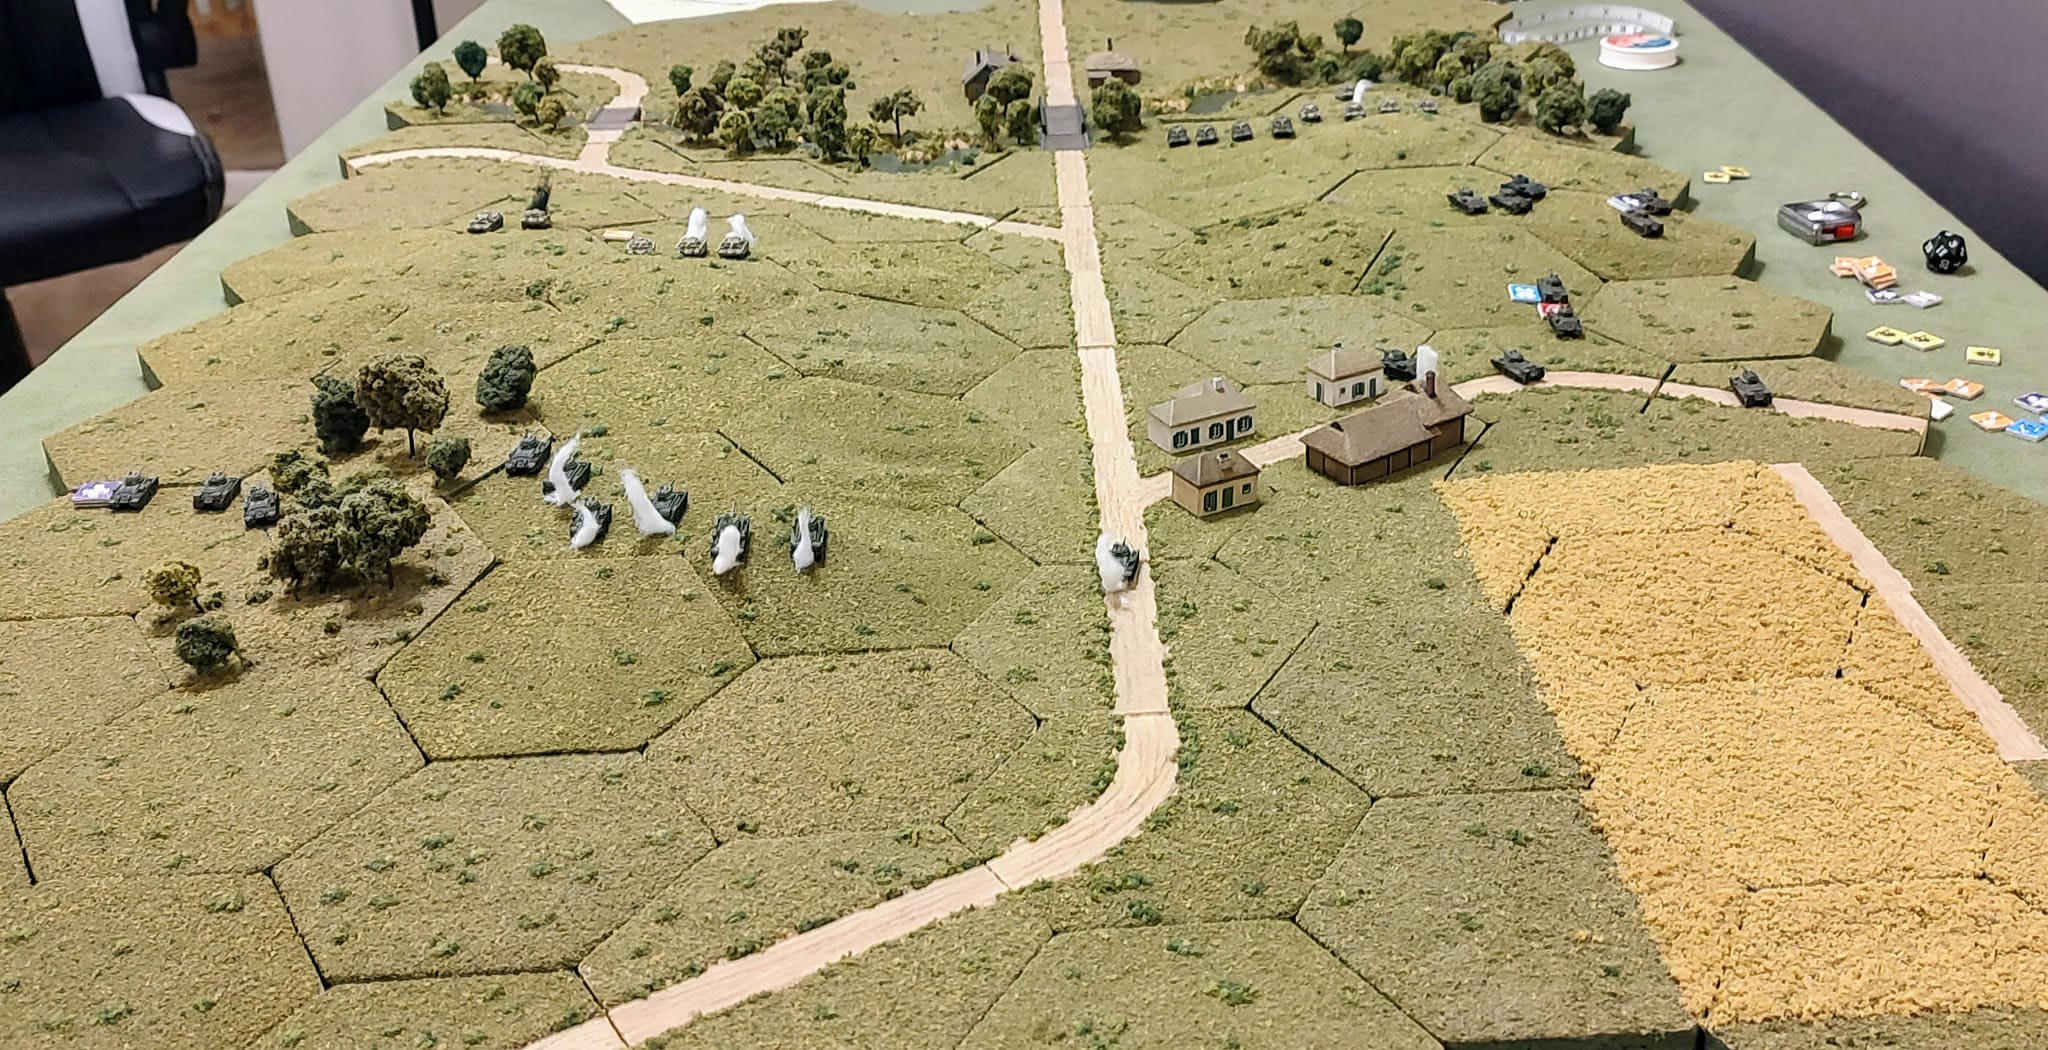
Another view of 2nd Company's assault on the German position held by 2nd and 3rd Platoons.
There was not much finesse this turn. It was mostly just short range gunfights, especially on the Russian right as 2nd Company starts to cause some major casualties to the German left. The Germans have now hit their Casualty Threshold and will need to roll morale at the start of Turn 6. The Russian 1st Company will also need to roll for Morale again next turn due to the loss of 2 more tanks this turn.
- Kenny Noe and healey36 like this
#73
Peter M. Skaar
-
- ODGW Members
-
- 552 posts
Major
Posted 26 September 2022 - 10:50 AM
Here we go... again. Mein Panzer Tutorial. We are now on Turn 6. The action has been pretty intense so far. The Russians have been taking a toll of the Germans but have suffered some significant casualties, especially in the 1st Company on the Russian left.
Both sides pass their morale checks this time. Both sides will continue to fight. For those interested, I published my own morale rules for Mein Panzer here a couple of posts ago.
The action on the Russian left was relatively quiet on Turn 6 as both sides, despite passing their morale checks, are pretty well spent. The Russian 1st Company is now down to 2 fully functional tanks while the German 1st Platoon opposite them is down to the XO tank. Some shots are traded but neither side has much gas left in the tank.
1st Company down to 3 tanks with 1 of those immobilized. It can still shoot but not move.
Another view from the Russian left showing the 7 knocked out tanks from 1st Company.

A view showing what is left of the German 1st Platoon. 2 tanks are knocked out, 1 is brewed up, 1 is immobilized but otherwise functional, and only the XO's tank is fully operational.
On the Russian right, the action is a lot more intense as 2nd Company, despite a few losses, still has a lot of strength left.
The Russian 2nd Company makes its big push on the right. The action here is very intense and both sides take more casualties.

Another view from the Russian right. The 2 immobilized tanks are now out of Command as the rest of 2nd Company moves forward.
The command distance for the Russians in this game is 2 inches between tanks of the same platoon and 12 inches to the Company CO. In the case of these immobilized tanks, it is not a big deal as they can still perform their standard action during the turn. Out of Command means they cannot use their bonus move but only perform the standard action. Since they are immobilized and cannot move anyway this has no further adverse effect.

The German 2nd and 3rd Platoons have suffered very heavy casualties in the short range gun fight.
Here is a picture of the whole situation at the end of Turn 6. The Germans have suffered very heavy casualties as well as the Russians. Both sides are near their break point.
A view from the German right.

Another view.
Next, we will wrap up the game with Turn 7,8, and 9.
- Kenny Noe, healey36 and Jeff Burghart like this
#74
Peter M. Skaar
-
- ODGW Members
-
- 552 posts
Major
Posted 10 October 2022 - 10:55 AM
Turns 7, 8, and 9

The Germans get the initiative on Turn 7. Both sides had amazingly low rolls.
The Germans get the initiative on Turn 7. The Germans still have the 2 HQ tanks and 2 out of 4 of the Panzer IVs. They have lost over 2/3rds of their starting force and must roll for morale having lost more tanks on Turn 6.
The German rolls but does not pass his morale check this time. He rolls again and another failure results in the start of an "orderly" withdrawal off the map. He does not get the rout result but the jig is up and based on the situation, the remaining Germans need to get out as quickly as possible.
I rolled a moral check for the Russian 1st Company as well. They really did not have roll as they suffered no additional losses on Turn 6. Truthfully, I forgot that fact and the 2 remaining mobile tanks began withdrawing after the 2nd roll resulted in orderly withdrawal result. Apparently the German player was happy to see this and did not point out that the Russian could have kept going forward.
The Russian 2nd Company is still in the fight and does not roll for morale. The have 6 tanks remaining although only 4 are mobile with the other 2 immobilized and basically out of the fight at this point.
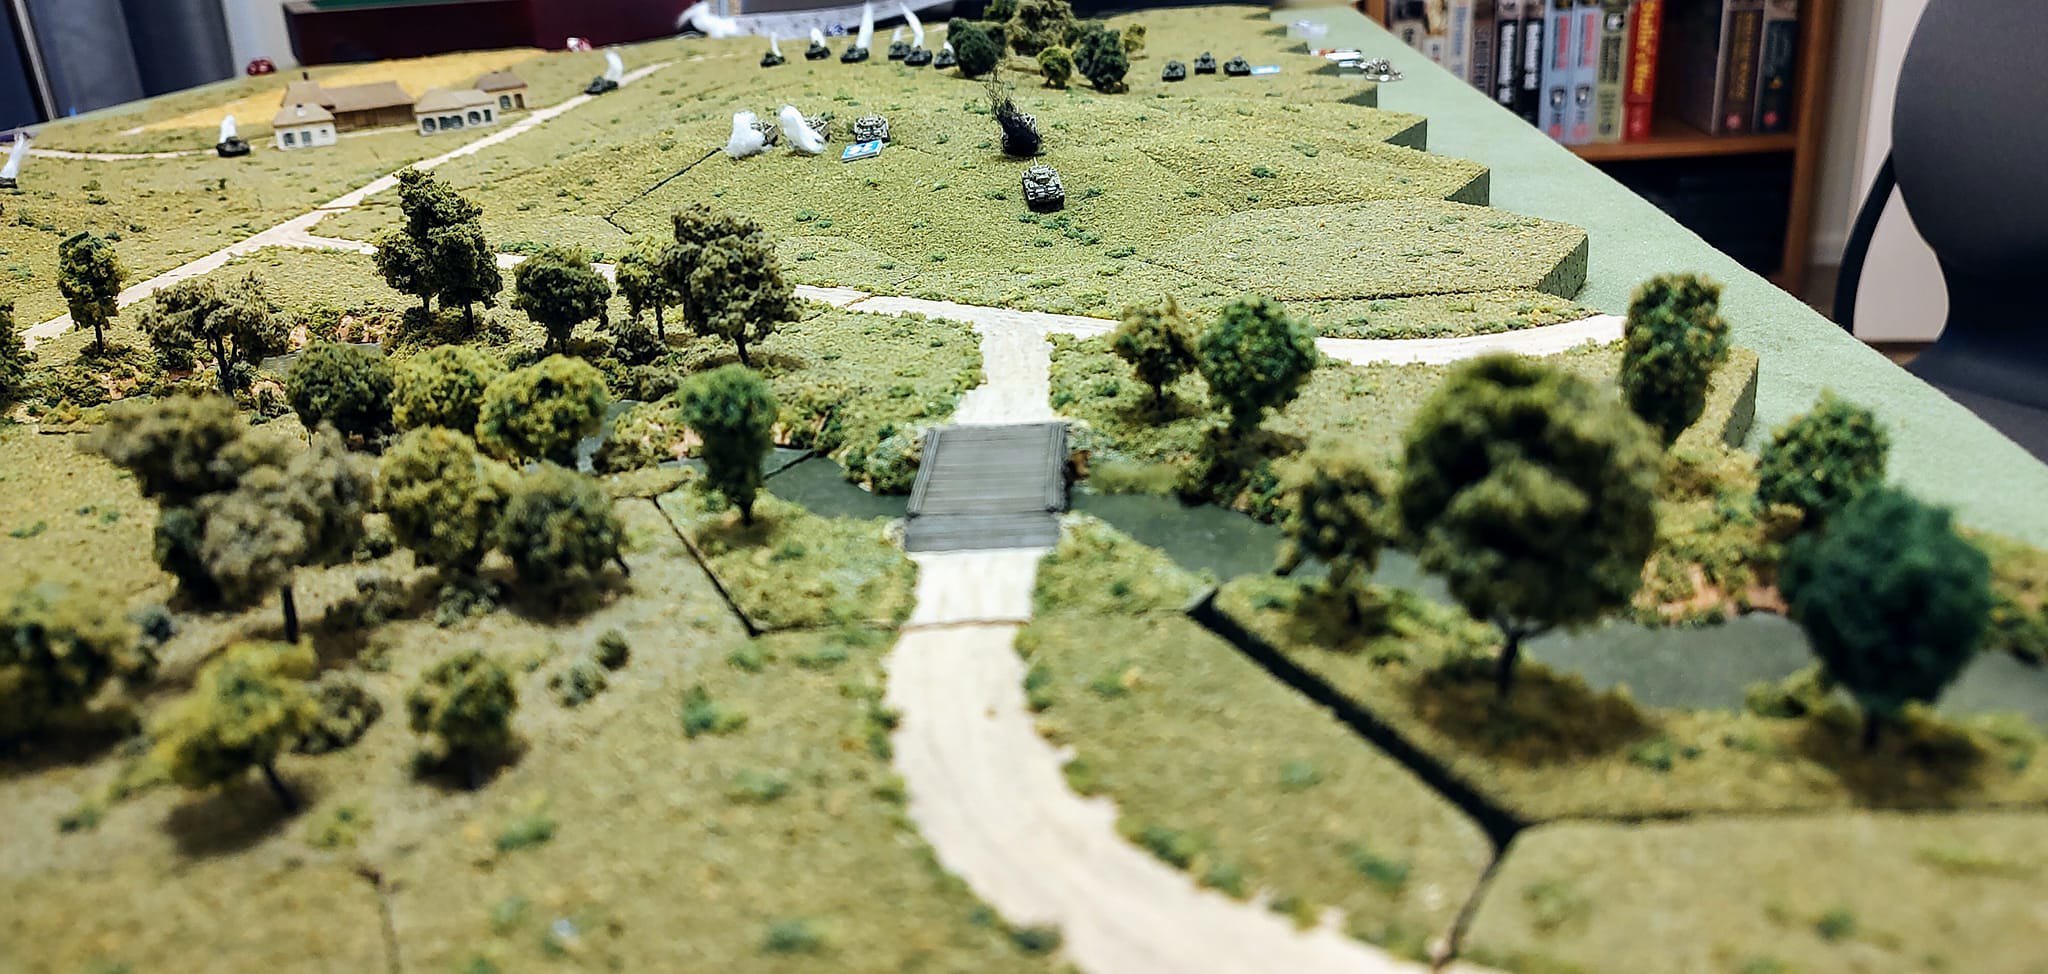
Turn 8. The Germans move toward their map edge to exit. The CO tank is behind and gets hit by a shot from a T-34 resulting in a catastrophic kill aka a "Brew Up". This is basically the final straw for the Germans and the survival of the 3 remaining tanks is all that matters. On the German right, the XO tank makes it to the bridge.
Turn 9. The German completes his exit as the 3 remaining tanks escape. The Russians have possession of the battlefield and the 2 bridges by default.
I will score this as a Russian victory although it was acheived at great cost.
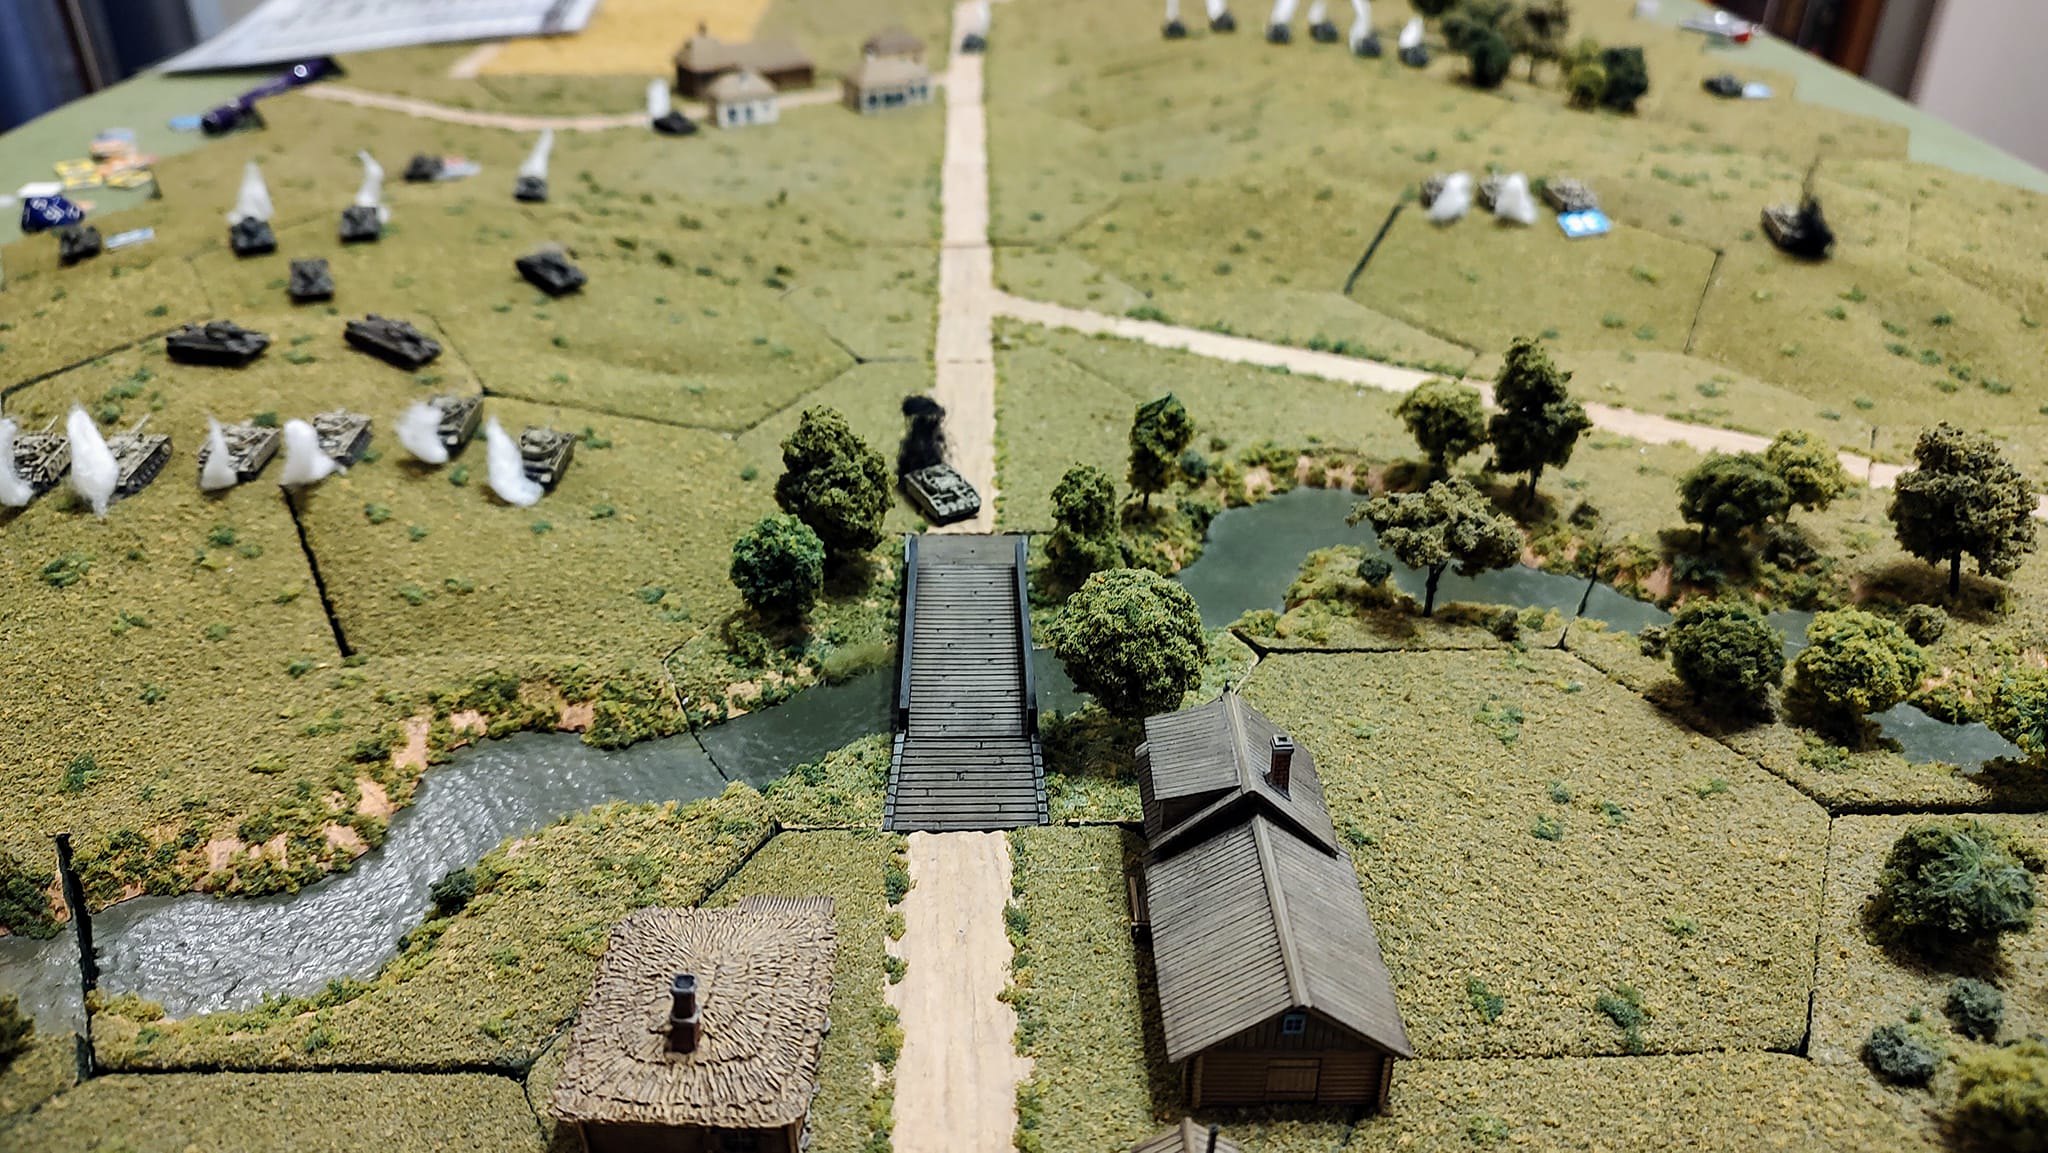
This is a picture of the dispositions at the end of Turn 9.
The German CO's tank is immobilized and suppressed initially. Shortly after, it is brewed up.
- Kenny Noe likes this
#75
Kenny Noe
-
- ODGW Staff
-
- 1,090 posts
Mein Panzer Guru
Posted 10 October 2022 - 10:59 AM
Well done Peter!! Good game!
#76
Peter M. Skaar
-
- ODGW Members
-
- 552 posts
Major
Posted 17 October 2022 - 07:22 PM
Thank you very much, Kenny! I am getting ready to do a final wrap segment next.
#77
Peter M. Skaar
-
- ODGW Members
-
- 552 posts
Major
Posted 19 October 2022 - 06:20 PM
MEIN PANZER TUTORIAL - CLOSING THOUGHTS AND OBSERVATIONS.
My goal with the Tutorial was to give new players and some old players like me, the basics of the Mein Panzer Core rules in a format that could be followed showing a game in progress from the initial dispositions to the final die roll.
In this Tutorial, I demonstrated the following key components of this rules set in a fairly simple, straightforward game. Here they are.
1. Troop Quality. Troop quality is the key component of Mein Panzer. Almost all die rolls are checked against a stand's troop quality to determine success or failure. The better the troop quality the better the chance for success.
2. Single 20 sided die used to resolve most die rolls with low rolls being better than high rolls. Getting 1s are great and 20s not so good.
3. Initiative. Both sides roll a single 20 sided die to determine who has the initiative for the turn. The initiative is determined each turn and can shift back and forth. You can pass the initiative to your opponent but most times there is something you really want or need to do so you take it.
4. Activation. Mein Panzer uses an impulse system of activation as opposed to an I-Go,You-Go approach where one side activates and moves everything before the opposing player can do anything. During the activation sequence, the first player activates a number of platoons equal to his activation chart. The second player then activates a number of platoons as permitted by his activation chart. Each player continues to activate until there are no more units to activate. Players can choose to pass rather than activate but that still counts as an activation.
5. Standard Activation and Bonus Move. During an activation each stand gets a Standard Activation AND Bonus Move. The Standard Activation can be a move action, fire, going into Overwatch, recover suppression and other standard actions as listed. The Bonus Move is only a move but can be used either before, during, or after the Standard Activation. There are some restrictions on units regarding bonus moves such as stands that are Out of Command cannot use their bonus move while Out of Command.
6. Command. Each Company sized unit has a Command Range. The Command Range or Distance is determined by several factors including Troop Quality. In the optional Command Rules, which were used in this game, Veteran Troops are more flexible in having a greater Command Distance than Regular Troops.
7. Direct Fire. This Tutorial covered the basics of direct fire as applied to tank to tank engagements. Things such as range, line of sight, terrain effects, The Hit Table, and The Kill Table were covered. In essence, we covered the nuts and bolts of the Direct Fire rules in this game.
I like the direct fire mechanics in this game. A single die roll is used to determine if you hit your target and another to see what were the effects of any hits. There are no buckets of dice in this game or saving rolls. I think combat is pretty simple but realistic. Since the vehicles were tanks and neither side started hidden, we did not cover the spotting rules.
8. Morale. For this game, I used a simplified set of Unit Morale Rules rather than the Morale Rules that are a separate chapter in the Core Rules for Mein Panzer. I posted my Morale Rules here, in the Tutorial, for those that might want to try them.
The Scenario
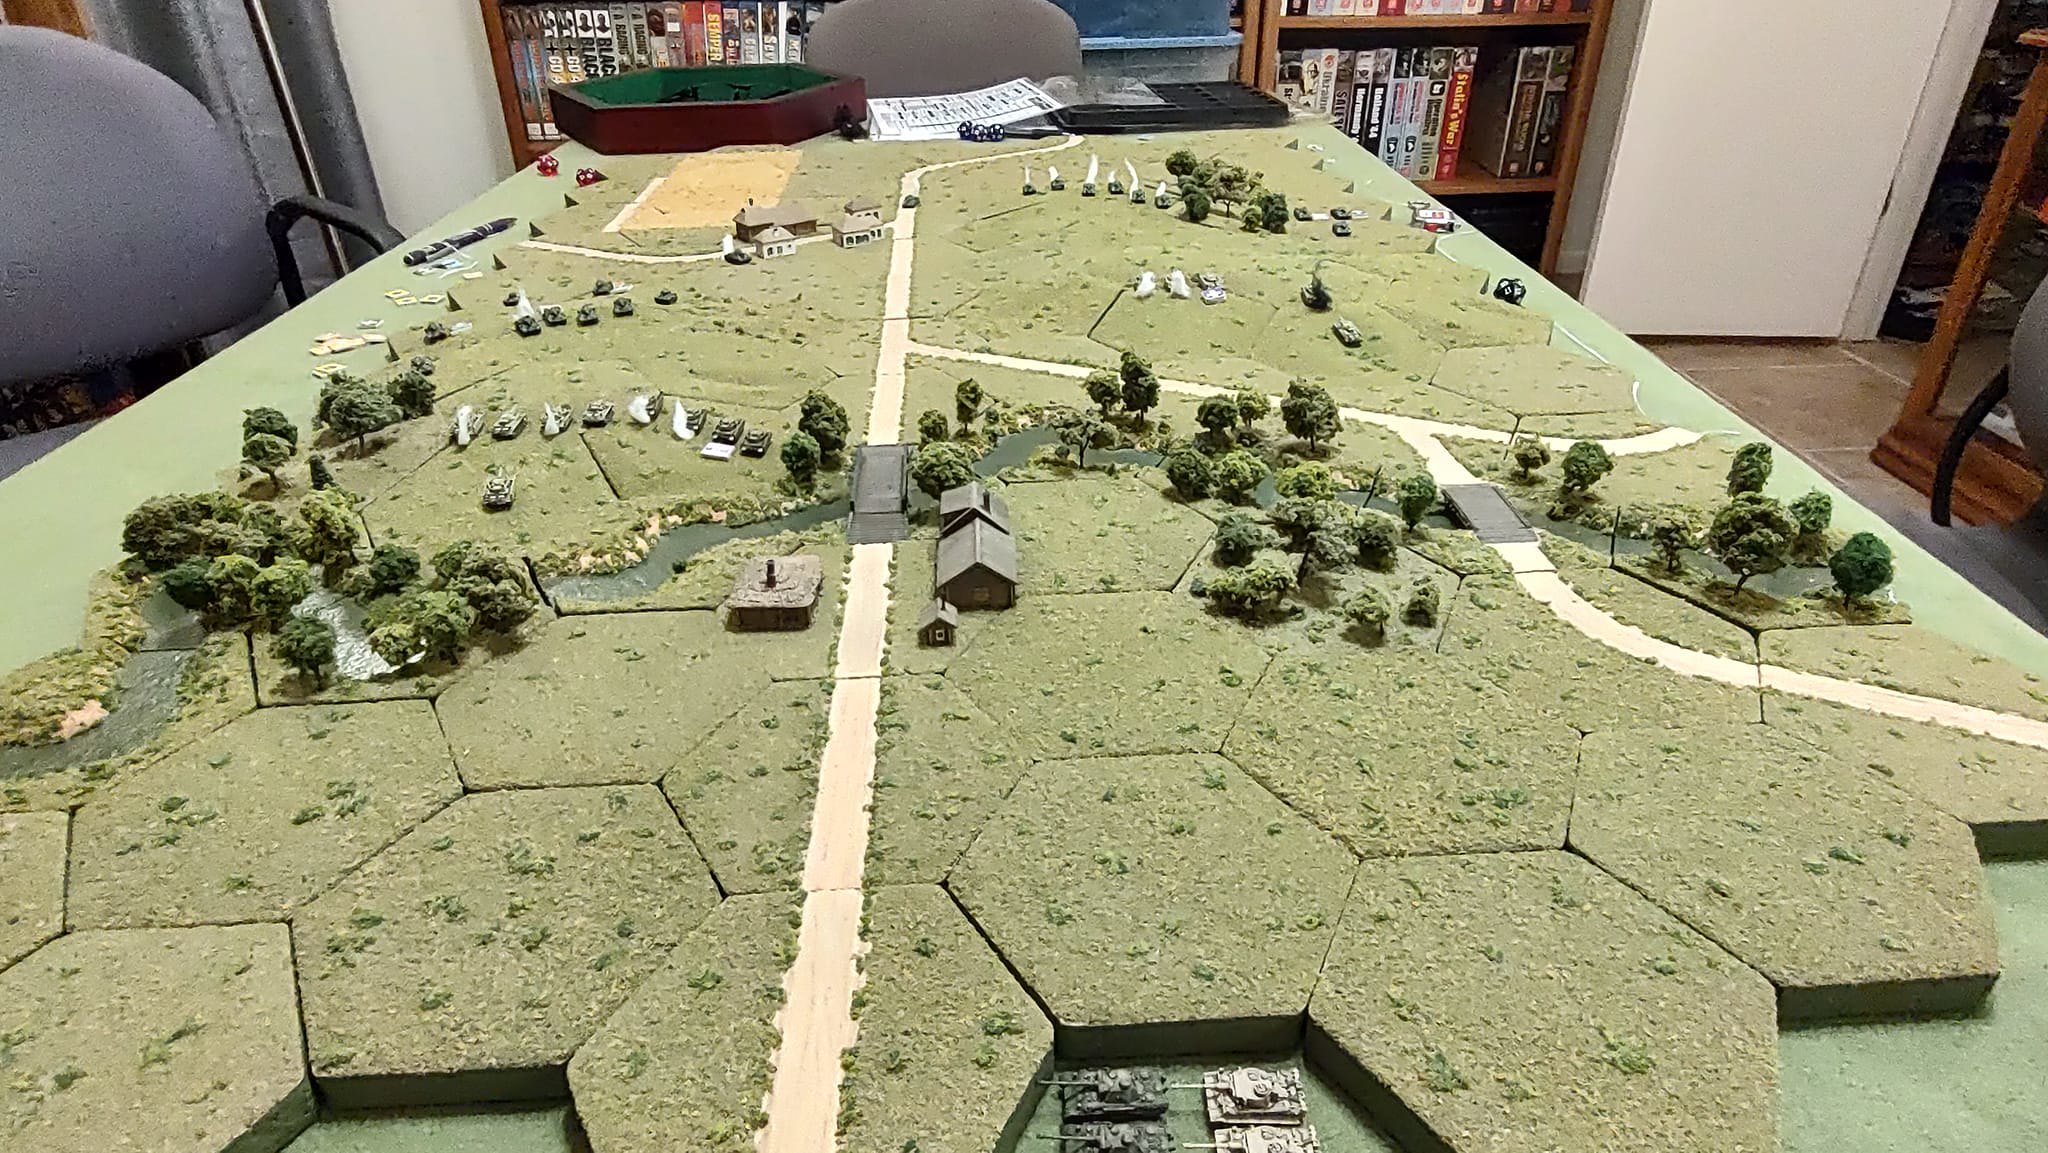
It had been 4 years since I had played Mein Panzer. The last game had been in 2018 when I introduced 3 new players to the basics of Mein Panzer with a game set in North Africa. For this Tutorial, I wanted a simple scenario that concentrated on the basics of Mein Panzer. I chose a pure tank engagement but decided to go to the Russian Front this time with a classic match-up between the Germans and Russians featuring Panzer IIIs and IVs for the Germans and T-34/76s for the Russians.
As mentioned before, troop quality in Mein Panzer is very important and effects almost everything else in the game. I decided to make the Germans Veterans and the Russians Regulars. The main effect of this was to give the Germans a Troop Quality Rating of 12 and the Russians a Troop Quality Rating of 10. The other effect was to give the Germans a greater Command Range AND a bonus shot for being Veteran in addition to the overall better Troop Quality Rating which the Germans have anyway.
In Mein Panzer the T-34/76 is clearly superior to the Panzer IIIL/M/N which were the majority of German tanks in this scenario. The T-34 has advantage of speed, armor, and main gun. The only thing the Panzer III has going as an advantage is its Rate of Fire (ROF) of 2 vs 1 for the T-34. The T-34 main gun has a decent chance of inflicting damage on the frontal armor of the Panzer III if it hits. The Panzer III, on the other hand has a bit less chance of inflicting damage on the T-34 but, being Veteran, has 3 chances to hit vs 1 for the T-34.
The Panzer IVG/H in this scenario, while inferior to the T-34 in speed and armor, has a superior main gun which was used to good effect during this game.
Terrain. I kept the terrain fairly simple for this game with 2 hills, a minor river with 2 bridges, a few buildings, one main road with a couple of branches, and just a few trees. I wanted the terrain to have an effect but I did not want the terrain to totally dominate the game and I think I achieved that here.
Objectives. I had a points system I devised for tank losses but also wanted a terrain objective for the two sides to fight over. The 2 bridges provided that focus.
Turn Limit. I set a 10 turn limit for the game.
Balance. I wanted a game in which that both sides had a chance to win. I did not want a perfectly symmetrical contest so the German Veteran Panzertruppen in their inferior tanks were taking on the slightly more numerous Russian Regulars in their better tanks. The Germans had 14 tanks in one Company of which only 4 were the better Panzer IV while the Russians had 20 tanks split evenly into 2 Companies of 10 tanks each. I also decided to act as if 2 players were operating the 2 Russian Companies.
Balancing the game was done by "feel" and not by a points system. Overall I thought the balance was pretty good.
The Game
This game went pretty smoothly overall. I had not played for 4 years but was able to read and comprehend the rules quickly. I did make a few mistakes on a few of the rules but nothing that greatly affected the game.
The Germans had things pretty much their way through about Turn 3. The Russian 1st Company was taking a lot of casualties already while the Germans had only lost 1 Panzer IIIN to a critical Misfire.
Starting on Turn 4, things started to even out a bit. The Russians were taking more casualties but also starting to inflict some on the Germans as they closed the range. The German 1st Platoon on the right lost 3 of 4 tanks and the German left flank was in danger of total collapse. The only thing that saved the Germans was the fact that the Russian 1st Company had lost a large number of tanks and was unable to exploit the situation.
On the German left, things were still developing as the Russian 2nd Company was able to get to the base of the hill relatively intact to prepare for the assault on the German positions.
Turns 5 and 6 were also big turns. The Russian 2nd Company lost some more T-34s but was able to inflict critical losses on the German 2nd and 3rd platoons.
On turn 7, the Germans failed their Morale Check and started to withdraw. The Russian 1st Company also failed its Morale Check although they really did not need to roll as they had suffered no additional losses.
Turn 8 and 9 were somewhat anti-climactic. The Germans continued to withdraw with their remaining operational tanks while the Russian 2nd Company continued its attack.
I called the game after 9 turns. The Germans only had 3 operational tanks left that got off the board. By default, the Russians had control of the battlefield and the 2 bridges. I assessed this as a Russian victory.
Final Thoughts
I thought the scenario played out well. The game seemed well balanced to me and I think the final result showed that. It was close and could have gone either way.
I had considered giving the Panzer IIIL/M tanks some APCR ammo in a very limited quantity but I think this would have tipped things in the Germans favor a bit. During the game, Russian tanks were hit but survived due to the hard time the 50mm guns had of penetrating the frontal armor.
I also considered giving the Russians Veteran status. Certainly, there were units in the Russian Tank Corps that would be veterans during the Summer of 1943. That would have given the Russians a bonus shot as well but might have been more devastating for the Germans.
I had also thought about some Tiger Is and Panther Ds as possible reinforcements for the Germans but decided not to add them in. This probably would have tipped things in favor of the Germans unless I used some sort of point penalty for their use.
Mein Panzer is a great set of rules for WWII Combat at the Company to Battalion level. Some things are abstracted but the rules are very playable and I think do a fine job in giving a fun and challenging game.
If there is interest, I will consider doing another Tutorial which will add in the infantry, artillery, and spotting rules to illustrate those aspects of the rules in addition to the main Core Rules which we covered in this Tutorial.
If you have any questions feel free to ask me.
THANK YOU!
- Kenny Noe and Jeff Burghart like this
#78
healey36
-
- ODGW Members
-

- 951 posts
Colonel
- LocationMaryland USA
Posted 20 October 2022 - 02:03 PM
Thanks for the tutorial, Peter. I'd certainly be up for reading your take on the infantry/arty rules in a game format. Something relatively small would be fine. It would likely clear up a number of questions I have and point up things I've been doing wrong or misinterpreted.
#79
Greg Mc
-
- ODGW Members
-
- 20 posts
Private
Posted 20 October 2022 - 02:58 PM
Very good tutorial, I've already begun recommending it to friends I am trying to introduce the game to. Thanks for taking the time and effort to do this! I'd love to eventually see an infantry/artillery tutorial.
#80
Peter M. Skaar
-
- ODGW Members
-
- 552 posts
Major
Posted 20 October 2022 - 03:01 PM
Thanks very much, Greg! I will consider doing another scenario featuring artillery and infantry in the future.


0 user(s) are reading this topic
0 members, 0 guests, 0 anonymous users

