


MMG Minis and Terrain
Started by
Sacha
, Aug 30 2006 01:42 PM
58 replies to this topic
#41

Sacha
-
- ODGW Members
-

- 724 posts
Lt Colonel
- LocationJakarta, Indonesia
Posted 18 October 2007 - 07:32 PM
Some fancy smancy Jagdpanzer IV's
#42
healey36
-
- ODGW Members
-

- 950 posts
Colonel
- LocationMaryland USA
Posted 14 January 2017 - 08:05 PM
I finally busted out the MP rules I bought a year or so ago with an eye toward figuring them out. I haven't played with any micro-armor for a very long time, probably close to twenty-five years. The rules look sharp, but I'm old now and it takes me longer to assimilate this stuff. I'm looking forward to getting some tanks back on the table-top.
Back then we were playing GDW's Command Decision. We'd made a set of geomorphic terrain modules which were roughly configurable for various types of battles (I think we even played some 6mm Napoleonics on them as well). So today I went over to the storage bin to have a look...that was the place I recalled seeing them last.
Sure enough, all the way in the back against the wall I found them (every time I look in there for something it's always in the back against the wall...uncanny). After all these years they still looked to be in relatively good shape. They need some clean-up and a bit of reflocking, but that's easy enough. A couple of them were a bit warped, presumably from humidity or just age...I'll probably pitch those and make some new ones as required. I pulled out a few and brought them home...thought I'd post a few pics of anything notable as I go through the process.
A few details on construction. They were made generally in one-foot square sections, although some of the larger hills were on one-foot-by-two-foot sections, with quarter-inch masonite as the base. Roads, gullies and streams all ran to the board edges consistently to assure matability (sic). They were flocked with ground-foam, with roads of model-train ballast. Hedge-rows, trees, fences and some buildings were built as separate bits so their placement could be varied, while some mods had buildings permanently affixed. They were scaled specifically for 1/285-1/300. It all seemed to work at the time and it looked pretty darn good when you got thirty or forty of them laid out on two or three big tables.
Here's the first one I pulled out today. I specifically recall this mod being intended to resemble "The Factory" from the Anzio/Netuno campaign. If you've read about that debacle you will recall that this was the scene of a lot of tough fighting as the Allies tried to push inland.
Anyway, here's a few pics:


Let me know what you think. Rather than start a new thread I thought I'd post them here...hopefully Sacha doesn't mind me hi-jacking his thread (after over nine years of dormancy).
Healey
#43
healey36
-
- ODGW Members
-
- 950 posts
Colonel
- LocationMaryland USA
Posted 21 January 2017 - 03:05 PM
Here's another flat 12" x 12" module I pulled out and cleaned up. This one was in much better shape...just needed a vacuum with the mini-vac and a bit of reflocking along the edges:

Reminds me a bit of the ruins you see out in the Irish countryside, although these might be in better shape. A couple of ruined farms and small enclosed fields.


The structures were made using bass-wood, a bit sturdier than balsa. The ruin walls' thicknesses are not to scale but built for durability.
A lot of the buildings we used were ruins...it's a bit easier to track infantry moving/occupying roofless buildings than enclosed structures. We had a large inventory of commercially available structures we used as well, some ruined, some intact. The placement of these could be varied on the table-top.
I found a few boxes of the old micro-armor...criminy, that stuff looks rough. It's going to require quite a bit of reworking.
Healey
#44
healey36
-
- ODGW Members
-
- 950 posts
Colonel
- LocationMaryland USA
Posted 25 January 2017 - 08:03 PM
Not all of the buildings we used were fixed to the modules...we had quite an inventory of pieces that we could rotate around as required.
Here's a couple:
Corner building:

Destroyed abbey:


The paint jobs are close to thirty years old and they've been banged around quite a bit, but they are still functional.
These were purchased from The Armoury in Pikesville, Maryland. They were a big distributor for gaming supplies, and on Saturdays they would sell to the public. I bought a ton of 15mm Minifigs in there, along with a bunch of these 1/285 scale resin buildings. Each building was modelled in its intact form and its rubbled (sic) form. I rarely ever bought the intact versions...seemed to have a fascination with stuff in a reduced condition. These were all of The Armoury's design, cast on-site. The old guy that ran the place gave me a tour once that included the production process for these and their own line of acrylic paints. After the old guy passed away the company stumbled along for a few years under the family's tutelage, then sold out to another game supply company that eventually shut it down. I think the building is a medical supply warehouse now...kills me every time I go by there.
Healey
#45
healey36
-
- ODGW Members
-
- 950 posts
Colonel
- LocationMaryland USA
Posted 26 January 2017 - 08:06 PM
1/285 Flakpanzer IV "Ostwind" by GHQ:

I retrieved this from the box...basic 25 year-old paint-job with a screwball number. For purposes of demonstrating scale I'll use this figure in future terrain shots.
Healey
#46
healey36
-
- ODGW Members
-
- 950 posts
Colonel
- LocationMaryland USA
Posted 29 January 2017 - 07:07 PM
Back in the day we were never ones for a felt table-cloth, a few books jammed underneath, some strips of felt for roads/streams, and cotton-balls tossed about on the table-top. No, we were obsessed with the terrain and models looking as good as possible. The rules, while equal in importance of course, definitely played second-fiddle to the "look" of the action. This probably sprung from the fact that we were modellers first, gamers second. When GHQ rolled out their Terrain Maker® system we probably would've jumped on it except we had too much sunk in our proprietary version (plus all of those hex lines would have driven us nuts).
Still, we made a lot of mistakes along the way. Here's an example:

A properly engineered road includes some sort of drainage, typically a shallow ditch along the edge intended to drain away storm runoff. Our roads never had that feature...we simply laid down a bed of white glue where the road was intended, dusted it with model-railroad ballast, and there you have it. Granted, doing it properly would have sharply increased the complexity, but it sure would have looked a bit better (and provided a little cover for personnel from those marauding fighter-bombers).
But who says Russian roads were ever engineering marvels anyway...
Here's another one that's functional but not the best:

The bridge is by The Armoury, and it kinda kills the mood with those opaque arches. The muddy stream does, however, feature a fair representation of banks running down to it. Must be a mid-summer drought, though.
A few more of these cleaned up and/or repaired and we can start getting them onto the table.
Healey
#47
healey36
-
- ODGW Members
-
- 950 posts
Colonel
- LocationMaryland USA
Posted 04 February 2017 - 06:41 PM
I cleaned up enough of the more generic modules to put together a three foot square playing space, which I know is quite small. However it'll be big enough to push some stuff around and get the hang of MP's mechanics.

Apologies for the lousy lighting in the pic, but actually it gives a sense of what is high ground. This is before the application of additional terrain (fence-lines, hedgerows, groves of trees, etc.), which I understand is a process of the joint set-up by the players.
The square in the top right-hand corner is the first one we ever made...a ruined farmhouse on a slight rise that was the scene of numerous vicious actions all those many years ago.

I distinctly remember a particularly difficult effort trying to dislodge a 75mm PAK 40 from the front garden...a costly affair as I recall. Good memories have re-emerged as I've gone through this process...a bit therapeutic after the loss of one of my Command Decision mates in the last few weeks.
But we move forward. I've quickly read through the rules and will most likely jump straight into the advanced stuff, which of course never works out well for me, lol. Perhaps I should reconsider and use the layered approach advocated by ODGW. Straight-up tank-on-tank actions have never been my favorite, but perhaps it's best to start there.
I pulled out my copy of Thomas' One Hour Wargames just to have a look at his small scenarios framed for WWII. These might be useful for the purpose of pulling together various types of small engagements...or not.
Still a ways to go. I think I might clean up another three generic mods to make the playing surface three-foot-by-four-foot (which would provide the four-foot depth specified, but on a narrow front), and I'll need to repaint and re-base a bit of infantry/heavy weapons.
Healey
#48
healey36
-
- ODGW Members
-
- 950 posts
Colonel
- LocationMaryland USA
Posted 08 February 2017 - 10:04 AM
With regards to infantry stands my methods certainly yield a result less spectacular than Sacha's. The eyesight has sagged to a point where painting faces and hands on 1/285-1/300 infantry is no longer possible (even with the Optivisor and good light). No worries...it's about the game, right? Meh...
Back in the Command Decision days we simply super-glued block-painted infantry and heavy weapons to clear acetate and numbered each for plotting purposes:

The acetate had one great advantage - it allowed the underlying terrain to be visible through the base. Hence a stand on turf looked like it was on turf, a stand on a road looked like it was on a road. The downside of acetate was (1) it got filthy in a relatively short period of time, (2) it clouded over time (as can be seen above), and (3) the figures tended to become detached not too long after being cemented.
Sacha's round bases look sharp, but I have a mental block with regards to defacing the national currency. Also the pennies are a bit thick to my taste. Instead I decided to go with Litko three-quarter-inch circular thin plywood bases. I was concerned that painting/gluing/puttying these bases might end up providing a warped toboggan effect, but those fears have proved unfounded. With just two completed there appears to be no warpage.
Despite having ten or fifteen new packs of figures I went ahead and debased all of the old stuff and tried to clean it up as best I could. It's all Heroics & Ros 1/300, which seems a bit sturdier (but less detailed) than GHQ figures. I also have some CinC figures but those seem extremely spindly...those can be a problem just cutting them off the sprue.

The Russians were painted a sort of olive drab which I didn't care much for, so after gluing them to the base I gave them a repaint with Model Master Medium Green enamel (FS34102), then a dry-brush with Vallejo Dark Flesh acrylic (70927). I might try inking the next batch to see if that raises the detail a bit more, but to be honest I doubt it will be noticeable (except under close-up with the Nikon).


I then gave the bases a coat of Tamiya Red Brown acrylic (XF-64). The first stand got dabbed with a bit of Elmers and then sprinkled with a blended green-brown ground foam from Woodland Scenics. However the base of each figure seemed too noticeable, even after flocking, so I used a bit of Squadron Green Putty to fill in a bit on the second stand. After letting the putty dry I dabbed in the Elmers and flocked the base.

For recognition purposes I decided to paint the base edge a representative color (red for the Russians). A shot of clear-matte lacquer should help protect them when handling.
The camera reveals all of the flaws, but from eighteen inches away they look tolerable.
Healey
#49
Cpt M
-

- ODGW Retired Staff
-
- 939 posts
Colonel
Posted 08 February 2017 - 10:25 PM
Indeed, the 18" rule is a standard in my group. And if you're getting any closer than that, then you're TOO DAMN CLOSE!! 
And nice work, BTW!
#50
healey36
-
- ODGW Members
-
- 950 posts
Colonel
- LocationMaryland USA
Posted 20 February 2017 - 09:02 AM
Thanks Cap'n.
Oy, basing infantry is a bit tedious. Sent off a note to Last Square for a pile of new lead, including components for a few command stands. I've also had to manufacture a few more terrain modules in the style of the old ones...many of those retrieved from storage are too badly warped/damaged for use. In the course of construction I'm realizing how faded the old flocking is compared to the new, but whatever.
With morning coffee I caught sunrise over the gaming table:

A ruined French farm (resin castings by The Armoury, stone wall and haystack manufacturer unknown) on a treeless plain.
Meanwhile Kampfgruppe Von Schtupp begins to accumulate.
Healey
#51
healey36
-
- ODGW Members
-
- 950 posts
Colonel
- LocationMaryland USA
Posted 27 February 2017 - 07:38 PM
Retrieved this 1/300 H&R Sturmovik from the lead-pile. A thirty year-old casting and paint-job, it just needed a red nose and a few decals:

Some air-support for the Ivans...
Healey
#52
healey36
-
- ODGW Members
-
- 950 posts
Colonel
- LocationMaryland USA
Posted 01 March 2017 - 06:02 PM
Panzergrenadiers on the move:

A couple of mortar squads:

Major Von Schtupp, staff and his trusty Schwimmwagen:

These are all Heroics & Ros 1/300 scale, mixed vintage. Again tried painting faces and hands and just made a mess of it. When using the Optivisor I tend to lose depth perception, which of course is a problem with stuff this small. I'm with Cpt M...we're moving on.
Germans got a base-coat of Tamiya Field Grey (XF-65), then an inking of Vallejo Game Color (can't read the number on the bottle anymore), a dry brush using Vallejo Model Color Dark Flesh (70927). Based on 3/4-inch round Litko plywood bases with a home-made mix of Woodland Scenics fine ground foam for flocking. Then they all got a shot of Testors clear matte.
Healey
#53
simanton
-

- ODGW Members
-

- 262 posts
Captain
Posted 06 March 2017 - 08:06 PM
Grandson of Lili von Stupp?
#54
healey36
-
- ODGW Members
-
- 950 posts
Colonel
- LocationMaryland USA
Posted 07 March 2017 - 04:57 PM
Very likely a second or third cousin...note the different spelling:

Lili Von Shtupp
#55
healey36
-
- ODGW Members
-
- 950 posts
Colonel
- LocationMaryland USA
Posted 09 March 2017 - 11:39 AM
Stug IV on the move:

A twenty-five year-old GHQ casting and paint-job...did a terrible job with the mold-marks. I don't recall who made the decals...I had a couple of sources back then. Always a mistake to apply decals after weathering...
Healey
#56
healey36
-
- ODGW Members
-
- 950 posts
Colonel
- LocationMaryland USA
Posted 14 March 2017 - 07:51 AM
Colonel Sergei Anpopov and his staff:


He's stuck with the GAZ-67 until he can capture a Schwimmwagen.
Healey
#57
healey36
-
- ODGW Members
-
- 950 posts
Colonel
- LocationMaryland USA
Posted 20 March 2017 - 11:38 AM
Okay, one last terrain mod clean-up and then I'll stop for awhile - newly plowed farm-fields:

A decent obstruction for miring tanks after a long rain:

That's it for a bit.
Healey
#58
healey36
-
- ODGW Members
-
- 950 posts
Colonel
- LocationMaryland USA
Posted 26 March 2017 - 09:14 AM
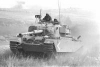
Elements of the 14th Tank Battalion, CCB, 9th Armored Division push east into Germany in the closing days of the war:

GHQ micro's motor through a ruined town mod.
Healey


1 user(s) are reading this topic
0 members, 1 guests, 0 anonymous users

