North Sea - December 1917 AAR
11 December 1917 (Day 2)
The naval dispatches were fairly flying throughout the night of 10-11 December following the near wholesale slaughter of Convoy 1 off the northeast Scottish coast that afternoon. Beatty, feeling the collective heat from First Lord Geddes, in turn vented his frustration to Admiral Frederic Brock, Admiral Commanding, Orkneys and Shetlands. So soon after the incident, neither Beatty or anyone on his staff acknowledged that at the time of the attack, the convoy had passed beyond Brock’s immediate operating area.
The controller's map at Midnight, 11 December 1917.
It’s interesting to note the level of turmoil and personal angst at the upper reaches of the Royal Navy in the autumn of 1917. There was, of course, a huge vacuum of leadership between Beatty, Commander of the Fleet, and First Lord of the Admiralty Geddes, primarily in the form of First Sea Lord Jellicoe, a man who had adopted a largely defeatist mentality when it came to the war against the U-boats. He had remained skeptical of the effectiveness of the convoy system and, for nearly a year, responded to the many calls for action by saying there was little that, in his opinion, could be done to mitigate the submarine threat. The effect of this was a near total loss of confidence in him by Geddes, PM Lloyd George, and even CIGS Robertson, ultimately resulting in his sacking on Christmas Eve, 1917.
Brock had called for the Scandinavian convoys to be reorganized into larger, less-frequent sailings with larger escort assignments, something that flew in the face of Beatty’s inability to provide more destroyers. This, combined with his gruff, antagonistic demeanor, won him few friends or allies in his efforts to garner additional resources, and he was largely left to make do with what little he was provided.
Beatty, however, was no idiot. Jellicoe might have a firm grip on the lightning rod, but Beatty knew he was standing close by. He had no destroyers to spare, but was keenly aware more needed to be done to curb the carnage in the North Sea. In the early hours of the 11th, he advised Brock that he was making the 2nd Cruiser Squadron, the 3rd Light Cruiser Squadron, and the 2nd Battlecruiser Squadron available to provide limited cover/support for Brock’s convoy operations.
To that end, Captain Louis Woolcombe (Acting Commander of 3rd Light Cruiser Squadron) was to execute a sweep across the North Sea on a line some 100 miles south of the convoy route. Three light cruisers (Chatham, Yarmouth, and Birkenhead) and three destroyers (Pelican, Paladin, and Nereus) would comprise Woolcombe’s Force F. Barring any encounters with the HSF, it was a 60-hour out-and-back; a message was sent to Brock reporting that Force F could depart Scapa in a matter of a few hours.
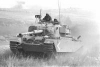
Rear-Admiral Reginald Tupper had only just arrived three days earlier to take command of 2nd Cruiser Squadron at Lerwick. Tupper, having come over from 10th Cruiser Squadron, had dreamt of landing the plum assignment of 4th Battle Squadron. Instead, he’d been passed over for Browning and was transferred to Lerwick. He arrived to find his command consisted of two Minotaur-class armored cruisers and three armed merchant cruisers, one of which, HMS Alsatian, had inexplicably been designated by his predecessor as the squadron’s flag. Tupper wasted no time transferring his flag to HMS Shannon, and when word came down to prepare, he advised Brock that Shannon and Minotaur could put to sea within hours. The two cruisers, together with destroyers Sable, Sorceress, Sturgeon, and Satyr were designated Force E and ordered to sweep the sea lane ahead of Convoy 3. A minor problem with a pair of Minotaur’s Yarrow boilers delayed their departure, however, and Force E would in fact sail three hours after the convoy.
Rear-Admiral Arthur Leveson received word that his 2nd Battlecruiser Squadron was to raise steam and stand by to support Brock’s operations as required. The directive Leveson received seemed to leave much of the operation’s execution to his discretion, and in view of his concurrent charge as Rear-Admiral Commanding the Australian Fleet, Leveson elected to only partially activate the squadron, sending Inflexible and Indomitable while leaving Australia and New Zealand at Scapa. Force W would be comprised of the Grand Fleet’s two oldest battlecruisers, with destroyers Mansfield, Menace, and Mischief to serve as the van.
Convoy 3 was set for its Lerwick-to-Bergen run at first light on the 11th. Four colliers and a pair of bulk-carriers (Bollsta, Kong Magnus, Bothnia, Torleif, Maracaibo, and Cordova) were scheduled to pass out of the harbor at 0830. Due to the propensity for U-boat mining operations outside the harbor, they were led by a pair of minesweepers for the first fifteen miles; there they met their escort and were reconfigured into two columns of three ships. Destroyers Partridge and Pellew took up positions on the starboard and port bows respectively, while RN trawlers Livingstone, Commander Fullerton, Lord Alverstone, and Tokio took up positions beside and behind. Plodding along at 11kts, the convoy was scheduled to reach Bergen by midmorning the next day.

Convoy 3 as it departs Lerwick.
With radio-silence maintained by Heinrich and his destroyers, the Germans’ success the day before was unknown to Scheer and Hipper. By 0100 on the 11th, Heinrich’s half-flotilla was nearly 160 miles out, due east of the Firth of Forth, planning their next move. If undetected and unchallenged, Heinrich decided he would venture back into the shipping lanes somewhere along the Northumberland coast north of Newcastle.
Kolbe had the intelligence report in-hand indicating that a convoy was scheduled to depart Lerwick that morning. Speed could be estimated, but the exact time of sailing was unknown. His position at Midnight was approximately 150 miles out from Lerwick, at roughly the mid-point of the shipping route between the Shetlands and Norway. Thinking that executing his attack from the north might give him a tactical advantage, Kolbe ordered the destroyers to proceed nearly 30 miles north of their current position, then a turn west to roughly parallel the expected course of the convoy.
Cruiser HMS Antrim, having suffered some severe storm damage while on convoy escort in the North Atlantic, had been in the repair yard at Grangemouth for two months having things put right. Her captain, Victor Gurner, was generally pleased with the speedy repairs made and was looking forward to getting back to sea. Only partially coaled and her magazines largely empty, Antrim was scheduled to leave the yard midmorning on the 11th, destined for Chatham where, unknown to Gurner, she would either begin a period of refit or be paid off.
HMS Antrim.
__________
The overnight and early-morning hours were filled with sighting reports flowing into the Royal Navy’s stations from various sources, provided predominantly by drifters working the fishing grounds across the northern and western North Sea. Reports were intermittent and inconsistent until 0500 when a patrolling naval trawler operating fifty miles north of the Lerwick-Bergen route and 120 miles northeast of Lerwick, reported a small group of warships moving northwest at 15kts. The trawler was able to keep these ships in sight for 90 minutes, radioing approximate speed and position. Contact was lost shortly before 0700 as weather conditions deteriorated.
A massive low-pressure front had begun pushing over the North Sea at 0500, and by 0900 near-gale conditions were in play over the Shetlands, continuing south along the eastern English coast as far as Scarborough. The front proved fast-moving at nearly sixty miles-per-hour and was largely far out to sea by 1100.
At 0500, Convoy 2, sailing south to Newcastle, reached the approximate position of Convoy 1’s destruction the previous day. Nothing was observed that hinted at the earlier catastrophe, yet the watch remained vigilant with eyes focused toward the horizon and the radiomen glued to their headsets. Maintaining position within the convoy became difficult as the storm-front moved over them, but it also shielded the ships from the prying eyes of the U-boats. By 1000, the worst of the weather had passed well beyond the Firth and was racing out to sea.
Around this time, Kolbe’s destroyers, unaware of their detection, had turned southeast from their track north of the projected Bergen convoy route. Unbeknownst to Kolbe, Convoy 3 had just picked up its escort and began churning east-northeast toward Bergen. Kolbe made the presumption that he’d somehow missed the scheduled convoy and that it was now east of his position, when in fact it was still more than 60 miles west.
At 1100, HMS Antrim casts off from the yard at Grangemouth and sails out toward the Firth and open sea. An hour later, she slips past the ruins of Tantallon Castle under sullen, overcast skies, turning south for Chatham. Captain Gurner, ever-mindful of the submarine threat, doubles the watch.
A few minutes before Noon, Brock orders Tupper’s Force E to sea after receiving another report of unidentified ships, now just 30 miles southwest of Convoy 3. Shannon, Minotaur, and the four destroyers slip out of Lerwick and quickly raise their speed to 20kts. From the bridge of Shannon, Tupper orders Sable and Sorceress into line-ahead as the van, while Minotaur, Sturgeon, and Satyr fall into line aft.
HMS Shannon and HMS Minotaur.
By 1300, nearly all of the rough weather is safely east of operations. Kolbe’s force is soon spotted by a naval trawler operating along the convoy route. Its report is radioed to Lerwick, then relayed to Force E and Convoy 3’s escort. Unbeknownst to Tupper, Force E has also been spotted and a report relayed to Kolbe, yet the exact position of the convoy remains unknown to him. He turns northwest, which not only brings him closer to the merchant ships, it also allows Force E to rapidly close on him. At 1400, wisps of smoke appear on the horizon off his starboard bow, and he directs the destroyers in that direction. At 1436, less than two hours before sunset, the merchant ships are spotted and Kolbe orders the destroyers around to attack.
Nearly simultaneously, LC Reginald Ransome, captain of Partridge and commander of the escorts, is alerted to the approaching enemy destroyer force. He signals LC James Cavendish in Pellew of his intention to turn into the onrushing DDs, an attempt to break up the attack, while signaling the convoy and trawlers to disperse. As the lumbering colliers slowly begin to turn away from the threat, Cavendish takes Pellew north across the bows of the lead ships, raising his speed to flank. In the distance he can see Partridge heading directly toward the German destroyers.
Naval battles, at least the ones on our table, tend to degenerate into great swirling masses of ships as maneuver often takes precedence over gunnery and actually coming to grips with the enemy. This thing proved no different, a sharp destroyer clash followed by a sweeping pursuit of the convoy. There were a number of head-scratching moments, but in the end, poor tactics and the dice prove decisive.
Moving from the operational map, we saw the convoy plodding across the table eastward as Kolbe’s destroyers entered from the northwest. The range was approximately 15000 yards as Partridge turned to make her run north. The convoy and trawlers semi-dispersed and turned south at flank speed (12kts).
As Partridge rapidly closed on the column of German DDs, Kolbe made the strange decision to turn south, than southwest directly toward the merchant ships. At less than 8000 yards, Partridge opens on G 101 with her forward 4-inch, missing badly. Kolbe held his fire, hoping the outnumbered Partridge would veer off, but she didn’t, and when the range had closed to just 3000 yards, Ransome cut loose his twin-mounts of 21-inch torpedoes.
Partridge looses her fish.
G 101 blazed away at Partridge as she passed, scoring no hits. Kolbe saw the torpedoes go in and ordered evasive action. The first fish passed safely behind G 101, fifty yards or so ahead of G 103, but the second torpedo didn’t miss, slamming into G 103 square amidships, blowing her in half. The third destroyer in line, G 104, watched a torpedo approach, thought she’d make it past, but instead there was a massive explosion as it clipped her tail, tearing away propellers, shafts, steering gear, and fifteen feet of her stern. She spun out of line, V 100 narrowly avoiding a collision as it turned to pass the stricken destroyer from behind. Partridge's fourth torpedo had slipped past or beneath V 100 unseen, but the mortally wounded G 104, dead in the water and rapidly flooding, was quickly abandoned.
Within minutes two of Kolbe’s four DDs were gone and the odds were suddenly much worse (or better if you’re Royal Navy). G101 continued firing on Partridge, and at 1500 a 4.1-inch round cleaves her stern below the waterline, jamming her rudder. Partridge lurches into a tight, uncontrolled turn to port, heeling over sharply. Cavendish’s Pellew returns fire, landing a hit on G 101’s foredeck, taking out her forward 4.1-inch. V 100 pays her back in kind, sending a round into Pellew’s forward engine room, yielding temporary engineering damage that cuts her top-speed to 20kts.
And so begins Kolbe’s great “run to the south”. At 30kts, he can quickly outrun Partridge and Pellew in their current state, so he brings V 100 in behind and sets off for the convoy. Pellew, however, manages to quickly sort her engineering damage and is off in pursuit, aiming to keep herself between the German DDs and the merchant ships. Kolbe momentarily mistakes the trawler Lord Alverstone for another destroyer and swings further west to get around. Quickly realizing his mistake, he opens on the slow-moving trawler but misses.
Within a quarter-hour, Partridge has her jammed rudder sorted and sets off due south. Miles to the west, Pellew and G 101 commence a running gun-battle, the Brit keen to keep the German well clear of the colliers that have now begun a slow rotation of their own to the southeast. The Germans manage to slowly close the range, and soon G 101 shrugs off her pursuer and turns her attention to the closest trader, SS Cordova. At 1524, Kolbe puts a pair of hits on the collier, one setting a fire in a hold that begins to burn out of control.
G 101 brackets Cordova with 4.1-inch.
As the sun begins to fade, V 100 takes up the fight with Pellew. Lively exchanges are traded without any apparent damage. G 101, satisfied that Cordova is doomed, turns on Maracaibo, a big Danish freighter recently converted to a bulk carrier. A 3-inch deck gun on the ship’s stern sends a few rounds in G 101’s direction, but no hits are landed. At 1536, Kolbe is alerted to smoke on the horizon some 13 miles aft.
The smoke proves to be Force E; in the fading light Tupper can see the melee ahead and orders Captain Vincent Molteno to take Shannon and Minotaur ahead flank. Word from the director has the distressed convoy ahead proceeding east at 11kts or 12kts. At their combined speeds, it will take Force E an hour to close the range sufficiently for his intervention. He orders the destroyers detached and sent ahead at 30kts.

Tactical map of the engagement created by the anal-retentive umpire.
At 1542, never-say-quit HMS Partridge emerges from the south side of the convoy, guns blazing. She lands a 4-inch round on G 101, wrecking her aft torpedo mount. V 100 returns fire, hitting Partridge twice, wrecking her aft torpedo mount and penetrating her hull below her aft gun mount. A hasty flooding of the magazine saves her from a catastrophic explosion, but Ransome’s DD, battered, littered with dead and wounded, runs south-southeast, ceding the fight to Pellew. Kolbe, however, has little stomach to continue; at 1554, the sun sinking over the horizon, he orders V 100 to close in behind and withdraws to the southeast.
__________
Some 350 miles to the south, Convoy 2 plodded on toward Newcastle. Its escort, the two old River-class destroyers Rother and Moy, are both positioned on the convoy’s port side some 800 yards off the two columns of merchant ships. From the wheel house of SS Highcliffe, Commodore Robert Woods monitors the convoy’s progress. He is blissfully unaware that his charges have been spotted by UB-21, their position radioed to Heinrich’s destroyer group approaching from southwest.
Operational map.
The game controller, who weighed in earlier regarding Heinrich’s operations, now advises the German that his high-speed out-and-back and out-again maneuvering has seriously depleted the partial fuel-oil supply he left Wilhelmshaven with. If he hopes to make it back to base, he will have minimal time, perhaps less than two hours, in which to locate the convoy and execute his attack.
UB-21’s brief sighting report provided Heinrich little information other than a position and directional speed estimate. Presuming the convoy’s speed being somewhere between ten and fourteen knots, and with its reported position just 20 miles off the coast, the required guesswork in executing a search seemed somewhat limited. At 1406, things took an unexpected turn when the German destroyers were spotted by an RNAS Curtiss H-12 returning to East Fortune.
Curtiss H-12 (courtesy of the Naval History and Heritage Command)
His position presumably revealed, Heinrich turned due east, believing this gave him the best, quickest chance for intercepting the convoy. At 1518, smoke was spotted both on his starboard and port bows. One was presumably the convoy, the other unknown. He chose poorly, turning northwest, raising his speed to 30kts. Within twelve minutes the source of the smoke was revealed, a lone British cruiser (HMS Antrim) travelling south at 15kts. He had little interest in tangling with the cruiser, and a reversal southward would leave little fuel or sunlight for a run at the convoy, now at least an hour south of him. A night action was certainly out of the question. Antrim provided an incentive to move away when she sent a salvo of her scarce 7.5-inch in the Germans’ direction. Heinrich, choosing discretion over valor, turned south in a wide arc, hoping for a glimpse of the convoy, but none came.
The remainder of the day was uneventful. Force F had left Scapa Flow mid-morning, executing a sweep of the North Sea that would take it to a point 60 miles west of Vigrestad on the Norwegian coast. Following a more southerly arc on its return, it was due back in Scapa by Noon on 13 December.
Heinrich and Kolbe would sail through the night to rendezvous with Emden early the next morning. Heinrich could report good success, having nearly wiped out an entire convoy. Kolbe, not so much, sinking just a single freighter (SS Cordova) while losing two of his four destroyers.
Overnight, Room 40 received a largely incomplete report of German ships passing down the Jade toward open sea. Until better information was available, no action is taken.


 ).
).