Jump to content


Photo

FAI redux

FAI

  • Please log in to reply
336 replies to this topic

#121 healey36

healey36

    Lt Colonel

  • Members
  • 737 posts
  • LocationMaryland USA

Posted 18 July 2020 - 04:22 PM

A nice view of SMS Moltke at Hampton Roads during her visit to the U. S. in 1912:


50127116731_26c51dd35e_b.jpg


MId-summer and it remains relatively quiet here. The game-table is empty of multi-player sessions.


Been kicking around a hybrid battle game set in the Med during WWII, combining a board-game at the operational level with GQIII at the tactical level. Without too much effort it seems that can be made to work. Need to print and mount some ship-forms, as there's not enough lead in the cabinet to outfit both fleets.


  • Beermonster likes this

#122 healey36

healey36

    Lt Colonel

  • Members
  • 737 posts
  • LocationMaryland USA

Posted 12 August 2020 - 08:09 AM

HMS Ark Royal, ready for a run at the zeppelin sheds at Tondern:


HMS Ark Royal
HMS Ark Royal 1/2400


Actually, Ark Royal saw action predominantly in the eastern Med during WWI (hence the light hull color), so it would be one of the other seaplane carriers (probably HMS Engadine) which made the run to Tondern. Built by Blyth Shipbuilding of Northumberland, Ark Royal had a long RN history, surviving WWI, then being renamed HMS Pegasus during the interwar years. She then served as a training and development ship with the Home Fleet during WWII. She was sold to a commercial shipping company after the war, renamed Anita I, then scrapped in 1950. 


Photo04cvArkRoyal-PegasusNPMarkTeadham.j

HMS Pegasus, possibly during WWII while performing catapult trials.


#123 healey36

healey36

    Lt Colonel

  • Members
  • 737 posts
  • LocationMaryland USA

Posted 21 August 2020 - 08:58 AM

A few weeks back a friend of mine shot through to the other side, 96 year-old Ray Malengo, retired chief petty officer, USN. He was a crotchety ol' SOB, pretty much what one might expect of a long-serving CPO, but he was easy to talk to, and he had the enduring energy and curiosity of a man a quarter his age. 


His career began in those dark days following Pearl Harbor, in the Atlantic aboard USS Ranger (CV-4). In 1944, he would transfer to USS Catoctin (AGC-5) which would serve much of the remainder of the war in the Med, supporting the various amphib operations there. Ray would proudly tell me how Catoctin had hosted visits by both the King of England (George VI) as well as the President of the U. S. (Roosevelt). Following the war, he would take a stint in Navy admin for a few years before a final turn at sea, this aboard USS Hartley (DE-1029), a member of the final class of destroyer escorts built for the USN. There he became a "tin can" sailor, the capstone on his long career.


"Greatest generation my ***," he would say. The guy was a hoot. He'll be missed.


Raymond Malengo
CPO Raymond Malengo 1924-2020


#124 healey36

healey36

    Lt Colonel

  • Members
  • 737 posts
  • LocationMaryland USA

Posted 05 September 2020 - 06:03 AM

Today is the 106th anniversary of one of the seminal moments in the war at sea – U-21’s sinking of the Royal Navy scout cruiser HMS Pathfinder, September 5, 1914. At a time of some considerable skepticism by the German Naval Staff concerning the viability of the submarine as an offensive weapon, the sinking of Pathfinder is notable as the first ship sunk by a U-boat using a self-propelled torpedo. Interestingly, both the British Admiralty and the German Naval Staff had largely downplayed the likelihood, even the possibility, that a submarine was capable of sinking a surface ship.


75289332_pathfinder.jpg?w=640

HMS Pathfinder


Otto Hersing and U-21 went on to a long distinguished career. Together, they were one of the few U-boat/commander combinations active with the fleet at the war’s outbreak, surviving to the armistice. U-21 and crew sank some forty ships, including four warships (cruiser HMS Pathfinder, battleships HMS Triumph and Majestic, and the French armored cruiser Amiral Charner). Hersing’s was a pretty impressive war record.


Despite the loss of Pathfinder, there remained lingering doubts about the submarine threat. Jellicoe apparently took it quite seriously, and the loss of Pathfinder was a major factor in his reasoning for concentrating the Grand Fleet as far north as possible. According to Massey, however, others felt the threat was exaggerated and were less than diligent in following directives on minimizing the risk of submarine attack. Seventeen days after the loss of Pathfinder, Jellicoe’s worst fears were realized when the old armored cruisers HMS Aboukir, HMS Hogue, and HMS Cressey were torpedoed and sunk by U-9 inside of an hour. More than 1400 men were lost, and any lingering doubts about the U-boat threat dissipated like vapor.


The table remains quiet here this holiday weekend, even as some things attempt to return to some level of normalcy (schools reopen, one can sit in a restaurant or go to the theater, etc.). The result is the dearth of "after action" reporting as attentions are directed elsewhere. I had vowed not to purchase any more ships until I'd seriously dented the unpainted inventory, but that all went by the wayside this past week as orders from GHQ, Viking Forge, Panzerschiffes, and War Times Journal all rolled in. Intervention may be required.


I've been reading up on the career of the commerce raider SMS Möwe and the RN's effort to track her down and end it. That proved unsuccessful and she would survive the war, only to be destroyed in the next. In the battle against the commerce raiders, there are numerous accounts of warships running up on them only to be engaged at fairly close range, with the raider getting in the first salvo. Perhaps one of the great mysteries of naval warfare is the encounter between HMAS Sydney and the auxiliary cruiser Kormoran in November 1941, where both ships were destroyed, the Australian light cruiser with all hands. It would be interesting to put Möwe on the table with one of the ships sent to find her, give her the first round, then see what happens.


Find something fun to do this holiday weekend as summer ebbs into what promises to be an interesting fall. I'll be painting ships.


Healey


#125 healey36

healey36

    Lt Colonel

  • Members
  • 737 posts
  • LocationMaryland USA

Posted 05 October 2020 - 04:57 PM

Recent Musings


AARs are scarce, I’m afraid, as there’s been precious little action around here. Wariness of gatherings remains abundant these days, for good reason. I’m in the same camp, so instead I’ve rededicated myself to hewing away on the unpainted lead/resin pile while doing a bit of research.


Reading up on WWI U-boat action led me to a revisit of the British innovation of the Q-ship, which then morphed into a detailed look at the armed merchant cruiser or auxiliary cruiser, depending upon whose navy you were reading about. The Q-ship was definitely a response to the relatively new phenomena of the submarine(s), but the AMC or auxiliary cruiser was a modernization of a tactic used for centuries. Both were largely built around the premise of pretending to being something or someone you weren’t, either by altering one’s appearance, or flying the flag and markings of a friendly or nonbelligerent. These tactics, the ships, and the men that commanded/manned them, are very interesting.


One problem is running down accurate descriptions of the ships themselves. Many sources have entries, but there are a lot of discrepancies between them. This may be the result of the ships being reconfigured a number of times over the course of their existence, the repair of damage, but likely just the paucity of credible information due to the circumstances of their operation.


Most data on the Q-ships is anecdotal, found in bits in various accounts of engagements. I have yet to find a comprehensive list of them, their size, configuration, or operational capabilities. The best you can usually do is tonnage, crew size, and basic armament (although not necessarily how or where it was mounted). With that information, together with a photo if one can be found, a presumptive FAI ship’s log can be cobbled together. Other intangibles add to the difficulty. For instance, it was not uncommon for the holds of a Q to be loaded with lumber, hundreds of empty capped oil drums, and other materials aimed to increase buoyancy when damaged. There are numerous accounts of ships taking multiple torpedo hits, raked by gunfire, yet still able to fight on, sometimes for hours before eventually succumbing. Some also had rudimentary armor fashioned from sandbags and other materials, especially around the bridge and various communications and engineering areas. I start with the merchant ship hull box chart and build from there.


Info on the armed merchant cruisers and auxiliary cruisers seems somewhat easier to find, possibly because there were so few of them. This may also be true because they were operated more tightly as true warships of the respective navies. Still, basic data can vary sharply between sources. While little may tie out exactly, reviewing three or four credible sources which aren’t simply printing what the other guy said, and you can begin to corroborate and assemble a general sense of a ship’s configuration. The number, position, and configuration of torpedo-tube mounts can be especially challenging.


So, a few ships have travelled across the workbench of late. First up, as noted in a previous post, came a look at SMS Möwe, an auxiliary cruiser of the Kaiser’s navy. Möwe had an extraordinarily successful record during the war, sinking some forty ships, including the mining of an old predreadnought battleship. Although she was rather substantially damaged in at least two engagements, she survived the war. As best I can tell, she was armed with four 5.9-inch in single mounts (hidden behind false hull panels) with a 4.1-inch mount on her bow. She had at least a pair of 20-inch torpedo tubes. She also carried a substantial number of mines. She displaced roughly 9800 tons, was roughly 400 feet long, with three coal-fueled triple-expansion engines. Most sources list her top speed at 13 knots, but accounts indicate she had occasionally run down quarry at speeds approaching 15-16 knots.


If source material is reasonably accurate, the Panzerschiffe model I have of Möwe has some inaccuracies (even the basic profile appears to be inaccurate). Finding her paint scheme is difficult, sources varying widely. Most show her to have had a beige-colored deck. This would imply that her deck was sheathed in wood, which seems unlikely but not impossible. I settled on a dark hull, white uppers, and a black funnel, aligning with a couple of the photos I’ve seen of her.


SMS Mowe

SMS Möwe


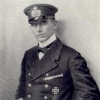
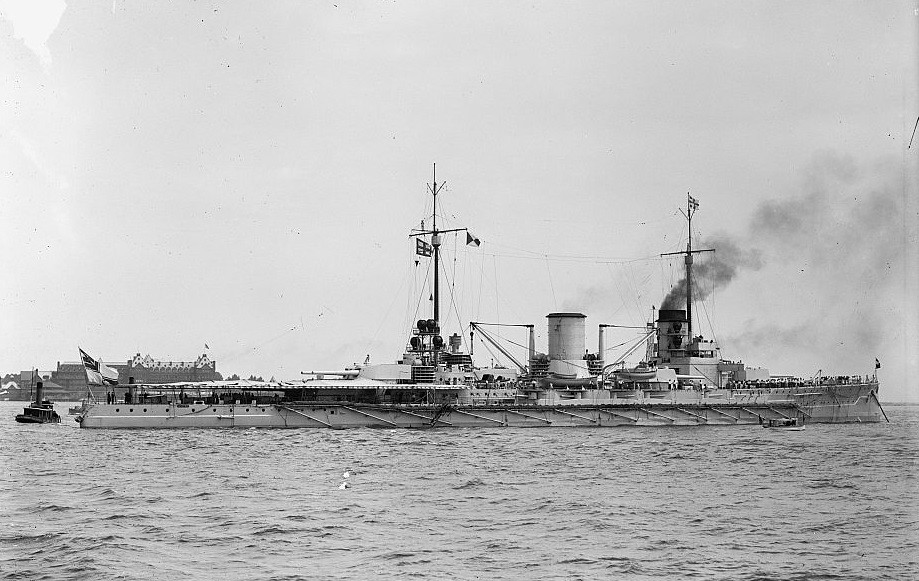
Another ship that caught my eye was HK Komet, an auxiliary cruiser operated by the Kriegsmarine during WWII. Hers was a relatively short career, operating successfully in the South Pacific in 1940/1941, where she had a hand in sinking or capturing eight ships. She was sunk by a British MTB at the start of her second cruise, October of 1942, attempting to run the blockade and pass through the English Channel on her way to the Atlantic. Built in 1937 as a freighter, displacement of 7500 tons, propelled by a pair of 6-cylinder diesels giving her a top-speed of 16 knots. She was armed with six 5.9-inch single mounts, a 60mm on her bow, four 20mm AA, and a twin 37mm AA mount on her stern. Her torpedo armament is described as six 21-inch tubes in two two-tube mounts and two submerged single tubes. Interestingly, she also carried a pair of Arado float-planes for recon purposes, stored in her forward hold and launched, as best I can tell, by catapult.


Photos of Komet are scarce, but one I have seen indicates a dark gray color for her hull, with dark uppers and funnel. No idea what her deck looked like, but I’ll presume steel painted a haze gray. Another Panzerschiffe model, my Komet looks to be fairly accurate in configuration, with the gun position placement to be approximate. I toyed with adding a catapult and a GHQ Arado float-plane, but got lazy and didn’t. Consider them stowed.


HK Komet

HK Komet


The auxiliary cruisers typically tried to disguise themselves as ordinary merchantmen, flying other national ensigns, painting in markings other than their own, and often giving their uppers the colors of the various shipping companies. Funnel markings were routinely mimicked. The fact that ships maintained their owners’ funnel bands throughout the war surprised me, as I would have thought all of that would have been blotted out in some sort of overall gray paint scheme. Some merchantmen did adopt national schemes, even dazzle schemes were deployed, in the last years of the war (here's an interesting link to a discussion on the NARA site, re: dazzle camo as employed on merchant ships: https://unwritten-re...lates-from-wwi/ )


Which then brings up the question of what the typical merchantman actually looked like. As best I can tell, it was quite a mish-mash early on, with the shipping companies slow to adopt the recommended drab gray paint schemes. By the time the convoy system/routes were developed and implemented, much of the individuality of ship markings, other than the funnels bands, had been painted over (although their outlines remained fundamentally the same). Steel decks had their linoleum stripped (if they had it), repainted with anti-skid paint (paint with a fistful of sand or grit added) in whatever color was handy.


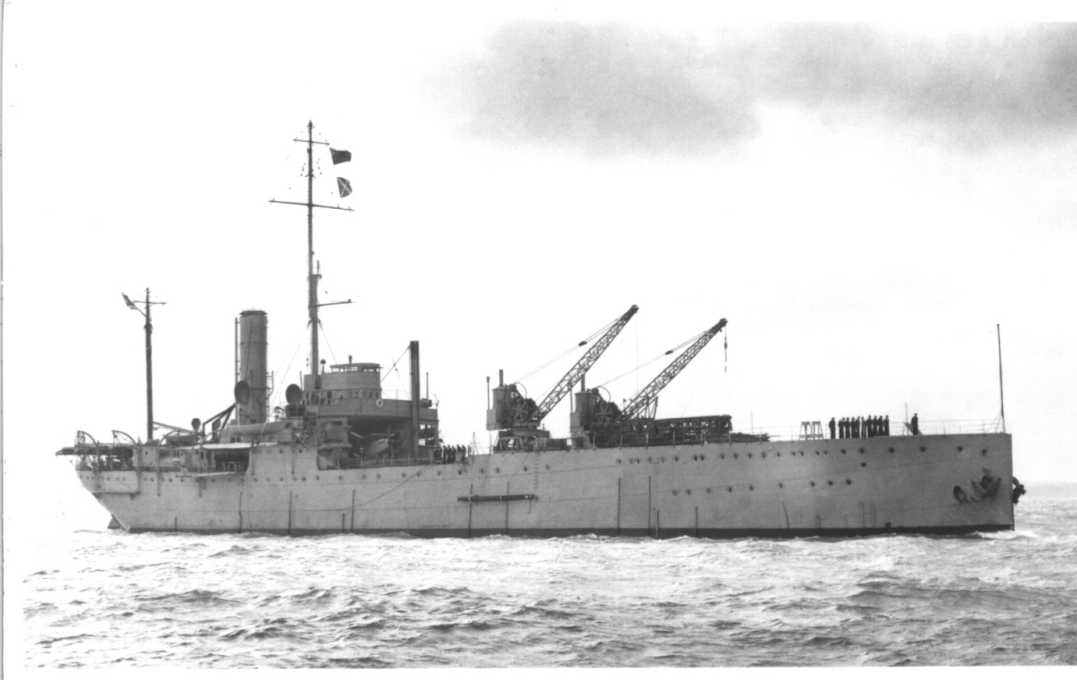
During WWI, colliers were mission critical to all of the navies, especially those still operating coal-fueled warships in areas where friendly ports were scarce. The British maintained an extensive replenishment operation known as the Royal Fleet Auxiliary, which was supplemented through the use of chartered auxiliaries drawn from the private shipping companies (the RFA continued through WWII and much of the postwar era as well). As the WWI navies displaced coal with oil as their primary fuel, many of the colliers were converted to tankers.


50488498783_1748e211e9_b.jpgRFA Mercedes


Interestingly, I believe the RFA rostered and operated only a single collier during WWI, the Mercedes. As best I can tell, the many others that the RN/RFA employed were all requisitioned and chartered. With that in mind, you can well imagine the diverse fleet of ships pressed into service as colliers, many never having hauled any coal previously. Panzerschiffe offers a model of the Mercedes, calling it a “typical collier”. It was, in fact, anything but typical. Mercedes, a one-off, built with her bridge and control functions mid-ship and all of her engineering and propulsion gear at the stern (most cargo ships of the day had control and engineering functions amidships).


Unfortunately, I had two of Panzerschiffe’s British collier model in inventory, so I took some liberties in making a second of the Mercedes “class”. In this way, SS Aberfan was commissioned, named after a town in the coal-rich southwest corner of Wales.


SS Aberfan

SS Aberfan


May God bless her and all who sail in her.


(to be continued)


#126 healey36

healey36

    Lt Colonel

  • Members
  • 737 posts
  • LocationMaryland USA

Posted 22 October 2020 - 03:18 PM

Another illustration of coaling-at-sea operations:


50517677076_16540050da_c.jpg


My understanding is that the coaling ship, in this case a Royal Navy BB, takes the collier in tow at a relatively low speed and, after setting up the derricks, begins the process of transferring fuel to the bunkers. The operation was typically screened by up to a half-dozen escorting DDs. Must have been a long, arduous process.


Illustration from Illustrated War News, January 26, 1916.


#127 Peter M. Skaar

Peter M. Skaar

    Captain

  • Members
  • 336 posts

Posted 22 October 2020 - 08:41 PM

Hi Healey


That is interesting.  Most people, including myself, don't ponder the logistics involved in moving a fleet from point A to point B.  We just want to start the battle with everybody ready to go.


#128 simanton

simanton

    Lieutenant

  • Members
  • 211 posts

Posted 22 October 2020 - 10:32 PM

I am not aware of the Royal Navy coaling battleships at sea during the First World War.  I have seen photographs of experiments by the United States' Navy in underway coaling of battleships, from one of the Cyclops/Jupiter type of collier.  As I recall it was with the collier astern of the battleship.  Colliers of this type had a very elaborate outfit of derricks/kingposts to facilitate transfer of bagged coal.


#129 healey36

healey36

    Lt Colonel

  • Members
  • 737 posts
  • LocationMaryland USA

Posted 23 October 2020 - 04:11 PM

I would largely agree that refueling coal-powered battleships while at sea was likely a rare occurrence. I have been unable to find a first-person account of it being done. It may be that these illustrations, for various purposes, were intended to tout the fleet’s capabilities, driving the notion of the Navy’s “long arm”. There are many accounts of colliers refueling ships while in port, but I can find none of a successful coal refueling at sea. I'll presume that, other than a few conceptual tests, it was not done.


The Fleet Coaling Service was created by the Admiralty during the 19th century, not too terribly long after the Royal Navy took possession of its first steam-powered combatant, HMS Comet, in 1831. The Service’s development was an outgrowth of the Admiralty’s efforts to establish a world-wide network of bases from which its steam ships could operate. Concurrent with the network’s development came the establishment of “coaling stations”. The Director of Contracts, an arm of the Admiralty, had the responsibility for the purchase and storage of coal stocks. Presumably, if there was no indigenous local source of coal, the station’s stocks were replenished by collier from elsewhere.


I attended a college located in the mountains of far western Maryland, at the top end of the George’s Creek Basin. This was the richest region of coal deposits in the state, which included the infamous "big vein" that descended from Pennsylvania and continued south into West Virginia. The bituminous coal mined there was of an especially good grade, burning hot but producing little ash. I got to know quite a few of the locals while there, and one of the stories that was frequently told was that the coal mined along the George’s Creek had been favored by the US Navy, with some sold to the British navy as well for their use. William Aspinwall, a prominent American steamship magnate, founded the Ocean Steam Coal Company around 1850, mining coal from this region for use by his line.


But I digress. While it might seem intuitively obvious, one thing that quickly becomes apparent when reading about these naval operations is just how filthy, time-consuming, and often dangerous a task was the handling of coal. Nearly all of the ships pressed into service as colliers during the war were not purpose built, but instead were just bulk carriers intended for ore, chemical, or grain cargoes. Crew training, hold sizes and configuration, along with shipboard derricks and equipment were often found lacking. Insufficient ventilation and wetting was another problem, as suspended coal dust could and did lead to occasional catastrophic explosions over many years of operations.


Studying collier operations during the First World War is a bit confusing. At first glance one might get the idea that the Royal Fleet Auxiliary (RFA) operated only a single collier during the war (RFA Mercedes), but this is far from the case. It’s important to understand the distinction between RFA “owned” colliers versus RFA “chartered” colliers. While it owned just a single collier, the RFA requisitioned/chartered nearly 2500 others during the war, of which more than 260 were lost (roughly one in ten). I suspect very few of these would have had the crew, training, and equipment to attempt a refueling at sea.


The gist of it is that if you were a crewman aboard an RFA-flagged collier, the odds of getting killed by poor or ill-suited equipment, insufficiently trained officers, crew or local longshoremen, fuel storage issues, or a run-in with the German Navy, were pretty short. Thankless but necessary work.


One last bit that’s interesting about all of this is one never reads about a concerted effort by the Germans to interdict the British colliers’ operations. I suspect that is because the navy had, by the early 1900s, locked in on converting the fleet to oil, making tankers the target of choice. Coal was plentiful, but it was a pain to handle and was less efficient as a fuel. Petroleum, more efficient and easier to handle, was still not abundant.  


RFA ensign
RFA ensign


#130 healey36

healey36

    Lt Colonel

  • Members
  • 737 posts
  • LocationMaryland USA

Posted 24 October 2020 - 09:11 AM

An excellent paper on the topic, titled "When Dreams Confront Reality: Replenishment at Sea in the Era of Coal":


http://www.ijnhonlin...he-era-of-coal/


#131 healey36

healey36

    Lt Colonel

  • Members
  • 737 posts
  • LocationMaryland USA

Posted 15 November 2020 - 09:27 AM

A good look at USS Flusser, a Smith-class destroyer built by Bath Iron Works and launched in 1909:


50605088521_0d711164b2_b.jpg


The photo, from 1916, shows Flusser while assigned to neutrality patrols off New York and Long Island Sound. Prior to that, she was assigned to patrol duty that carried the length of the east coast. Following the American entry into the war, Flusser would operate out of Brest, France, assigned to escort and patrol duties in the English Channel. She was decommissioned and sold in 1919. (Photo courtesy of the Library of Congress)


#132 healey36

healey36

    Lt Colonel

  • Members
  • 737 posts
  • LocationMaryland USA

Posted 11 December 2020 - 05:58 PM

We'd planned a major effort at tackling the German raid on Scarborough this upcoming weekend (106th anniversary on December 16), but that will all be scuppered by the current pandemic situation. It's nothing to whine about, frankly, as the group remains in relatively good health and there will be plenty of good days ahead...eventually. Better safe than sorry.


The HSF's raid on the coastal towns of Scarborough, Whitby, and Hartlespool was the classic bait-n-switch effort planned and executed by CinC Ingenohl during the first six months of the war, Hipper and his battle cruisers were sent to pound the English coast, hoping to bait the Grand Fleet into pursuit where they could be set upon by Ingenohl and the main body. Through a series of twists and turns, it very nearly happened, but of course, like so many of these efforts, a number of unfortunate occurrences combined with some poor decision-making neutered the outcome. While all, or most, of the naval units returned to port intact, the civilians living in the towns suffered some 500 casualties, nearly a quarter of which proved fatal. The political heat turned up enormously after this debacle, and the Grand Fleet was forced to get serious about preventing such occurrences in the future.


The eyewitness accounts are pretty harrowing, as people talked of seeing German BCs slowly slipping along the coast sending salvo after salvo their way. At Scarborough, the first rounds began landing around 0800 that Wednesday morning (December 16 coincidentally falls on a Wednesday this year as well). Hipper gradually moved up the coast, working over Whitby and Hartlespool in that order. A number of 6-inch coastal batteries were able to engage, but their fire was largely ineffective. By the time Beatty and his BCs were underway, Hipper had turned away and made good his escape. Beatty, always one for hot pursuit, nearly found himself in the grips of Ingenohl and the heavies, but alas, it was not to be.


50707433157_f6179a8693_c.jpg

A few shots of the damage, clockwise from upper-left, the offices of Kingscliffe Camp, an army billet at Scarborough, was hit; damage to a private house in Scarborough; damage to the Scarborough lighthouse by an unexploded shell which eventually buried itself in the facade of the Grande Hotel; damage to the Coast Guard signal station at Whitby, where one coastguardsman was killed. (from The Illustrated War News, December 23, 1914)


  • simanton likes this

#133 healey36

healey36

    Lt Colonel

  • Members
  • 737 posts
  • LocationMaryland USA

Posted 23 December 2020 - 11:41 AM

Hoping you old tars have a good Christmas (or whatever you're celebrating as this year winds down). Enjoy your rum rations. Won't be sad to see 2020 in the rearview.


NA Xmas card


On to the next...


Healey


  • simanton likes this

#134 Peter M. Skaar

Peter M. Skaar

    Captain

  • Members
  • 336 posts

Posted 25 December 2020 - 12:33 AM

Merry Christmas to you, Healey!  I hope you and your family have a wonderful holiday.


#135 healey36

healey36

    Lt Colonel

  • Members
  • 737 posts
  • LocationMaryland USA

Posted 25 December 2020 - 11:07 AM

Back atcha, Pete...hope the Big Man brings you many blister packs of new castings to paint and play with!


Merry Christmas to you and all of the Skaar family!


Healey


#136 Peter M. Skaar

Peter M. Skaar

    Captain

  • Members
  • 336 posts

Posted 27 December 2020 - 11:26 AM

Thanks very much, Healey!  No minis for me on Christmas this year but I plan to place an order with GHQ soon.  I have plenty of other things to paint in the meantime.


#137 healey36

healey36

    Lt Colonel

  • Members
  • 737 posts
  • LocationMaryland USA

Posted 17 January 2021 - 03:17 PM

I’d really like to be able to provide the reader another long-winded AAR regarding recent action here, but there’s been none. Egads, it’s been so quiet the wife at one point took over the game table for a bit of scrap-booking. There has been some work on the lead-pile, along with some general clean-up, but otherwise the fleets have largely remained in port.


I’ve been spending a bit of time trying to develop some workable, solitaire tactical “rules of maneuver” for hypothetical scenarios, primarily along the lines of course and speed changes for general movement. I don’t think you can do much more than that without making things terrifically more complicated, especially as situations tend to break down as the sides come to grips with each other.


I like to think I’m a decent occasional solitaire player, making every effort to be honest with myself and keep things within the realm of possibility, but one comes to miss the spontaneity of an opponent’s tactical decision-making and execution (or lack thereof). It’s the randomness that comes with not knowing exactly what the other guy is going to do that makes much of this appealing, yet so difficult to replicate. There’s just too many moving parts, many of which are interrelated.  


The current fashion in board wargames seems to be the random-activation-by-chit-pull phenomena. That doesn’t translate well outside the I-go-you-go turn-based format, which FAI and GQ3 are not. It’s an effort to introduce some randomness and “simultaneousness” to the board wargame format without forcing the players to plot movement. It has been a good development for the genre.


While we do plot movement here, it’s not onerous in its employ. It is, however, nonsensical for solitaire play, but the result is the loss of that sense of trying to understand one aspect of your opponent’s intentions. It would seem reasonably simple to develop tables for speed and heading, but of course it’s not, especially when considering the possibility of multiple columns/formations, not to mention command.     


We’ll work on it. It’s doable at some level.


While moving some more boxes around in the attic the other day, I came across some stuff that belonged to The Old Man back in the day. He left behind a ton of books (which I still need to sort through), a bunch of hand tools, a pile of model railroad gear, and a few other bits. These two prewar Tootsietoys were in there, perhaps a precursor to his naval career:


50845208317_f1866c8e85_c.jpg


Destroyer K880 looks like she saw some action. Good times, I’m sure.


Healey


  • simanton likes this

#138 Doug Barker

Doug Barker

    Private

  • Members
  • 23 posts

Posted 17 January 2021 - 09:02 PM

For capital ships solitaire for WW1 actions should be relatively straightforward as navies by and large prioritized force preservation. The RN was the main exception, with a much more "go at them" approach. So for most fleets the decision matrix is something like:


  • Is my fleet significantly superior? If YES then engage at range where your fleet has decisive advantage. Otherwise head for home as fast as possible.


Generally a "significantly superior" fleet would have advantages in both numbers and gun caliber, but would be a judgement call. This would give you a lot of stern chases a la Dogger Bank and the Falklands where the Germans had an inferior or a comparable force to the RN. The orders that the fleeing force would give would be small turns to port/starboard to unmask batteries and better extend range but overall pretty predictable and simple to simulate.


RN is the exception that tests the rule when it comes to capital ships. And I'm not sure how this would fit with actions between light forces as I'm not so familiar with those (except Heligoland Bight, which was more a demonstration of how the least disorganized force tends to win battles than anything else...). 


  • simanton likes this

#139 healey36

healey36

    Lt Colonel

  • Members
  • 737 posts
  • LocationMaryland USA

Posted 18 January 2021 - 02:00 PM

Those are good points all, Doug, my sense being they predominantly address the operational top-side as much as the tactical (although one can graft the operational direction to the tactical in a broad sense). No doubt, the Kaiser was all about force preservation, whether that was based in a true strategic outlook (the notion that a largely inactive HSF went a long way toward tying up Britain’s naval assets) or simply that he didn’t want to see his pride-and-joy collection of ships damaged or destroyed. That caveat certainly weighed heavily on the HSF’s operational doctrine.


Putting aside Graf Spee and his tragically misplaced decision to approach Port Stanley, the first year of the war saw German strategic naval strategy as one more of a hammer-and-anvil approach, i.e. let’s sail the Scouting Groups across the North Sea, poke the Brits in the eye, lure them into an incremental response/pursuit, then crush them when they stumble into the lurking main body. The strategy, at least early on, seemed one of attempting to do this a half-dozen times or so, gradually grinding the Grand Fleet down into something a bit less omnipotent. Fanciful thinking, for sure, but the German high command was able to convince the Kaiser to go along (within the bounds he set).


So I think yours is a fair assessment…confront the German on the table with a superior force and he’s likely, nine times out of ten, to cut and run. It makes sense when considering the operational guard-rails set by the Kaiser, and it is notionally reinforced by the historical accounts of most operations. I can’t think of a time when a German commander went rogue and turned back to weigh into a superior force in some Grenville-esque rearguard action (at the end of the day, I just don’t think they had the stomach for it).


We play mostly hypothetical actions here, or actions which represent a subset of a larger battle, all of which we like to think are bound within the realm of possibility. OBs are typically fairly even in strength, as most players don’t find games where they are at a sharp quantitative and/or qualitative disadvantage on the front-end too appealing, myself included. I distinctly recall playing the USN side of a game based on the WWII Battle off Samar where a handful of destroyers faced down an IJN force comprised of Yamato and a number of other heavies. Despite victory conditions that potentially awarded the game to the Americans, even without a ship remaining afloat on the table, it was just a miserable time, not much fun.


But I digress.


In an effort to introduce some unpredictable variability, the problem I was trying to mechanically address is two-fold: In a solitaire game, (1) how do forces enter the table, and (2) how does my “automaton opponent” conduct himself tactically during the course of the game.


The first bit, whether a solitaire game or one with multiple live players, can be relatively straight forward. Get yourself a map of the operating area (i.e. the North Sea, the South Atlantic, Eastern Mediterranean, etc.) and find the approximate location where the forces will collide. Identify and set the course for the interloper, then, if one makes the presumption (likely just the first of many presumptions) that intercepting forces moved in a direct line from their base, simply draw a line from the base to the point of engagement; this will provide an approximate heading for entering the table. Of course, this is unlikely in reality, as the intercepting force might have been engaged in a complex search routine prior to making contact, so the direction of approach might not be so simple. Alternately, we could use some of the scripted ideas Nathan Forney came up with in North Sea Campaign to build tables for randomly determining the point of entry.


The second bit is much more difficult to come up with. It basically breaks down into gunfire/torpedoes and movement. With respect to gunfire, my experience has been that live players typically begin firing as soon as the range allows, regardless of likely effectiveness. Without some ammunition depletion consideration, there’s really nothing to constrain them. Historically, however, commanders often showed a bit more discretion, but that, for game purposes, introduces more variability of behavior that one will need to accommodate. I would suggest that one might set a maximum range for exchanging fire, 18000 yards perhaps, figuring the zombie opponent will darken the sky with incoming rounds in every phase where he is within and capable of a minimum of 18000 yards. If multiple targets are available, pick the most prominent and roll a die to make a selection. Similar with torpedoes - figure out the maximum effective range for a torpedo exchange and set that as the trigger. Close that distance and his fish go in the water.


With regards to movement, the simplest approach would be to subjectively determine whether your opponent is likely to stand and fight, or bolt. If the answer is that he’ll likely bolt, send him off in the direction of his home base. Questions remain, however, such as whether he proceeds on a straight heading or with an occasional zig or zag, and what if the course home leads into the very teeth of your guns?


If the answer is he’s likely uncowed in his intentions, then a table and die can be used to randomly determine his direction of movement. A table using a D12 might look like this:


                                Die Roll                                       Result

1                                            54-degree (three increment) starboard turn

2                                            36-degree (two increment) starboard turn

3                                            18-degree (one increment) starboard turn

4                                            Proceed with no course variation

5                                            Proceed with no course variation

6                                            Proceed with no course variation

7                                            Proceed with no course variation

8                                            Proceed with no course variation

9                                            Proceed with no course variation

10                                         18-degree (one increment) port turn

11                                         36-degree (two increment) port turn

12                                         54-degree (three increment) port turn


You’ll have to set some guardrails for something like this to work, otherwise you may have an opponent maneuvering helter-skelter in a highly illogical manner. Perhaps only allow course changes every other turn, requiring one turn of no course variation in between. You’ll have to come up with something similar for speed changes.


An alternative to all of this is something akin to the randomizing effect of the chit-pull, a sort of spur-of-the-moment “decision” process. For example, when it’s time to execute your opponent’s movement, come up with two or three logical alternatives for his action. If you think he’s most likely to move on a straight course, make that the most likely outcome on a D6 roll (i.e. 1=one increment turn to starboard, 2-5=no course variation, 6=one increment turn to port). If you think he’s likely to increase his speed, roll a D6 (1-5=speed increases by that number of knots, 6=no change). Is he likely to create smoke, roll a D6 (1-4=smoke, 5-6=no smoke). And so on and so on…


To be honest, if I indeed pursue this, I’m leaning toward the latter. An ever-evolving framework of random “decision-making”, a sort of make-it-up-as-you-go, has an appeal and spontaneity to it. The challenge is to keep the choices rational, managing the outcomes, while not homogenizing it to the point of it having no effect and it becoming just a silly exercise.


Anyway, just throwing a few more thoughts out there. A giant hairball, for sure; might be time to crack out Featherstone's Solo Wargaming.


  • simanton likes this

#140 Doug Barker

Doug Barker

    Private

  • Members
  • 23 posts

Posted 18 January 2021 - 08:17 PM

To better model ammunition conservation you may want the zombie captains to fire some fraction of their battery (e.g. 25% or 33% of the tubes) until they hit their target. After that first hit it is full batteries. This doesn't really provide a disincentive to firing at max range, but kinda-sorta simulates ranging-in the guns until there is a straddle before really starting to burn through shells.


Movement is really difficult as there are so many variables (current range, damage taken, relative size of opposing fleets/ships, likelihood of damaging the enemy, likelihood of escape, etc etc) and can easily give you too much overhead. One thing to consider is picking cards or rolling dice to define mission and motivation of the zombie. So pick the Cradock card and you are going to engage closely regardless the odds, pick the Hipper card and you are going to stay engaged but at max range in an attempt to lure the enemy onto your battle fleet. That would help provide a bit of intent to the zombie without putting you in his shoes too much. Again more of a big picture kind of thing but I think that is an easier approach.


  • simanton likes this


Also tagged with one or more of these keywords: FAI

0 user(s) are reading this topic

0 members, 0 guests, 0 anonymous users